
GRAVITY Astrometry p2 Tutorials
This tutorial provides examples of the preparation of OBs for the on-axis and off-axis astrometry modes of GRAVITY at the ESO-VLTI. The specifics of this tutorial pertain to the preparation of OBs for Period 113 onward.
Please note that all the figures shown below can be clicked on to get higher resolution versions.
To follow this tutorial, you should have familiarity with p2: the web-based tool for the preparation of Phase 2 materials. Please refer to the main p2 webpage (and the items in the menu bar on the left of that page) for a general overview of p2 and generic instructions on the preparation of Observing Blocks (OB). Screenshots for this tutorial were made using the demo mode of p2, but should not differ in any way from one's experience in preparing your own OBs under your run.
The example OBs that we will create in this tutorial are available on the p2 demo version, run 60.A-9252(M) - GRAVITY, in the folders On-axis- and Off-axis-Astrometry Tutorial.
0: Goal of the Run
In this tutorial, we will first prepare a concatenation of three OBs: a science target, a metrology calibrator, and a visibility calibrator. The purpose is to use the off-axis mode (roof-prism) of the GRAVITY_dual_obs_exp template to measure the separation of a brown dwarf from its host star, which is a binary, and to measure the binary separation and position angle.
We will then prepare a single observation block (OB) of a science target with a dispersed fringe observation in the K-band (2.0-2.4 mu) using GRAVITY's on-axis dual-field mode (beam-splitter). The OB will use the GRAVITY_dual_obs_exp template to measure the precise location of a planet relative to the star. It is not necessary to prepare a calibration OB in this case.
This tutorial will illustrate the use of a variety of features of p2 and the kind of decisions to be taken at the time of preparing in advance an observing run, as well as some aspects that are specific to the preparation of OBs for VLTI and GRAVITY.
1: Getting Started
The Phase 2 process begins when you receive a communication of the ESO Observing Programmes Office (OPO) announcing that the allocation of time for the coming period has been finalized and that you can view the results by logging into the UserPortal and clicking on "Check the webletters."
Let's assume you were granted observing time with GRAVITY in service mode. To start preparing your Phase 2 material including observation blocks, instructions, and finding charts with the web application p2, we recommend you collect all the necessary documentation first:
- The GRAVITY User Manual
- The GRAVITY Template Manual
- The VLTI User Manual
- The VLT Service Mode instructions
- The documentation to the help section about p2 referred to above.
2: Making OBs
2.0: p2
For the sake of this tutorial, we will use the p2 demo facility: https://www.eso.org/p2demo
This is a special facility that ESO has set up so that users who do not have their own p2 login data can still use p2 and prepare example OBs (for example, while writing a proposal to get the overheads right). You cannot use it to prepare actual OBs intended to be executed. When you prepare such OBs you should use your ESO User Portal credentials for p2 (with http://www.eso.org/p2).
After directing your browser to the p2 demo facility the main p2 GUI will appear as follows:
Runs for a number of instruments appear in the lefthand column, since the p2 demo facility is used for all of them. Similarly, if you log into p2 (instead of p2demo) with your own ESO User Portal credentials, you will get the list of all the runs for which you are PI, or for which you have been declared as a Phase 2 delegate by one of your colleagues.
Select the folder corresponding to the GRAVITY tutorial run, 60.A-9252(M) by clicking on the + icon next to it. In this tutorial we assume that time was allocated in Service Mode. This is indicated by the small wrench icon that appears next to the RunID. "Inside the run" you will see one folder, called "GRAVITY Astrometry p2 Tutorial". That folder contains the final product of the tutorial you are now reading. You can refer to the contents of that folder at any time, perhaps to compare against your own work. There may be other folders are OBs visible, as this account is a public account and used for testing by other people as well.
2.1: Off-axis astrometry
When the separation between the FT and SC targets is larger than about 0.27 (UTs) or 1.17 (ATs) arc-seconds, a roof-top mirror is used to separate the targets and direct 100% of the light to the FT and SC fibers, respectively. This observation mode is used, for example, to measure precise relative positions in double stars.
The typical observational sequence consists of the acquisition of FT object, recording data of both targets, then swapping the objects (without interrupting the metrology beams), and recording a second set of fringes.
If one of the targets is too faint to track fringes, one can skip the swap on the science object and perform a swap observation instead on nearby binary star.
For the purpose of this tutorial, we show how the OBs are designed for the second case, and we include a third observation of a visibility calibrator.
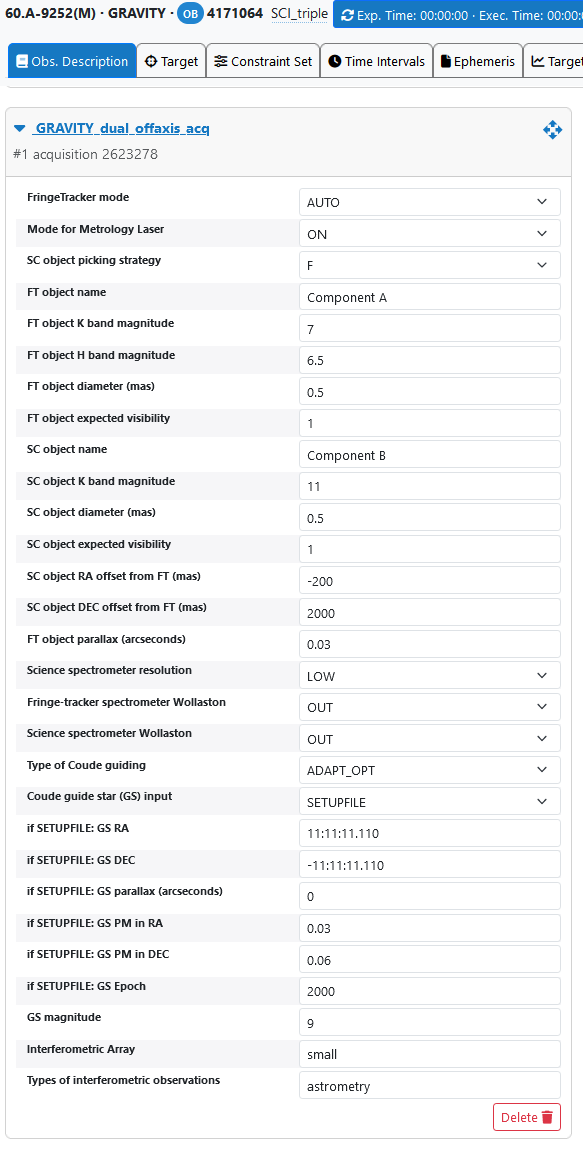
Below, the template for the acquisition of the binary star (with a brown dwarf secondary) is shown. Special attention should be given to the best availabe data for object coordinates, parallaxes, and proper motions.
SC object picking strategy:
T: Instrument operator picks the science target in the acquisition camera image.
A: The instrument acquires the brightest target in the field of view around the SC fibre position, without operator intervention.
F: The instrument does not use the acquisition camera to track the SC target, instead it relies on the separation being accurate and the separation metrology. This requires that the separation between the fringe tracker target and science target is very well known.
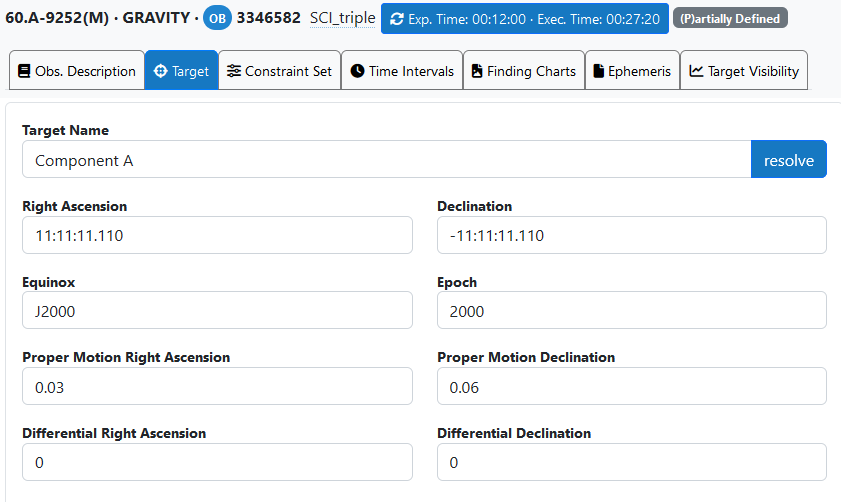
The target tab contents are shown below, please make sure the data are identical to the FT target data in the observation description.
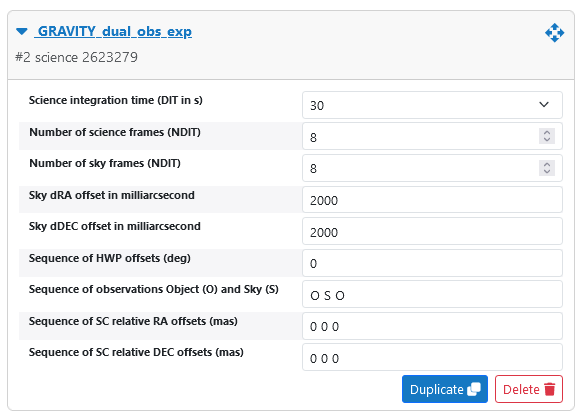
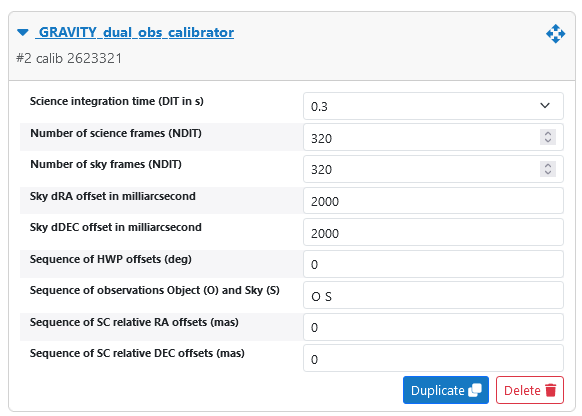
Below, the observation template of the first OB is shown, note the longer DIT due to the faintness of the SC object.
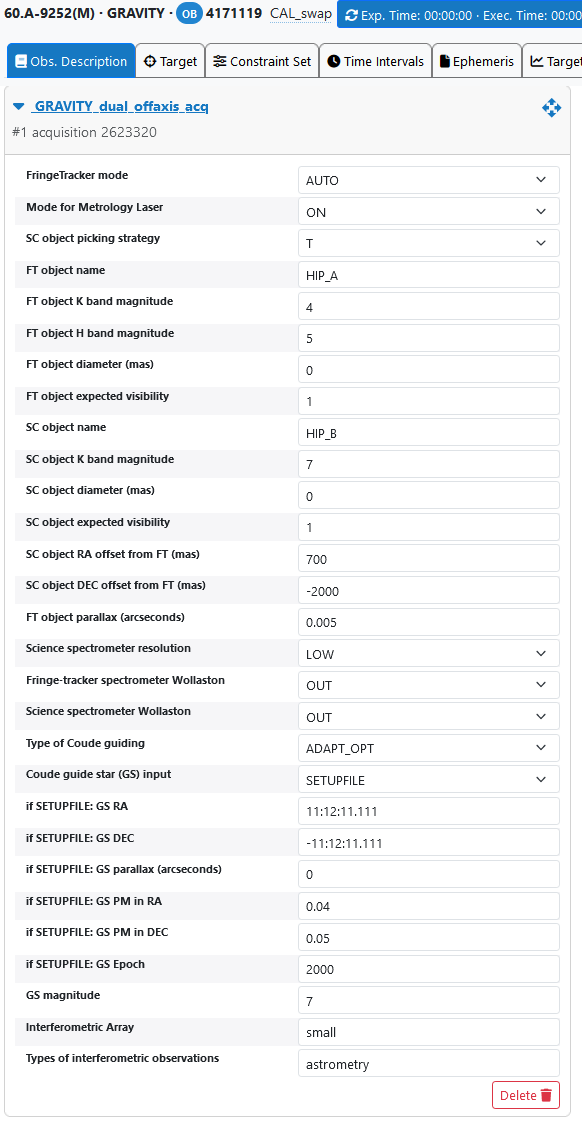
Below, the template for the acquisition of the bright binary metrology offset calibrator.
Below the template for the observation before the swap.
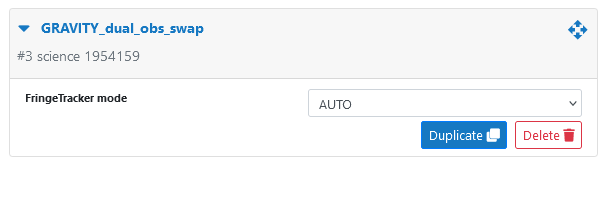
...followed by the swap template
..and another observation template

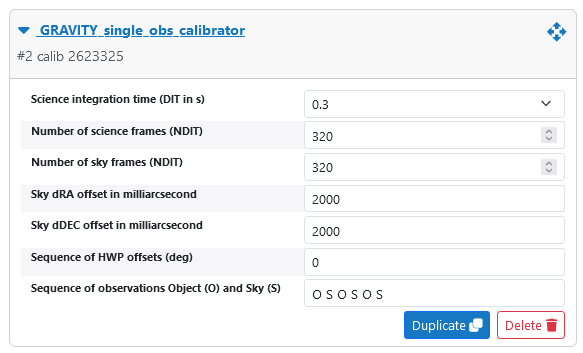
Finally, we acquire the visibility calibrator, if needed.

...followed by the observation template
2.2: On-axis astrometry
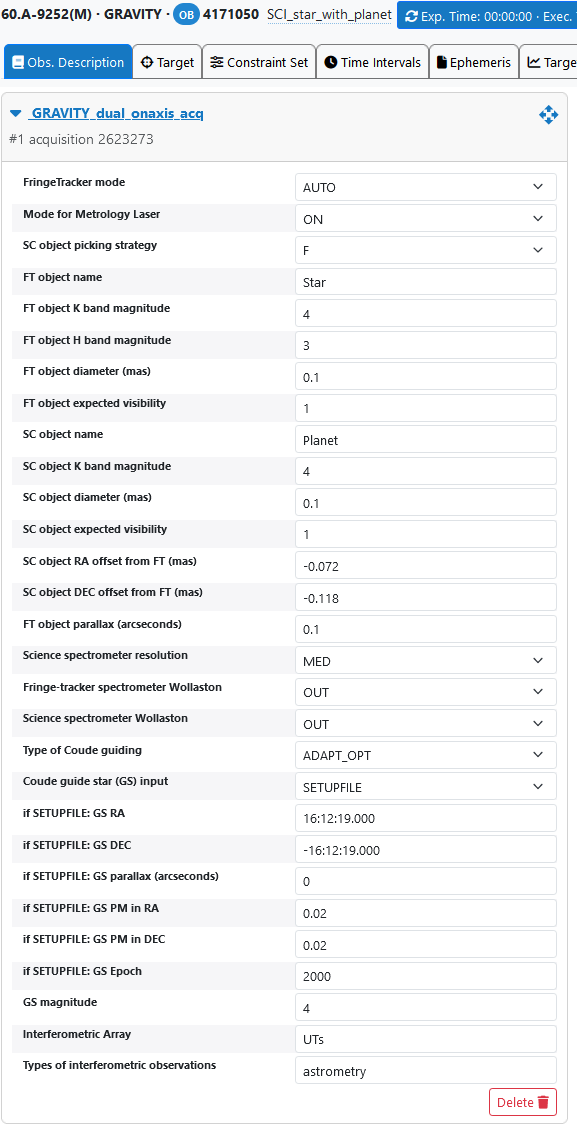
When the FT and SC targets are too close together, a beam splitter is used to send 50% of the light to the FT combiner, and the other 50% to the SC combiner. In our case, the separation is 138 mas. Below, you can see the screenshot for the acquisition template. The star is used as fringe tracking object (FT), and its coordinates are used for the Coude guide star (enable this by setting the "Coude guide star input" to SETUPFILE).
The fields "RA offset from FT to SC" and "DEC offset from FT to SC" require more explanation:
The small offsets (-0.072 and -0.118 mas) are not zero, because if they were, the instrument would assume North to be up on the acquisition camera. Therefore, we put a very small offset to have both:
1- All stellar flux in the fiber to center the interferometric fringes
2- Make sure the position angle of the instrument is correct (it will rotate accordingly the K mirror)
SC object picking strategy:
T: Instrument operator picks the science target in the acquisition camera image.
A: The instrument acquires the brightest target in the field of view around the SC fibre position, without operator intervention.
F: The instrument does not use the acquisition camera to track the SC target, instead it relies on the separation being accurate and the separation metrology. This requires that the separation between the fringe tracker target and science target is very well known.
Setting the target information
In this mode, the target coordinates defined in the Target tab are the coordinates of the star, and should be identical to the coordinates defined in the acquisition template for the Coude guide star. Please alse enter the proper motions for the star.
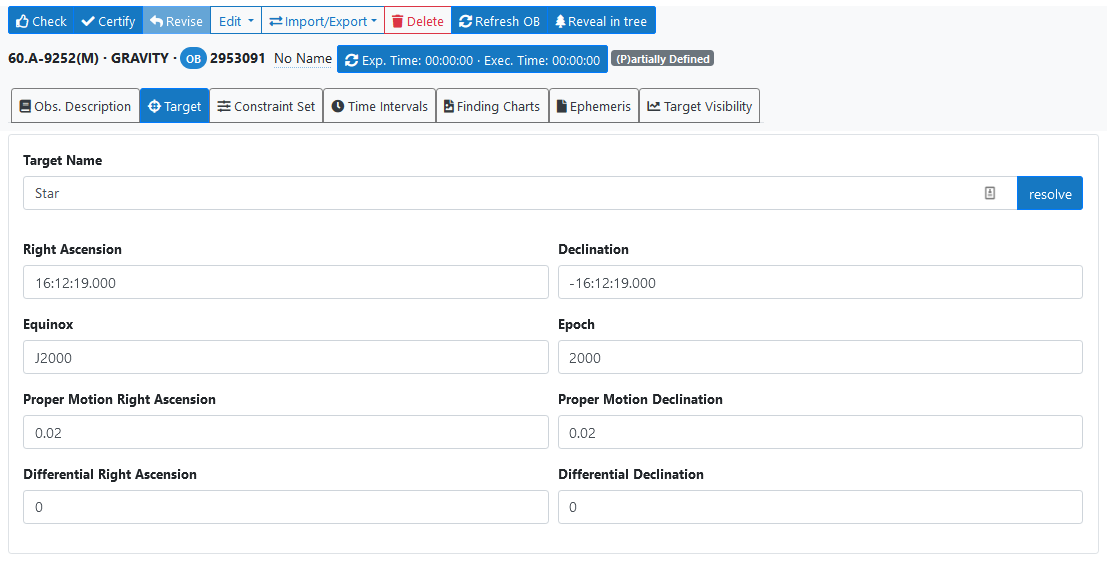
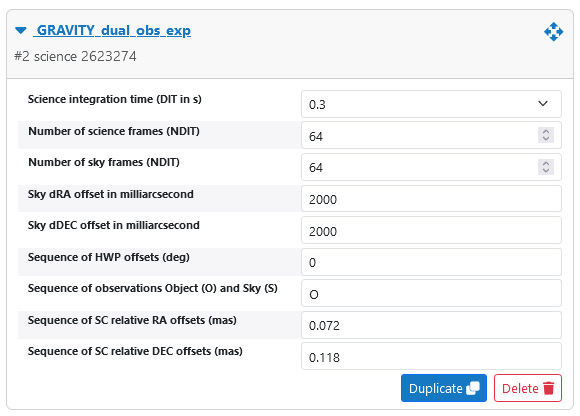
The first template following the acquisition template must be GRAVITY_dual_obs_exp. Here, the star is observed (note the short DIT of 0.3 seconds. Also note that a single relative offset of SC relative to FT is specified, with the opposite sign but same absolute value as in te acquisition template. This is to move the science fiber back to the star after acquisition.
The template below is used to move the fiber to the planet (note the first offset of -72 in RA mas and -118 mas in DEC), and to perform 3 observations: object, sky, and object. Since the offsets after the first are zero, the fiber will see the object again after the sky observation.
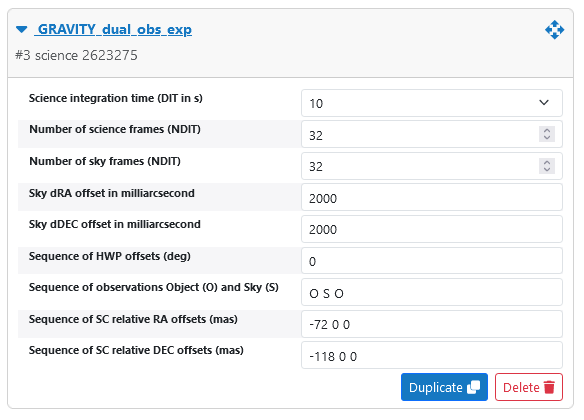
The pair of the last two templates can now be added to the OB a number of times to increase the signal-to-noise ratio.
2.3: Final remarks
Please make sure you verify (Check button top left) your OBs and/or concatenations and look at the report. You must fix reported errors before submitting the OBs to ESO. The submission is performed by first clicking the "Certify" button at the top left (which checks the OBs and locks them), and then clicking the "Notify ESO" button displayed after selecting the run label.