
CRIRES p2 tutorial: NGS AO spectro-polarimetry
The Phase 2 process begins when you receive an email from ESO telling you that the allocation of time for the coming period has finalized and that you can view the results by logging into the User Portal and clicking on "Check the web letters." Note that the username and password that you need to use for the User Portal are the same as those you will use to prepare your OBs.
You follow the instructions given by ESO and find that time was allocated to your run with CRIRES. Therefore, you decide to start preparing your Phase 2 material, which consists of a README file, and one or more OBs equipped with finding charts.
In what follows we will discuss and focus on concepts that are only specific to CRIRES observations, therefore assuming you have read the p2 documentation and, as such, you are familiar with the general concepts of p2, and its new features.
Goal of the run
In this tutorial we will prepare an OB for a simple example observing run, consisting of one spectroscopic observation of the young star PDS70 RA(2000)=14:08:10.15, DEC(200)=-41:23:52.57 in the spectro-polarimetric NGS AO mode in a K-band setting.
1. Creating and setting up the OB
For the sake of this tutorial, we will use the p2 demo facility, which allows users who do not have their own p2 login data to still use p2 and prepare example OBs (for instance during the Phase 1 preparation to get the overheads right!). You cannot use it to prepare actual OBs intended to be executed. When you prepare OBs that should be executed in PARANAL you must use your ESO User Portal credentials to log into the p2 (with http://www.eso.org/p2).
After directing your browser to the p2, and creating an empty new OB under your SM CRIRES run ID by clicking on the OB icon.

You can change the name of the OB by clicking on the "No Name" field between the OB number and the blue box "Exp Time". Here, we changed the name of the OB to AO Spectropolarimetry.

Selecting the right acquisition template
At this point, one can start to set up the observing strategy. After adding a name in the Observing Description Name field, we select the acquisition template "CRIRES_pol_acq_NGS", and click "Add Template".

Several parameters of the OB are already set to default values, and should not be changed unless there is a reason for doing that. In particular, for spectro-polarimetry the parameters "Target = AO Guide Star" and "SV Guide Star = AO Guide Star" should be left to "yes". Other parameters have to be set, in particular:
- Metrology: please select it to "yes" unless you have a specific reason not to do that
- Entrance slit width (0.2" or 0.4")
- Reference wavelength (see the various settings here)
- Polarization Stokes parameter: V, Q or U should be selected depending on which Stokes parameter is targeted in the science template to reduce overheads.

Adding a science template
The science observations are then described by the Science Template. For spectro-polarimetry, only one Science Template is available, CRIRES_pol_obs_AutoNodOnSlit, and it can be added by selecting it below the Acquisition Template.
To collect CIRCULAR polarization the Stokes parameter should be set to V. To collect LINEAR polarization two science templates should be added, one for the Stokes parameter Q and a second one for U.

Among the various parameters, one should set here the length of the DIT, and the number of DIT to be concatenated (NDIT), as well as the Reference Wavelength of the observations. In this example, we set DIT = 10 s and NDIT = 10. With this setting, according to the CRIRES ETC, we should obtain a S/N=10@2166 nm*. We report this information in the Instrument Comments field of the OB.
In polarimetric mode the parameter ‘Number of exposures per nodding position’ should be understood as ‘Number of Stokes parameters measured per nodding position’. Therefore, ONE Stokes parameter will result in FOUR exposures. For example the following configuration:
DIT=10s
NDIT= 10
Number of exposures per nodding position= 1
Polarization Stokes Parameter= V
Will result in FOUR 100-sec-long images with the polarimeter rotation at 0, 180, 180, 0 deg at each nodding position, respectively, which are the images needed to compute ONE measurement of the parameter Stokes V.

NOTE: ‘Polarimeter: rotation angle’ is useful to observe extended objects, but currently it should be set to 0 as extended objects cannot be observed in polarimetric mode for P109.
NOTE: the nod throw and other parameters can be set and checked with ObsPrep.
* The S/N depends on several parameters, here this is shown as an example.
2. Target coordinates and Constraint Set
The Target coordinates can be set by clicking on the Target tab, writing the name of the target and pressing the "Resolve" button. This automatically sets the coordinates and proper motion for the target. If the target cannot be resolved, this information can be entered manually.


By clicking on to the Constraint Set tab you access the corresponding section, where you will have to provide constraint on airmass, Sky Transparency (i.e., Photometric, Clear, Variable thin cirrus, Variable thick cirrus, the latter not selectable for AO-mode), Lunar Illumination, Image Quality (to be set to 2 for AO observation), Moon Angular Distance, Twilight (min), Turbulence Category and Precipitable Water Vapor (mm).
Please note that cirrus can induce linear polarization, so THICK cirrus should be avoided in any case for polarization measurements.
While defining the OB constraints you should always remember that Phase 2 constraint must agree with Phase 1 request. Details on each specific constraint (i.e., range and meaning) can be found in the general and specific observing conditions pages.
For our example, we will select the following constraints:

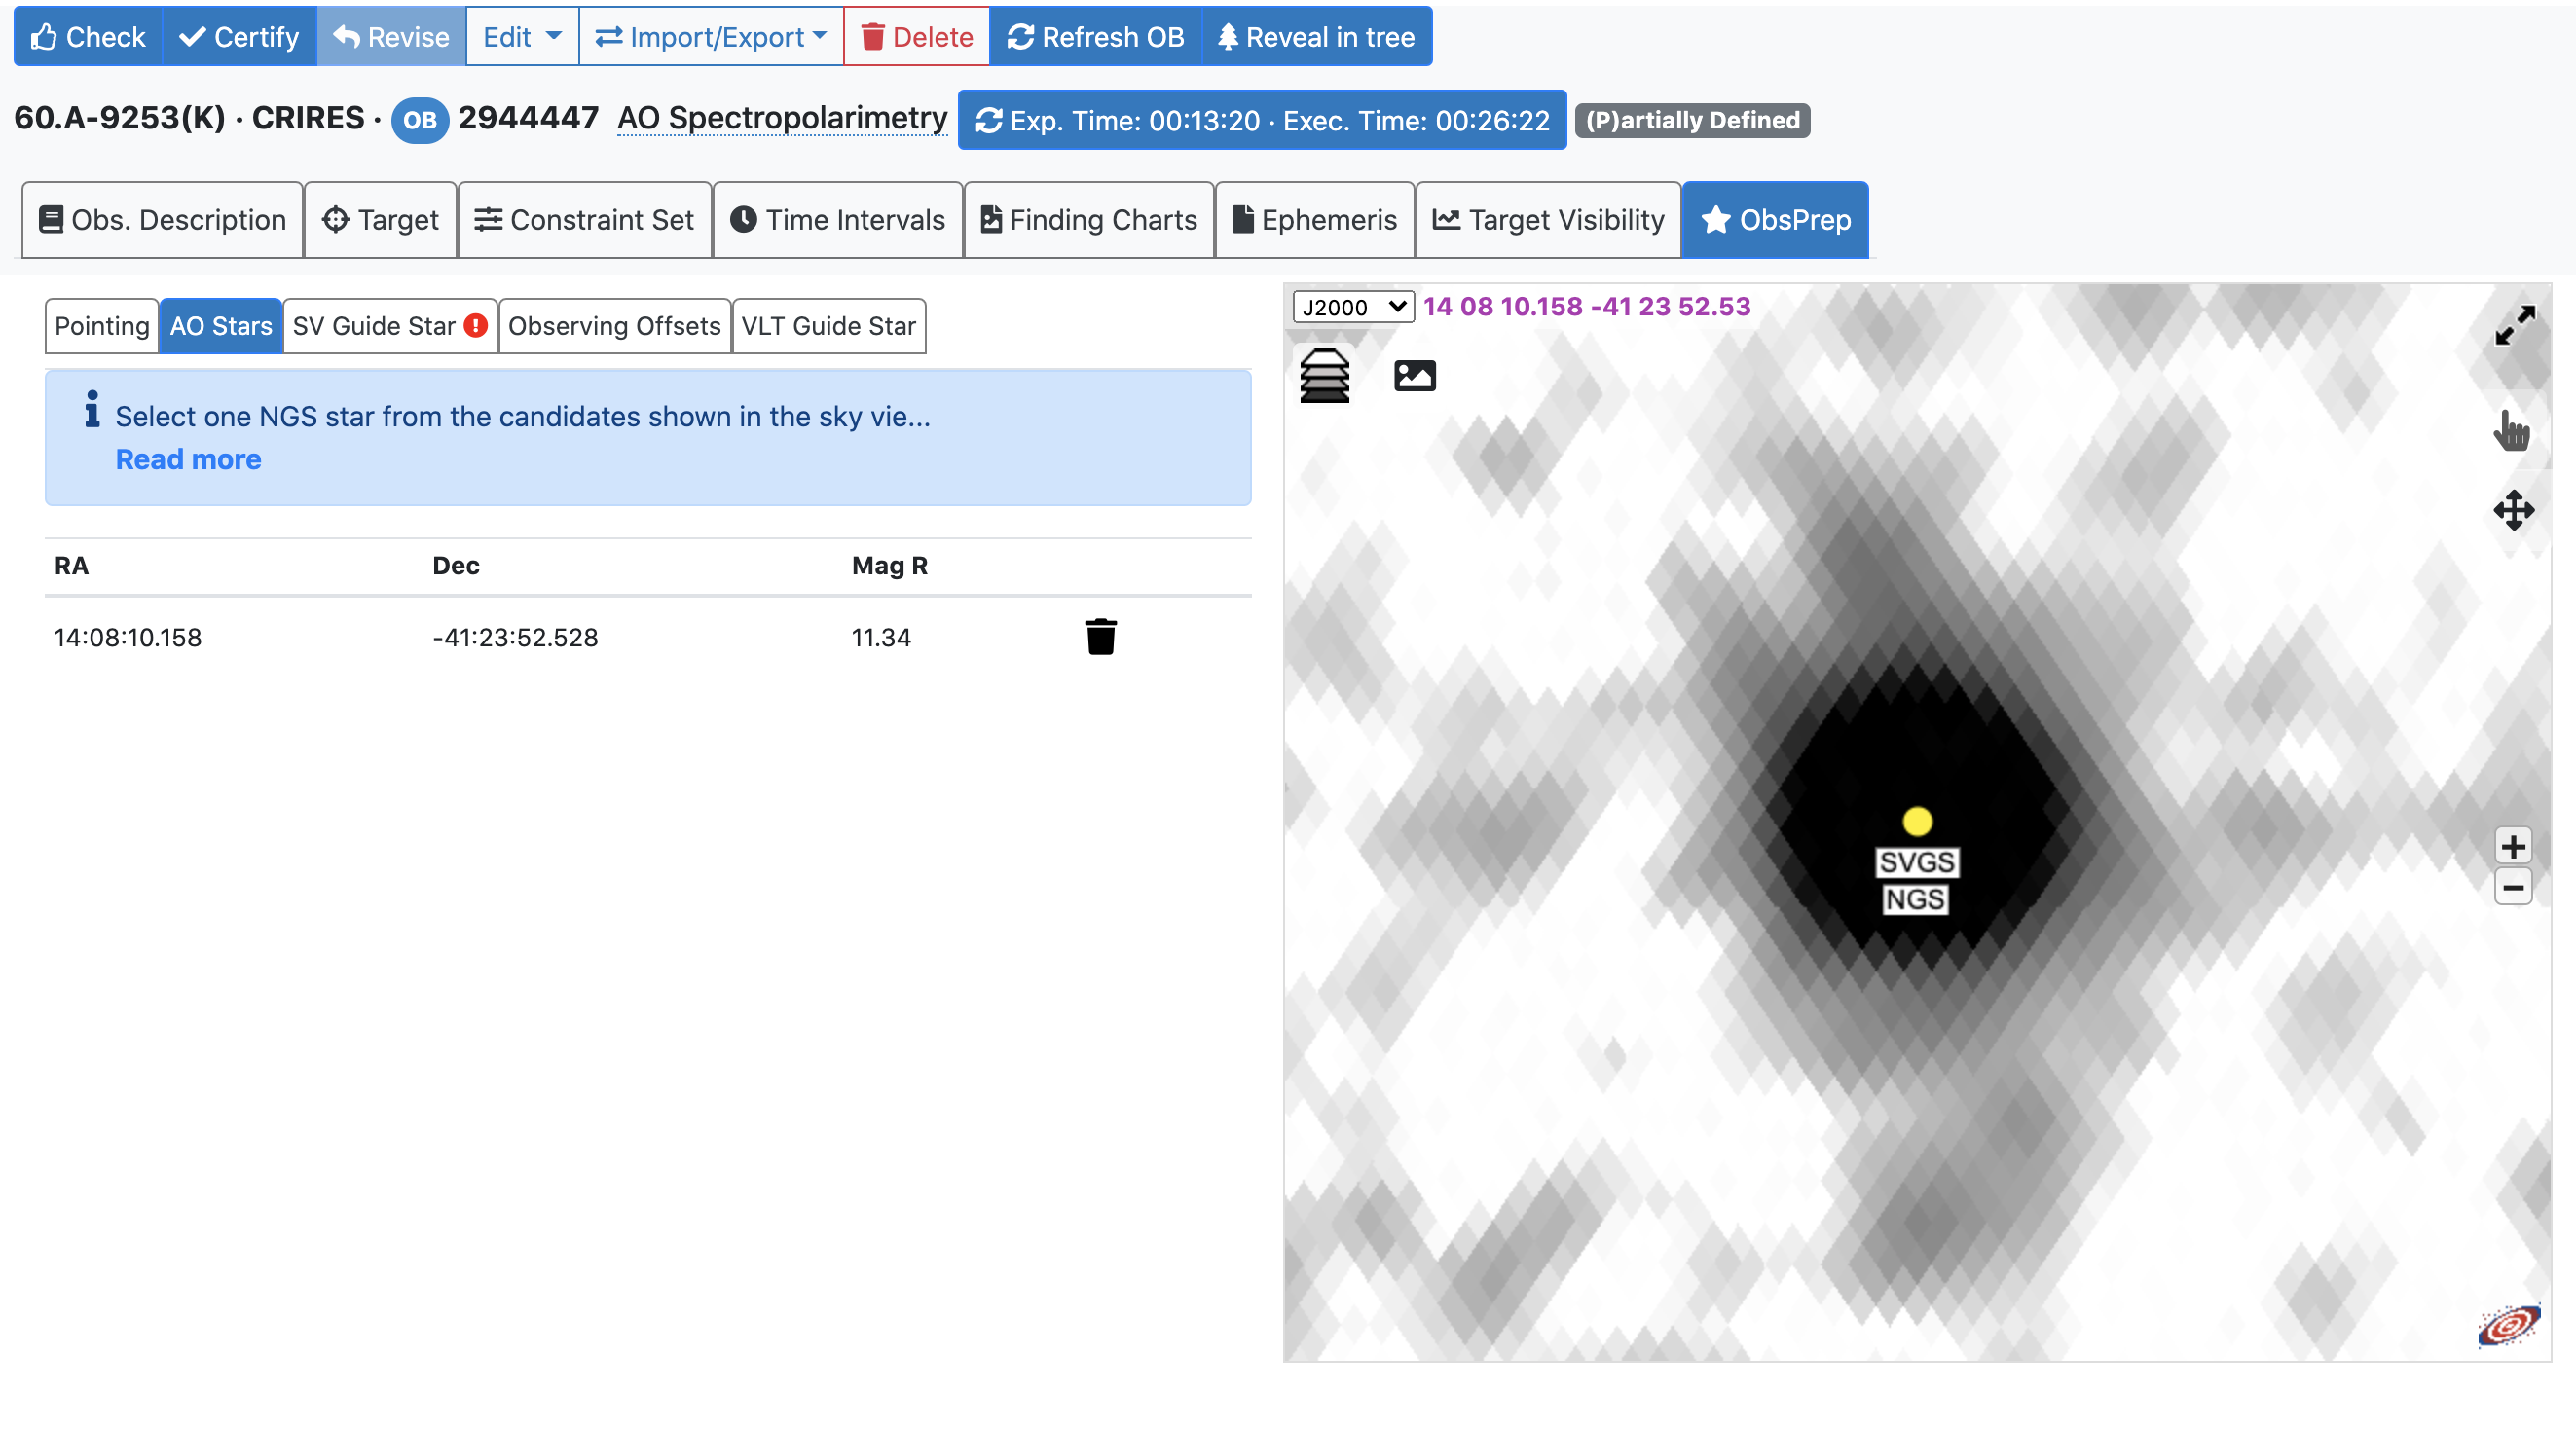
3. ObsPrep: NGS and SV star

4. Additional settings
If needed, time intervals for the observations can be set (e.g., to observe a transit of an exoplanet). Information on this and other steps can be found in this video.

Alternatively, you can provide your own-made finding charts (please consult this page to check all the requirements), which you must manually attach to the OB (i.e., click on the "Upload Finding Chart" button you find in the Finding Charts section).
Finishing the preparation: Check, Certify and Notify ESO
With the completion of the standard star OB, we consider the examples developed in this tutorial to be finished.
Though, for a real run, you would also make sure to:
- click the "Check" button (to the right of the Exec. Time button) for each OB. Check performs consistency checks on the selected OB(s).
- click on the Certify" button (to the right of the Check button). Certify does the same as Check, but additionally (if the check was successful) marks the OB(s) as fully compliant and reaxdy for ESO's review. It also marks the OB(s) as readonly.
- (optionally) select one or more certified OBs and click on the "Revise" button (to the right of the Certify button) to revoke the certified status and allow re-editing. If this is done it steps 1 and 2 above should be re-done for the OB(s) in question.
- complete the information in the README file
- click on the "Notify ESO" button (to the right of the Revise button). This will lock all certified OBs as well as the README, in preparation for ESO's Phase 2 review process.
As mentioned above, all users have access to the p2 demo facility. And, unlike the situation that existed with p2's predessesor, P2PP3, all OBs are created directly on the ESO database (there is no longer a "check-in" requirement). Hence, all users can see what you leave behind. Indeed, after a while, if not properly maintained, the p2 demo runs could and would get cluttered with all manner of OBs, containers, etc. Thus, as a courtesy to the next user who follows this tutorial, we would like to ask you to finish these exercises by deleting the OBs, containers, etc. that you make.
Finally, please note that when looking at the tutorial run in the p2 demo facility you will see that both OBs are marked as (+) Accepted (see the small screenshot below). This is a state that these OBs have been set in (by ESO) solely to avoid them being inadvertently deleted from p2.
Access to the final OB
By logging into the p2 demo, under the programme ID 60.A-9253(K) you can access to the USD-Tutorials folder where this OB have been created and stored. In the same folder you can also find a sample of OBs designed for different modes and observing strategy. The example OBs are not editable but can be exported if needed. We kindly ask you to please refrain from creating new OBs in the USD-Tutorials folder.
In the folder, you will also find an example of how to concatenate this OB with the observation of a telluric standard star.