4.4.3. Graphical Design Updates (cut_rad_hello/src/cut_rad_hello/mainwindow.ui)
The updates for this examples are several:
A new menu called Server
Deleted QTextEdit widget
A new QGroupBox that holds a QLabel and a TaurusLabel
A second QGroupBox that holds 8 new QPushButton for commands in the StdCmds Interface and a nested Horizontal Layout with 2 QComboBox and a QPushButton
A third QGroupBox for the Coordinates
You can see the final design on the image below.
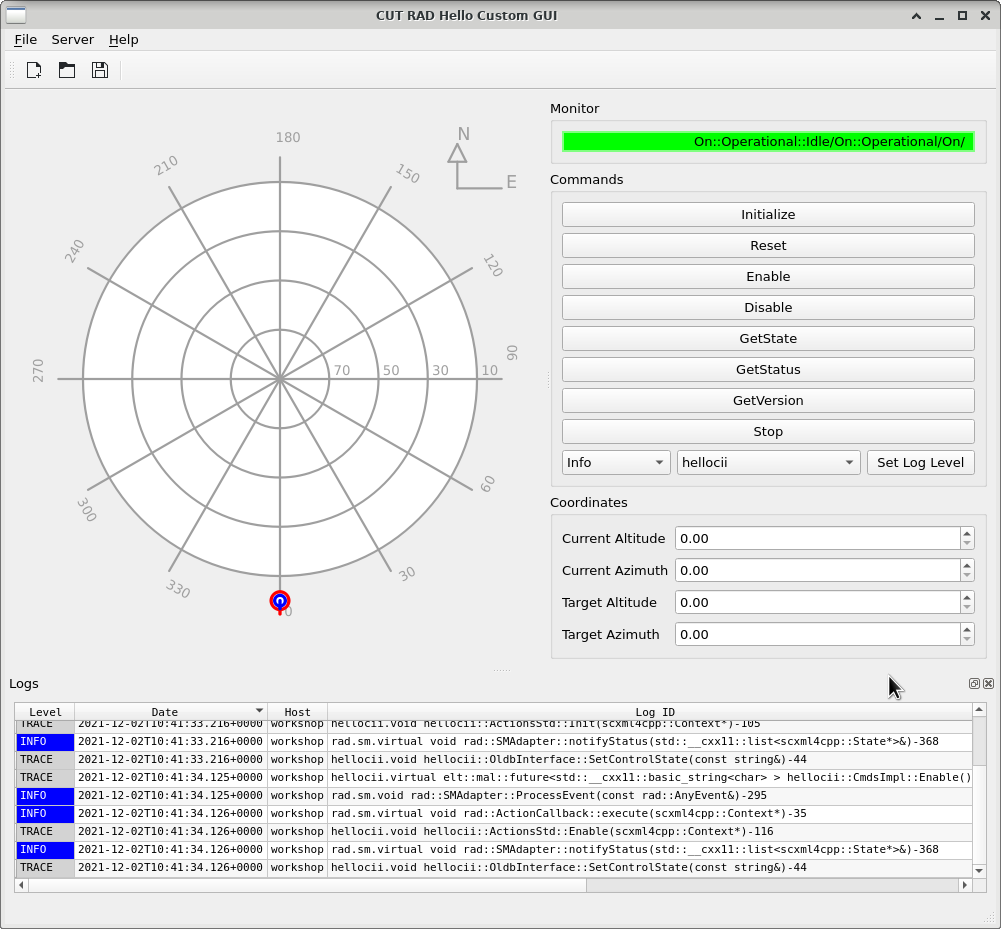
CUT RAD Hello GUI - Updates on the GUI.
We will start the Qt Designer, by executing this command in a terminal:
designer cut_rad_hello/src/cut_rad_hello/mainwindow.ui
We will start with the changes following a top to bottom visual order.
4.4.3.1. New Menu: Server
This menu can be created by clicking on the menu entry called Type Here. Type &Server and press Enter. Once done, drag and drop it to in between File and Help menu entries.
Now that the top-level menu is created, we can create its entries: Please create them using the Action Editor Dock Widget in the designer.
Text |
Object Name |
Tooltip |
Icon Theme |
Shortcut |
|---|---|---|---|---|
&Connect to Server |
actionServerConnect |
Connect to Server |
network-receive |
|
&Disconnect from Server |
actionServerDisconnect |
Disconnect from Server |
network-offline |
|
&Start Server Process |
actionServerStart |
Start Server |
network-server |
|
&Exit Server |
actionServerExit |
Executes Exit on Server |
application-exit |
Drag and drop the Connect to Server and Disconnect from Server Actions to the menu.
Create a new separator in the menu.
Drag and drop the Start Server and Exit Server Actions to the menu.
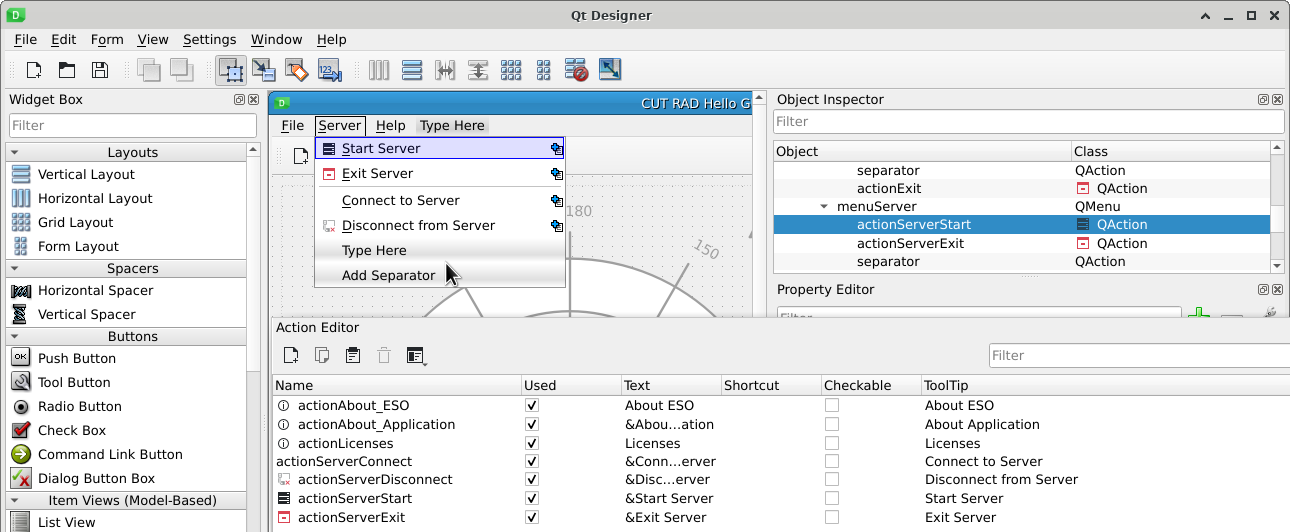
New Actions and Menus.
4.4.3.2. Deleted QTextEdit widget
The QTextEdit that holds the long text can be deleted just like that. Left click on the widget, and press the Delete key.
4.4.3.3. A new QGroupBox
We start by dragging a new QGroupBox from the Widget Toolbox. This widget is located in the Containers section. Drop it in the Vertical Layout that holds the Coordinates, above of the Layout that is already holding the coordinates widgets. Select it, and change its title property to Monitor.
From the Widget Toolbox drag two Label to the QGroupBox that was just created. Assign a Form Layout to it.
Change the text property on the first QLabel to State:. For the second one, we will use a technique called Widget Promotion.
Widget Promotion is used to change the widget from one recognized by the Designer, to another that though is available, it is not recognized by it (does not have a designer plugin).
We will use it to declare that a QLabel is instead a TaurusLabel. This is very useful while developing, because it can be used to add widget that are part of this application, but we do not want to create a full library that includes widgets, designer plugin and bindings for it. We can also use it while developing widgets, to make sure the widget works properly even before we have created the plugin library for it.
To promote the second QLabel, we right click on it, and select Promote to… context menu entry. A new dialog window named Promoted Widgets will appear. Here we can add new widgets classes. These are custom widgets that the designer is not currently aware of.
To create a new entry, we need to know from which Qt class it inherits, its class name, and its header file. Write the following entries:
Base class name: QLabel
Promoted class name: TaurusLabel
Header file: taurus.qt.qtgui.display
Then click on the Add Button, right click the new entry, and click on the Promote button in the bottom of the Promoted Widgets dialog.
Now this label is a TaurusLabel. As we already know, the most important property of a TaurusLabel is the model. We can use the Property Editor to create properties the Qt Designer is not aware of. Use the Plus button on the Property Editor and select String…. For Property Name use model. Then repeat for a second property but Bool… and name it autoTrim.
Browse to the end of the Property Editor, and set the properties to:
model: cii.oldb:/elt/hellocii/mon/state
autoTrim: True

First Group Box Added.
4.4.3.4. A second QGroupBox
Drag a new QGrouBox from the Widget Toolbox. Drop it in the Vertical Layout, below the one from before. Change its title property to Commands.
Set its layout to Vertical.
Drag and drop 8 QPushButton to it. Change their text and objectName properties as indicated:
text property |
objectName property |
|---|---|
Initialize |
initPushButton |
Reset |
resetPushButton |
Enable |
enablePushButton |
Disable |
disablePushButton |
GetState |
getStatePushButton |
GetStatus |
getStatusPushButton |
GetVersion |
getVersionPushButton |
Stop |
stopPushButton |
Drag a new Horizontal Layout from the Widget Toolbox to the QGroupBox we are working on, below all the other buttons. The reader will notice that this layout appear as a thin red line. Dropping new widget in it requires very fine precision with the mouse, or to use the Object Inspector. Search for the QGroupBox in question and drag and drop a QComboBox from the Widget Toolbox to the Object Inspector entry.
Double click on the QComboBox and a new Edit Combobox dialog will appear. You can create the entries for this Combo Box here. Please create the following entries:
Trace
Debug
Info
Warn
Error
Fatal
Then change the Combo Box property currentIndex to 2. This will make Info the default entry.
Repeat the creation of a new Combo Box. This one will identify the Loggers.
hellocii
rad
rad.sm
scxml4cpp
malZpbClientAsyncImpl
malZpbServer
Leave the currentIndex to its default, which should be hellocii.
Add a new QPushButton with objectName to the same Horizontal Layout, set its as setLogLevelPushButton and change its text property to Set Log Level.
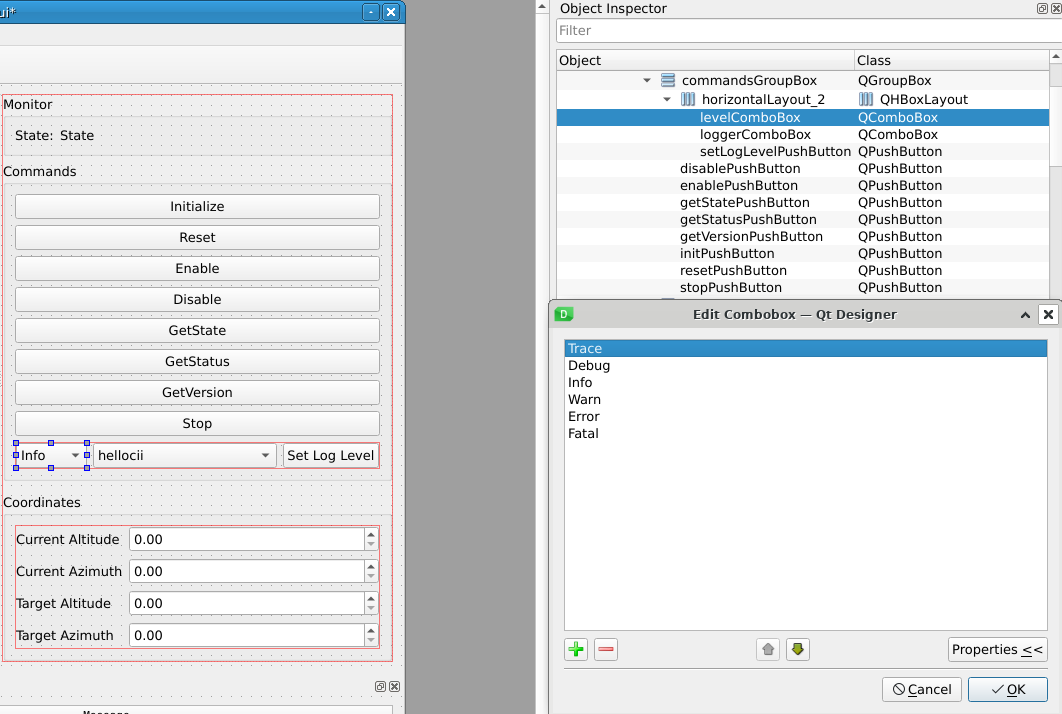
Second Group Box Added.
4.4.3.4.1. A third QGroupBox
Drag a new QGroupBox from the Widget Toolbox. Drop it in the Vertical Layout, below the one from before. Change its title property to Coordinates.
Drag the Form Layout from the previous tutorial inside of this new Layout. This can be a bit tricky, because you can only drag and drop a Layout by dragging its line or by the empty space between the widgets it coordinates.
With this, we are ready with all UI modifications.