4.2.4. Design of the Graphical User Interface
The GUI for this example is a simple one. We will create four QDoubleSpinBox, one QTextEdit, one
CutWidgets.QeDartBoard widget, and several QAction.
The QDoubleSpinBox will be used to modify the values of the QeDartBoard. The QTextEdit will present an explanation on the UI. QAction is used to abstract the UI and the implementation from tasks.
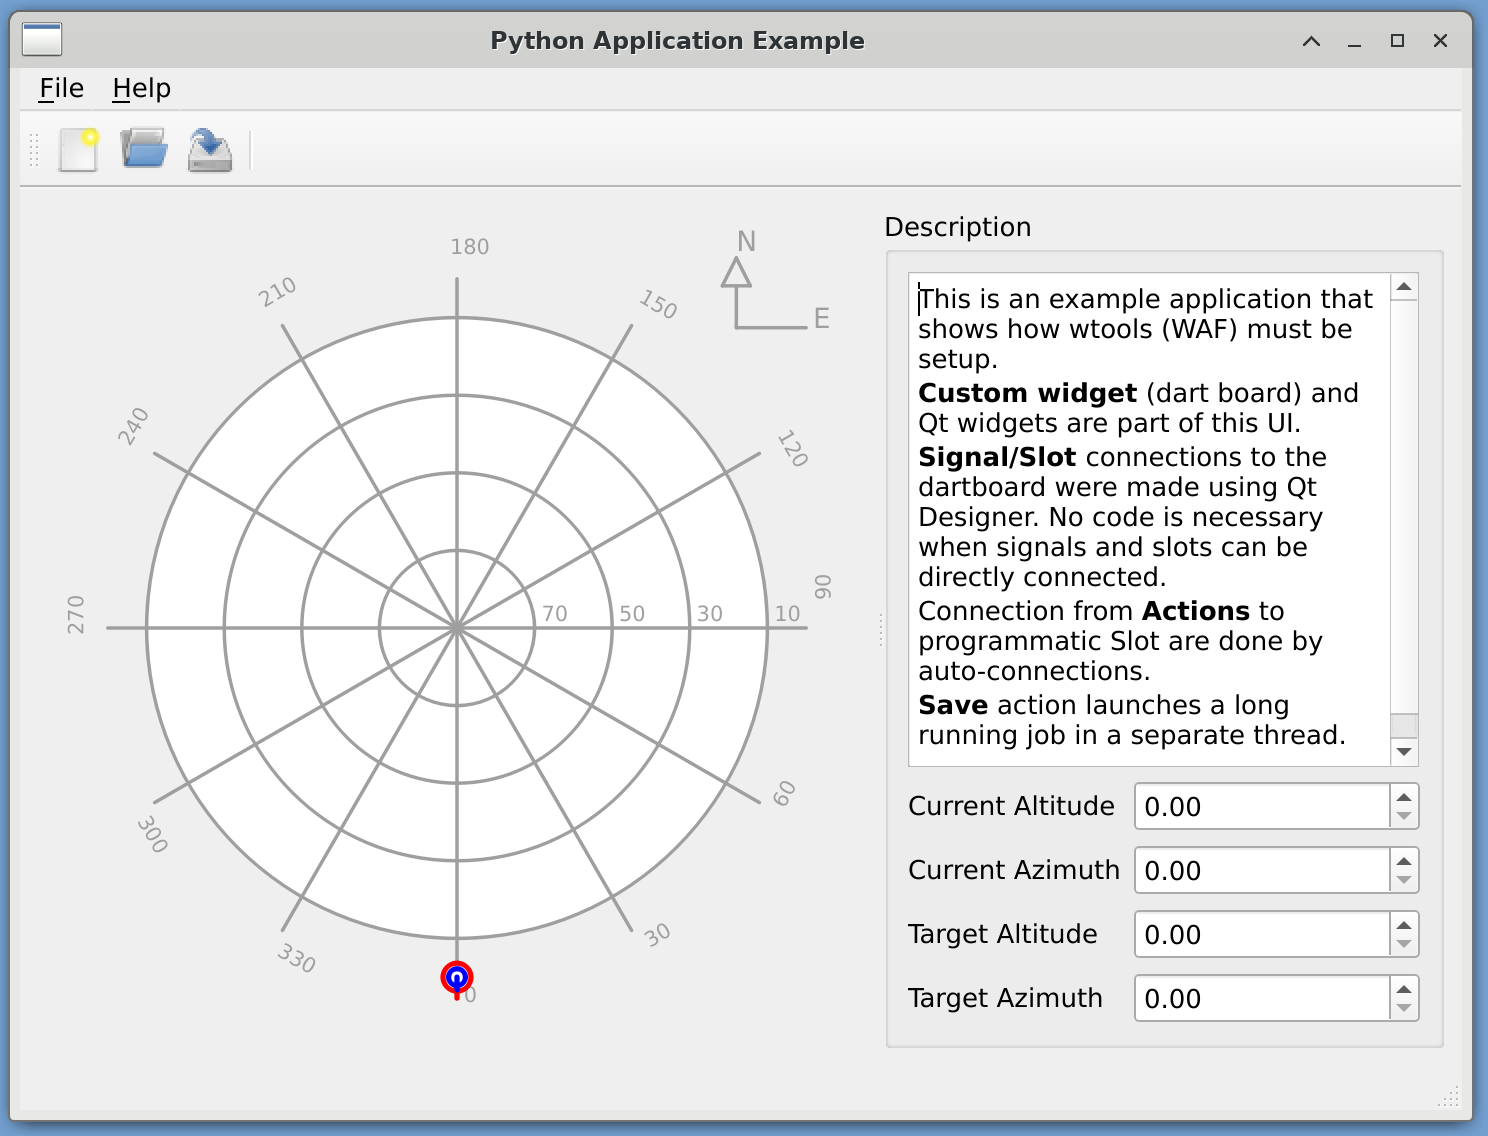
Python Application Example - GUI design to achieve in this example.
We will start the designer, by executing this command in a terminal:
$ designer-qt5
The Qt designer will start, and automatically, will ask us what kind of UI this new file will be. The default selection is Main Window. Please click on the Create button in the lower right corner of this window: this will close this New Form dialog.
The designer will then create an empty UI that inherits from the QMainWindow class, and we will have access to the whole set of designer tools.
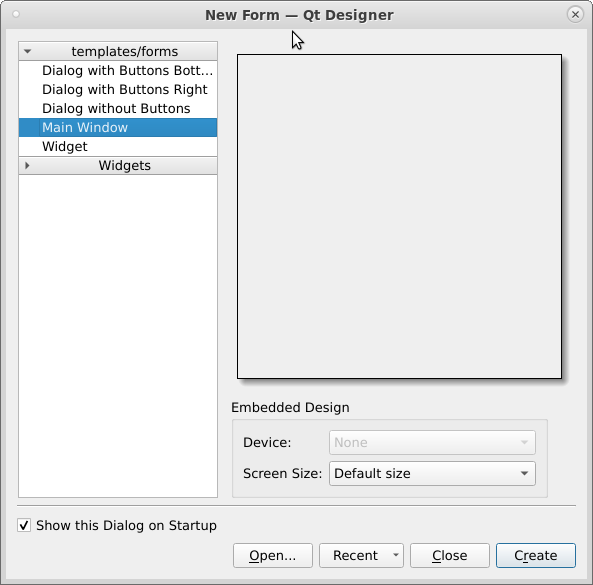
Qt Designer - Selection of new Graphical User Interface template.
Please save this file as PythonApplication/src/python_application_example/mainwindow.ui.
The most common GUI used for the presentation of an application is the QMainWindow. This one has a MenuBar on top, a Toolbar, a central widget, and a StatusBar. Most desktop applications follow this setup.
On the left side of the Designer window, is the Widget Box Docking Window. We begin by dragging a QeDartBoard from the Widget Box Docking Window, to the MainWindow in the center of the Designer.
A new QeDartBoard Widget will appear. We can drag its corners to make it bigger. Make it a little bit bigger so we can see its features, but don’t go overboard, left some space free for the other widgets.
Drag a Form Layout from the Widget Box Docking Window to the MainWindow in the center of the Designer.
Drag a Label Widget from the Widget Box Docking Window, and drop it on top of the Form Layout. Notice that the Form Layout can contain other widgets, and the target’s background for the new widget changes color when dragging.
Drag a DoubleSpixBox Widget from the Widget Box Docking Window, and drop it right of the Label Widget, inside of the Form Layout. Notice that the empty space on the right of the Label Widget is highlighted in red.
Repeat steps 4 and 5 three more times.
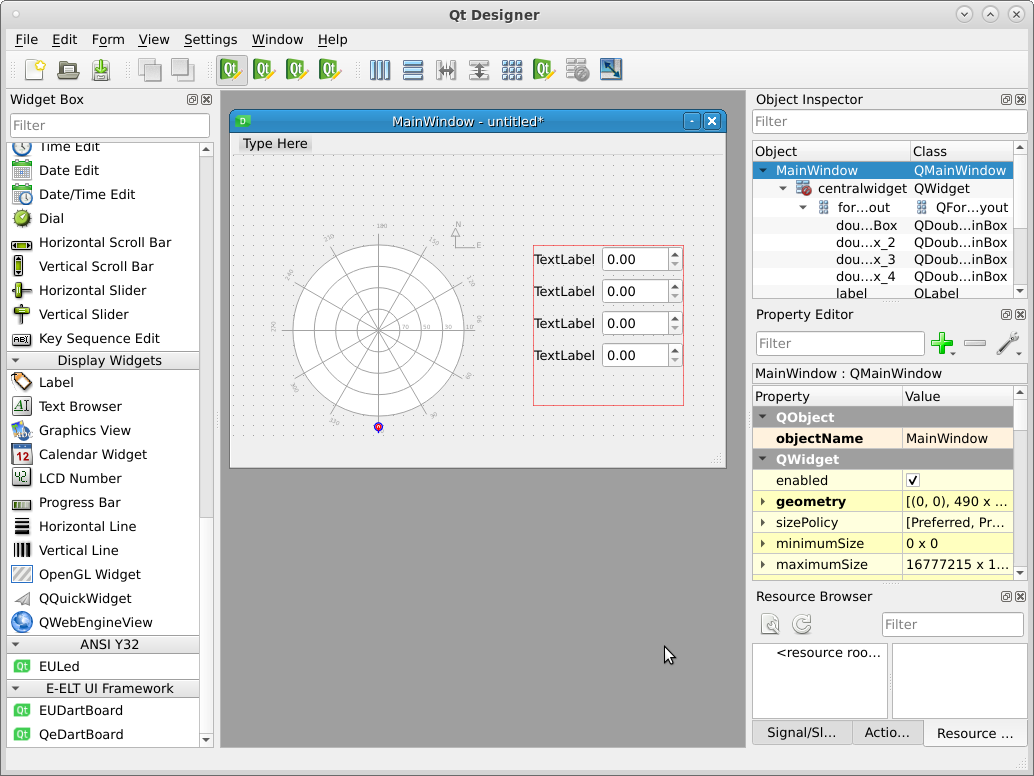
Qt Designer - Progress so far.
We have now static widgets, and a layout. We will stop at this point to explain some characteristics of positioning and size:
You can resize the MainWindow. This will in fact change the default starting size of the application when its opened.
If you resize the MainWindow, you will notice that the widgets do not move. If you make the MainWindow too small, some widgets will disappear until to resize it to a proper geometry.
Resize the Form Layout. You will see that the widget it contains are properly redimensioned.
It is strongly suggested by the E-ELT Control GUI Guidelines, that User Interface scale and redimension themselves when resized. This is a basic feature of a well programmed GUI. Layout allows developers to achieve this.
Let’s continue with the GUI.
From the Widget Box Docking Window, drag a Vertical Layout to the MainWindow. Resize it so it is bigger than the Form Layout.
From the Widget Box Docking Window, drag a Text Edit widget to the MainWindow, and drop it inside the Vertical Layout.
Drag the Form Layout, and place it inside the Vertical Layout.
Widget that can contain other widgets, have the Layout context menu. Right click on an empty space of the MainWindow, and a context menu will appear. Select the Lay out Entry. Select Layout Horizontally Entry.
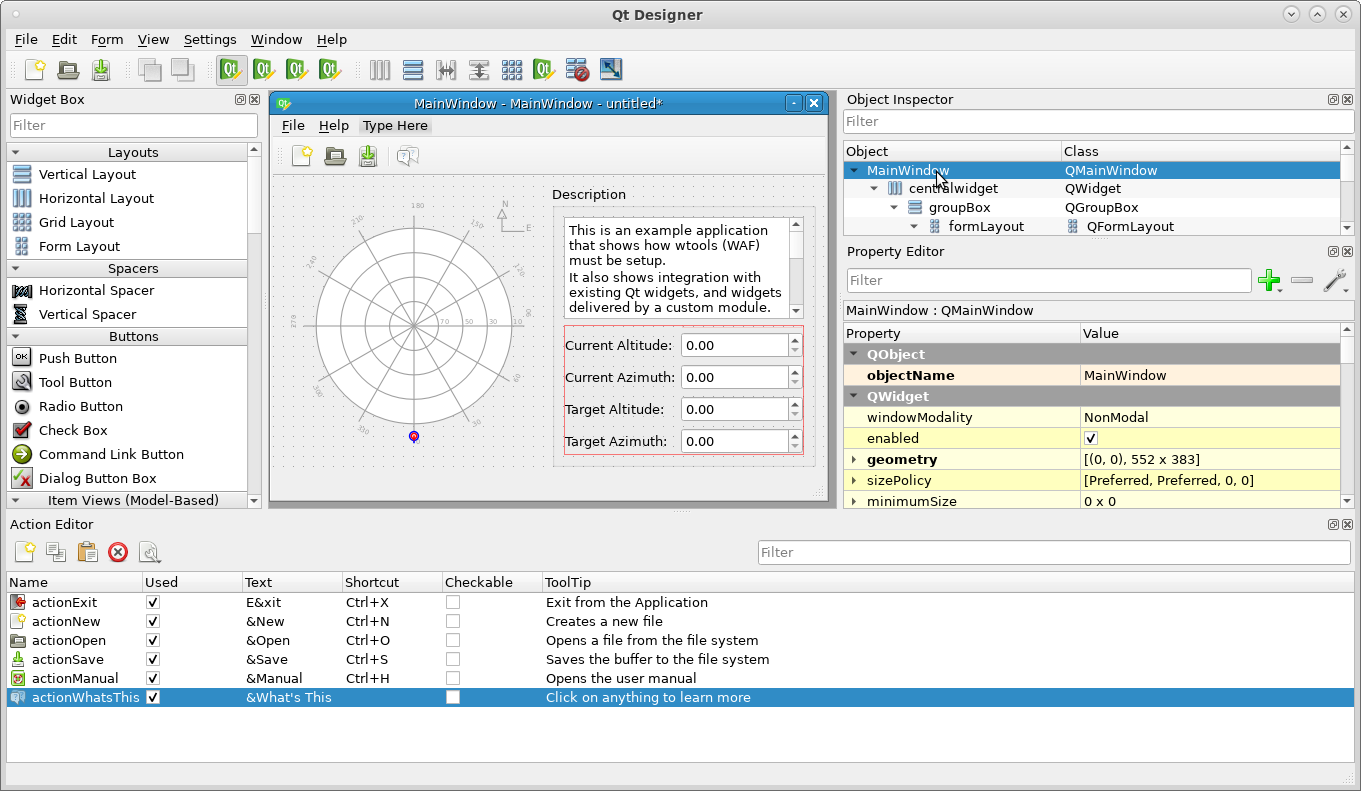
On the Right hand side of the Designer, is the Object inspector Docking Window. This is a tree representation of the GUI. Select the centralWidget Entry.
Now, on the Right hand side of the Designer, under the Property Editor Docking Window, scroll down, until you see Layout. In there is the property Layout Stretch. Set it to “1,1”.
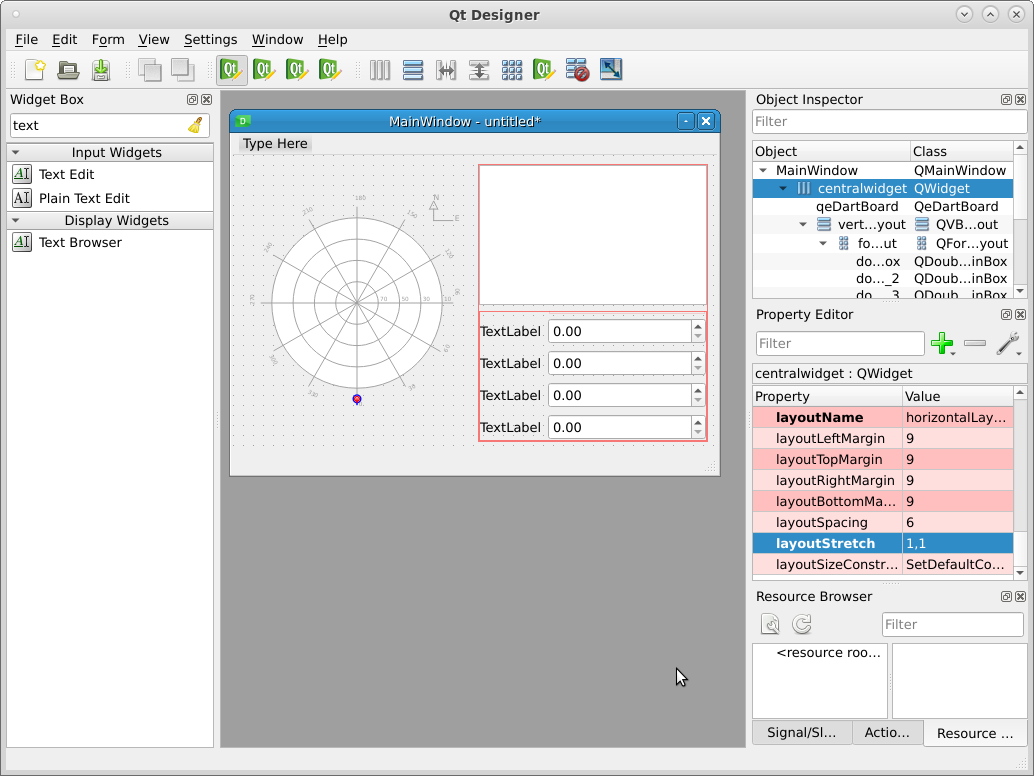
Qt Designer - Progress so far.
We have now a completely elastic GUI. Go ahead and resize the MainWindow, and you will see that every component in it resizes nicely.
The layoutStrecht property indicates in what proportion each component of the Horizontal Layout will stretch. In this case, there are two first order child (though the Vertical Layout has many children) on the MainWindow, which are the QeDartBoard and the Vertical Layout, and each will get 50% of the available space.
Tip
Elastic UI are achieved by use of Layouts. Do not fix the size of a widget. Instead use Layout and stretch factor to set the appropiate sizes.
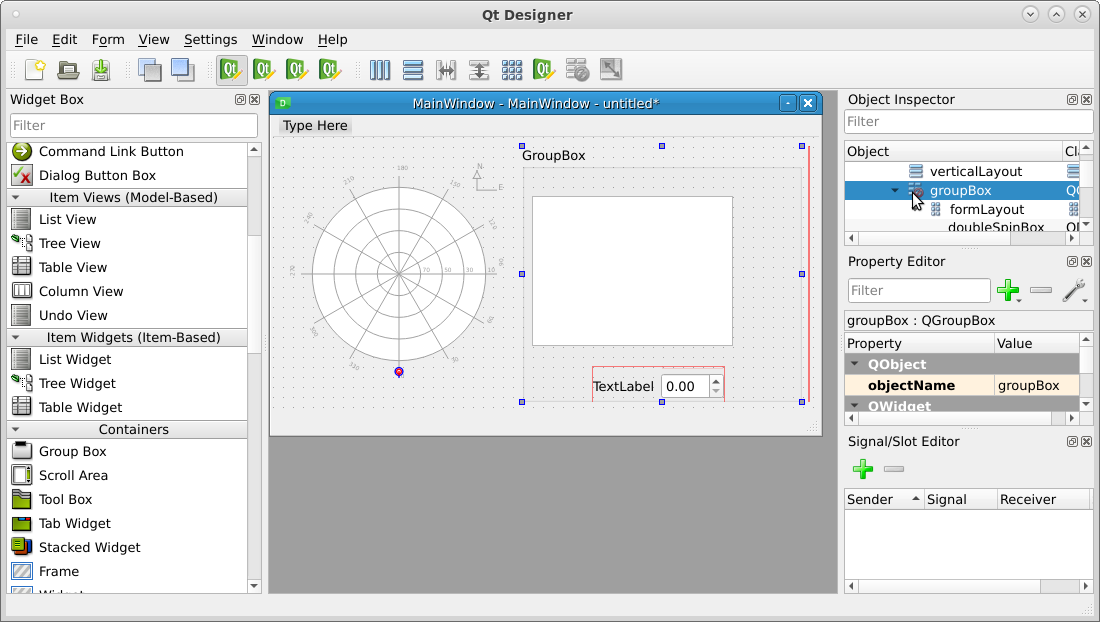
At this point, only one thing is missing from the original image. Surrounding the whole Vertical Layout, there is a Groupbox with the Description title. From the Widget Box Docking Window in the left hand side of the Designer, drag a Group Box. Drop it in between the QeDartBoard and the Vertical Layout.
The Group Box widget will appear. Now we drag the Text Edit widget into the Group Box widget, and the Form Layout into the Group Box widget. An empty Vertical Layout will be left with no elements, and looking like a single red vertical line. Double click on the Text Edit widget and a new Dialog window will appear. Here, copy and paste this long text.
This is an example application that shows how wtools (WAF) must be setup. Custom widget (dart board) and Qt widgets are part of this UI. Signal/Slot connections to the dartboard were made using Qt Designer. No code is necessary when signals and slots can be directly connected. Connection from Actions to programmatic Slot are done by auto-connections. Save action launches a long running job in a separate thread.
Qt Designer - Progress so far.
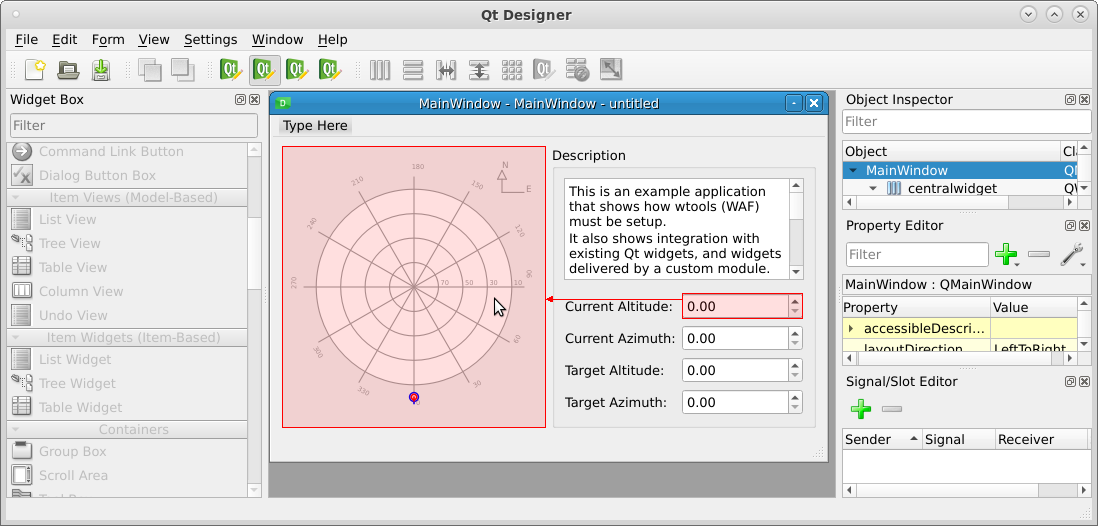
Finally, use the Object Inspector Docking Window on the right hand side of the Designer. Select the groupBox, right click on it, select Lay out Entry, and select Vertical Layout Entry. Since the Group Box is also a container, it can use layouts.
The UI is nearly finished. Update the Labels by double clicking on them, or changing its text properties.
4.2.4.1. Widgets Connections
But one thing is missing: connections: Qt UI files are capable of expressing in the UI files connection between elements of the UI. We will create four of them:
In the Designers Toolbar, click on Edit Signal/Slot button, or press F4. You will no longer be capable of adding widgets, but you can drag one widget and drop unto another to form a connection.
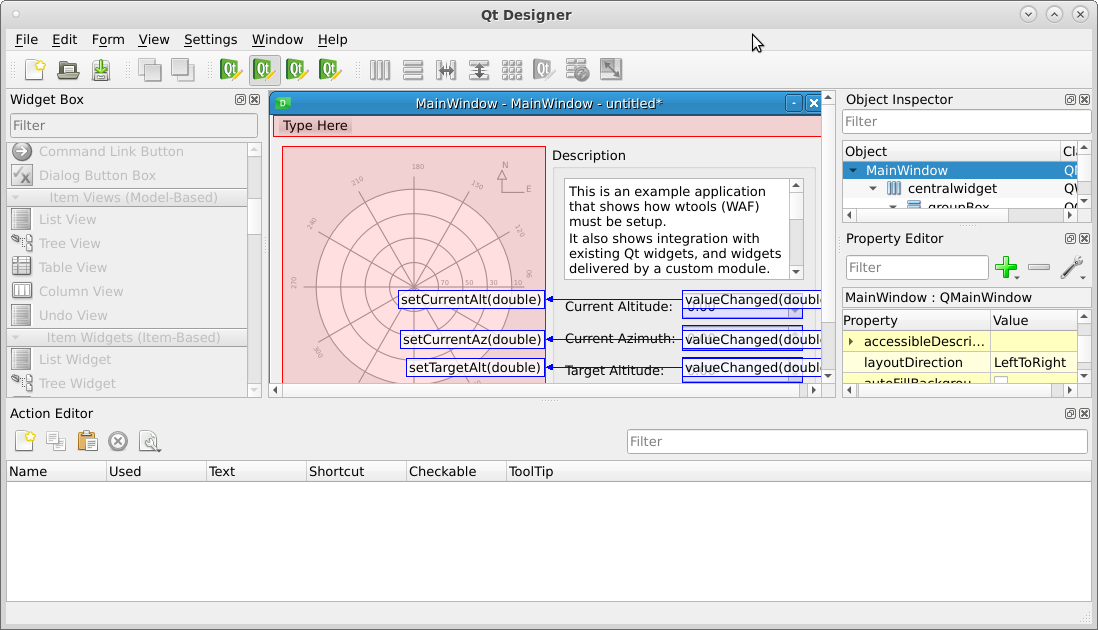
Drag from the first Double Spin Box, and drop on top of the QeDartBoard.
Qt Designer - Drag and Drop operation using Edit Signal/Slot Designer functionality.
When you drop, a new Configure Connection dialog will open. It will automatically read from the source widget its signals, and from the destination widget its slots. Now the developer must select matching signatures. Please selected in the left side
valueChanged(double), and on the right sidesetCurrentAlt(double). Press the Ok button.
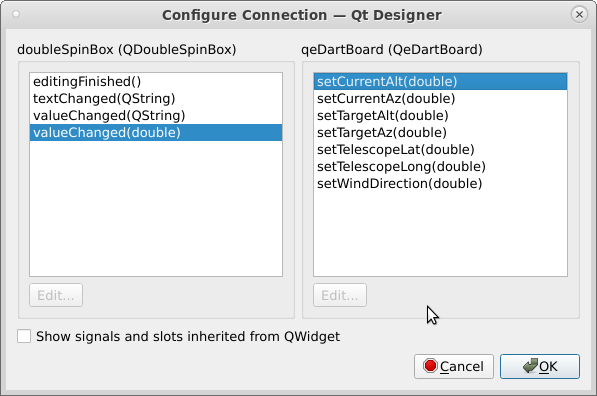
Qt Designer - Configure Connection dialog window
Repeat the same procedure for the remaining three Double Spin Boxes, but using as slot:
setCurrentAz(double), thensetTargetAlt(double)and for the fourth Double Spin Box, setTargetAz(double).
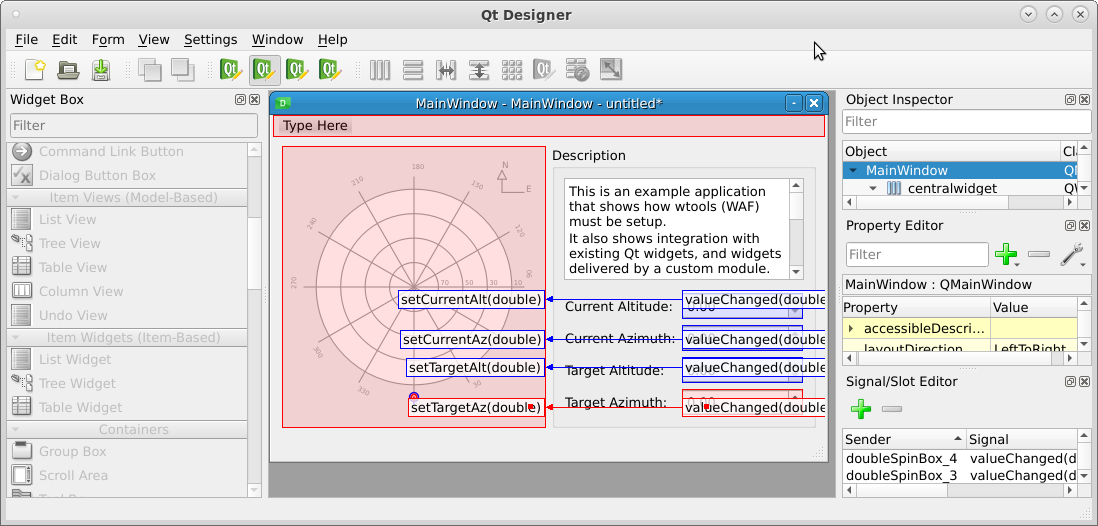
Qt Designer - All four connections are made.
The developer may test this right away inside the Designer. The Designer plugin we develop in the widget_example, and any Qt Plugin that is rendered in the Designer is a fully capable one.
In the Designer Toolbar press the Edit Widgets button, or press F3. Now change the values in the Double Spin Boxes, and play with the values in the Double Spin Boxes and see how the target (red) and current (blue) indicators in the Dart Board move.
4.2.4.2. Actions
For this the developer needs to use the Action Editor Tab. We recommend to drag this from its current position below the Property Editor Tab, and move it below the MainWindow Form. This will give us extra space. If the Action Editor Tab is not visible, you can make it visible using the Designer Entry.
Qt Designer - Action Editor placed below the Main Window Form will give the developer extra space.
Now the developer may proceed to create actions:
On the toolbar included in the Action Editor Tab, press the New button. A New Action dialog will pop up. Enter the following information exactly as in the entries below (the
&character included):
Text: E&xit
Object Name: actionExit
ToolTip: Exit form the application
Icon Theme: application-exit
Leave Checkable and Icon with its default values.
Shortcut: Click on it, and press Control + x.
Click on the Ok button.
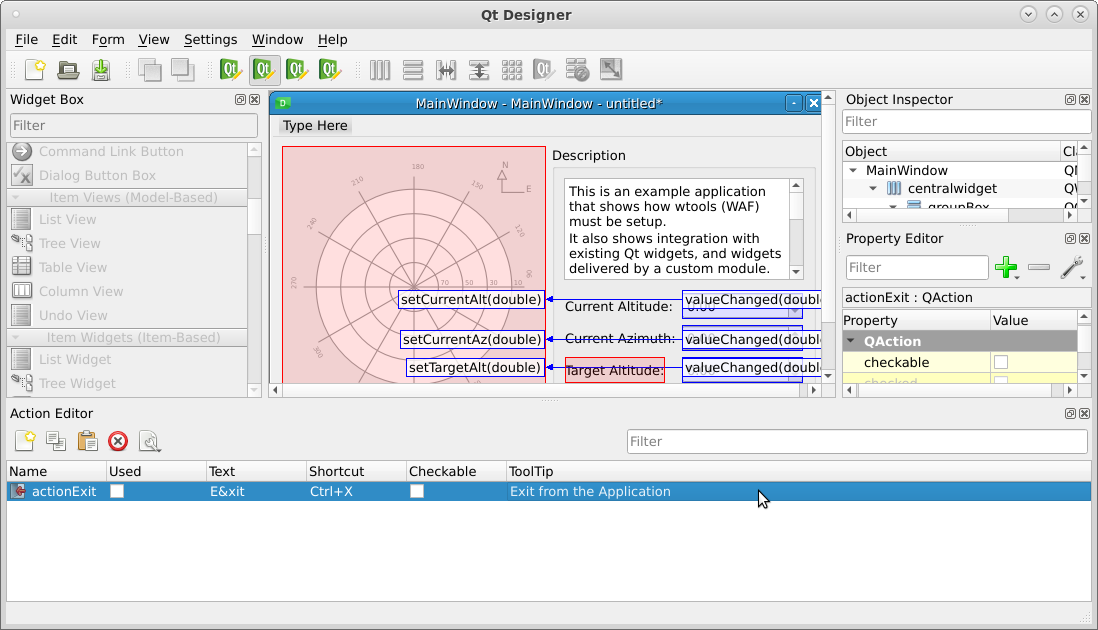
Qt Designer - A new Action has been created: actionExit
In these Action, we configure the presentation and how the user access them. Its implementation is still left for the developer, as we will see in the next section, but presentation and access, is determined in the UI file, using the Designer.
Please create five more actions:
Text |
Object Name |
Tooltip |
Icon Theme |
Shortcut |
|---|---|---|---|---|
&New |
actionNew |
Creates a new file |
document-new |
Control + N |
&Open |
actionOpen |
Opens a file from the file system |
document-open |
Control + O |
&Save |
actionSave |
Saves the buffer to the file system |
document-open |
Control + S |
&Manual |
actionManual |
Opens the user manual |
system-help |
Control + H |
&What’s This? |
actionWhatsThis |
Click on anything to learn more |
help |
At this moment we are ready to create the Main Menu: On the Main Window Form, where the Menu should be, there is a
text that reads Type Here. Please click on it, type &File and press Enter. A Menu will appear, and
the Type Here text will move right. Please click on the Type Here text again, type &Help, and
press Enter.
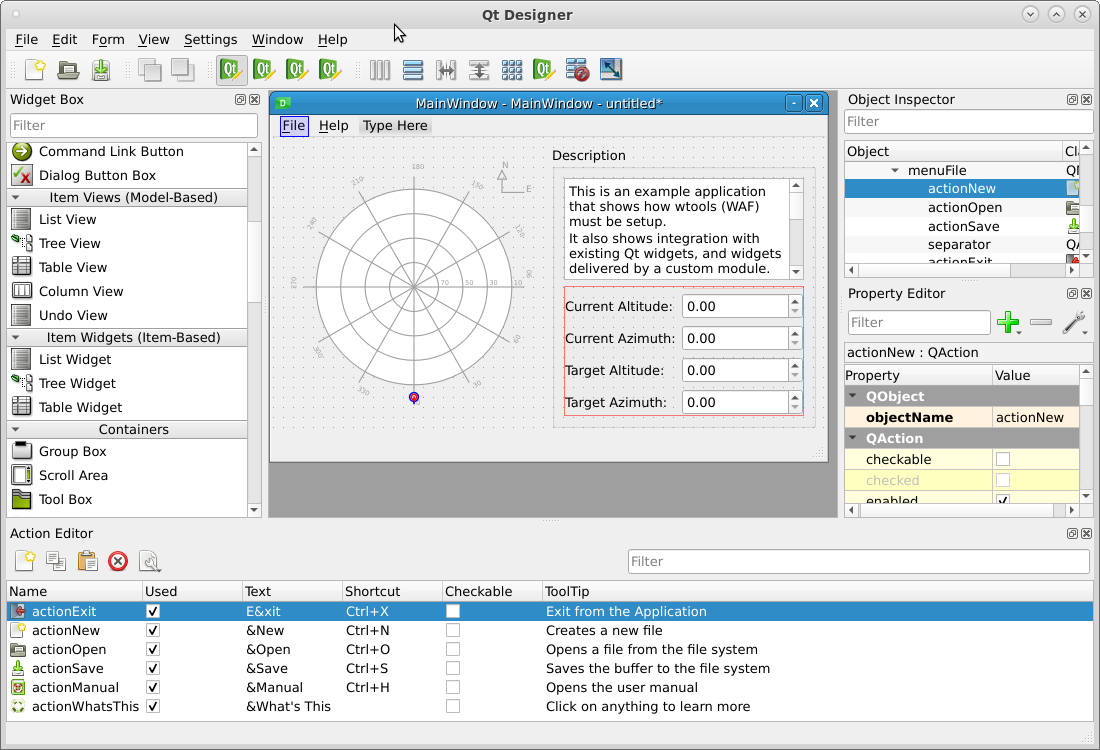
Qt Designer - All six actions and two menus have been created.
Now the developer may populate the menus:
From the Action Editor Tab drag the actionNew Action to the File Menu. An empty File Menu will pop up. Drop the actionNew in this empty menu.
Repeat for actionOpen and actionSave.
At this point click on the File menu, and double click on the Add Separator entry.
Now drag the actionExit action to the File menu, but be sure to drop it after the separator.
Repeat the drag and drop operation for the actionManual and actionWhatsThis, but drop them instead into the Help Menu.
Warning
The developer must learn the difference between accelerators and shortcuts.
- Shortcuts
Are keyboard combinations, usually involving two keystrokes, one of them a modifier key (Control or Shift), and are accessible from anywhere in the application while it has focus.
- Accelerators
Are only valid while the user navigates a menu, for example the File menu. In the text of the File menu, the original entry was
&File, which means that Alt + F will open that menu. Then instead of clicking the New entry (which original text is&New), the user can press in the keyboard the letter n.
Action can be placed in the Menu, or in the Toolbar.
On the Object Inspector Tab, go to the Main Window QMainWindow entry, right click on it, and select Add Toolbar entry. This will create a new toolbar for the UI.
From the Action Editor Tab, drag the New, Open and Save Actions.
On the new Toolbar, right click and select the Add Separator entry.
Now, from the Action Editor Tab, drag the What’s This Action.
This reuses the definitions from the Menu, and makes them accesible from the toolbar. Actions are highly reusable, and can also be triggered, enabled and disabled by code. Disabling an Action will make them unavailable both in the menu, and the toolbar.
Qt Designer - New toolbar and buttons in place.
Important
Every piece of the UI we have defined, can be also defined through code. We strongly recommend to use UI files instead of code. UIs defined through code are hard to maintain and easily grow into thousands line file.
Note
All elements used in the designer, end up in an XML formatted file, the UI file. This file will be used by the uic-qt5 –Qt UI Compiler–, which will be automatically invoked by WAF, and generated the Python version of the same UI file.
Widgets, layout, properties, actions and connections, all are saved into XML, and then when WAF is executed, a python version of it is automatically generated. This is intentionally invisible to the developer as in no case, the developer should use this file directly.