4.4.1. Introduction
This documents teaches the reader how to develop a basic GUI application for the RAD Hello application. This documents assumes you have read and followed both Python Application Tutorial, and the RAD Tutorial, Part 1.
In this tutorial, the reader will learn how to extend an existing application, implement MAL Reply/Request communications and trigger them from the GUI, and show OLDB data points.
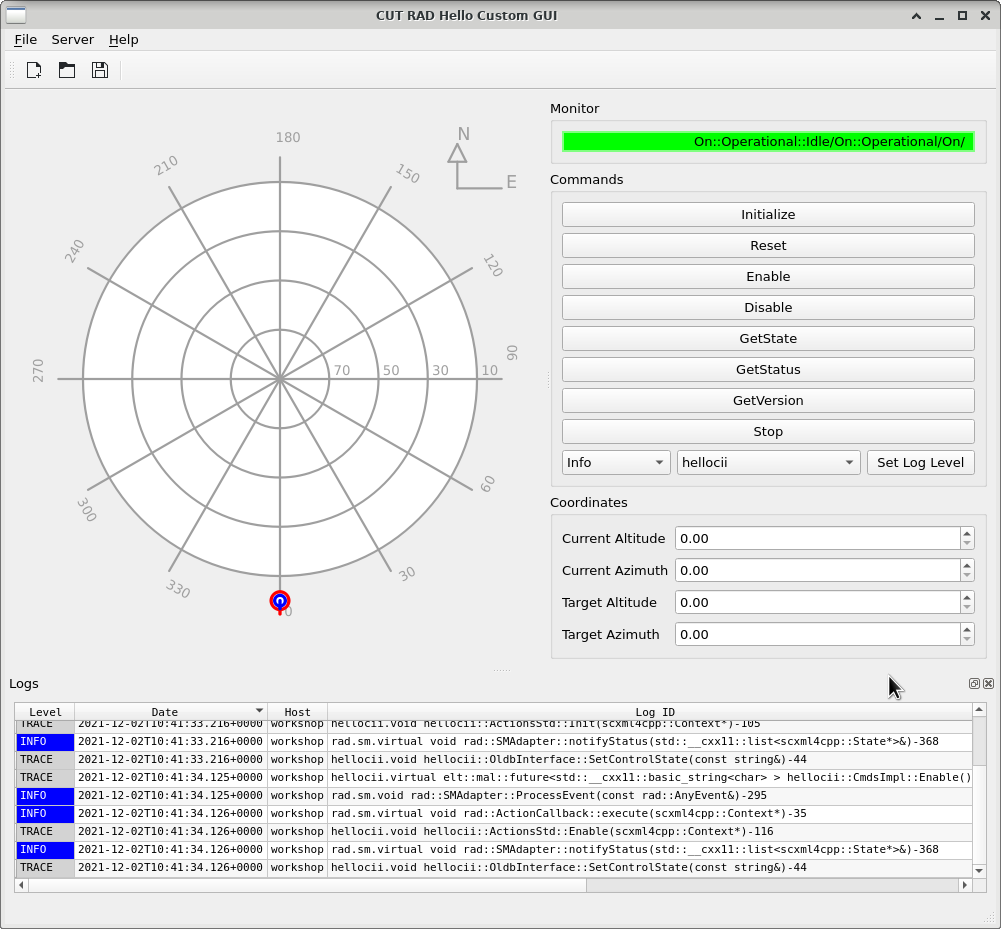
Final product of this tutorial
4.4.1.1. Definitions
- Python module
A python file, may contain several classes, functions and scripts.
- Python package
A directory, and a __init__.py file. This packages contains all other python modules in inside of the directory.
- WAF module
A directory with a wscript, that is not a top-level project script.
- WAF project
The first wscript of a project. It also must document the external dependencies of the project.
- Widget
Display or Control element of a GUI. Widgets present data or information to the user of the GUI, and implement interaction capturing input from the user, making it available for the application to process. Widgets are intended to be a small unit of a GUI, that can be reused.
- Composite widget
a widget that is implemented by composing several other smaller widgets. Implementing a composite widget commonly achieves a complex tasks by cooperation between its parts.
- Sequential Programming
a programming paradigm in which the flow of control is predetermined by a sequence of instructions.
- Asynchronous Programming
a programming paradigm in which the program reacts to events. Different kinds of inputs can be translated into events, such as key strokes, mouse movements, network connection status, battery level, etc.
Note: Asynchronous programming is not restricted by multi-threading, but some long running responses to events certainly benefit from it.
- Event Loop/Engine/Pump
Asynchronous Programming needs to implement an additional section of the program that gathers input, creates events, and trigger the responses to those events. One possible implementation of this, and the one that Qt uses, is an Event Loop (See QEventLoop).
4.4.1.2. Conventions
Note
Through this document, the author will refer to widgets by name using the following notation: TextOnTheWidget kindOfWidget
For example: Accept button or Open File dialog
Note
When referencing code, like methods or class names, this notation will be used closeEvent(QEvent *event).
Note
Executable programs will be depicted like this cut-demo-service.
4.4.1.3. Download, Compilation, and Running
This tutorial builds an application for the RAD Tutorial Part 1, based on the final product of the CUT Python Application Tutorial. In order to avoid much confusion, we suggest to download a final example of this tutorial from CUT repository.
From GIT repository |
From Webpage |
|---|---|
|
|
mv cut/examples/rad_hello ./
rm -rf cut
After reading this, the user may want to replicate the experience by their own, as excercise. In that case, we recommend to create a new template for the Python Application, and apply the same modification this tutorial introduces.
git clone https://gitlab.eso.org/ecs/cut
cookiecutter cut/templates/python_application

organization [European Southern Observatory]:
organization_domain [eso.org]:
copyright [ESO - European Southern Observatory]:
author []: ESO Developer
project_name [Template Python Application]: CUT RAD Hello GUI
project_name_slug [cut-rad-hello-gui]:
project_version [0.0.1-dev]:
app_name [TemplatePyApp]: cut_rad_hello
app_exe_name [cut_rad_hello]:
waf_module [cut_rad_hello]:
pkg_name [cut_rad_hello]:
The directory we will be using for this tutorial is the hello_rad, and it contains the code for a GUI
application that is compatible with the RAD Tutorial Part 1. This is a WAF project on its own, so it can be build in an
independent manner from the rest of Control UI Toolkit. In order to do so the reader must execute:
cd hello_rad
waf configure build install
And to execute the application:
cut_rad_hello
CUT RAD Hello GUI: We will update an application to interface the hellocii example code from RAD.
In order to use the cut_rad_hello, you must either have started the RAD hellocii example, or select from the Top Menu Bar the entry . This menu entry will open the hellocii server application for you.
4.4.2. Project Structure
The final structure of this WAF project is drawn below.:
rad_hello
├── cut_rad_hello
│   ├── src
│   │   ├── cut_rad_hello
│   │   │   ├── applicationwindow.py
│   │   │   ├── __init__.py
│   │   │   ├── mainwindow.ui
│   │   │   └── stdcmdsfacade.py
│   │   └── cut_rad_hello.py
│   └── wscript
└── wscript
4.4.2.1. Project Definition (wscript)
The first file we should take a look is hello_rad/wscript:
 1from wtools.project import declare_project
 2
 3def configure(cnf):
 4    cnf.check_wdep(wdep_name='hello.hellociiif-python', uselib_store='hello.hellociiif-python', mandatory=True)
 5    cnf.check_python_module('PySide2', condition="ver >= num(5, 14, 1) and ver <= num(6, 0, 0)")
 6    cnf.check_python_module('taurus')
 7    cnf.check_python_module('tauruscii')
 8    cnf.check_python_module('elt.cut')
 9    cnf.check_python_module('elt.pymal')
10    cnf.check_python_module('CutWidgets')
11    cnf.check_python_module('CiiWidgets')
12
13declare_project('cut-rad-hello-gui',
14                '2.3.1',
15                requires=['cxx',
16                          'python',
17                          'pyqt5'],
18                recurse='cut_rad_hello',
19                cxx_std='c++17')
The project is now named cut-rad-hello-gui, and its recurse list has change also to reflect the new project
structure. The main difference is the new check_wdep method invocation in the configure step.
This is used to import the dependency of the ICD defined in the RAD tutorial.
The ICD is a very important construct, as it defined the communication protocol between the server (hellocii application) and the client (cut_rad_hello GUI application). We should only need to depend on that library.
Aside from that change, the directory structure include one new file: stdcmdsfacade.py. This class is in
charge of implementing communication using the ICD library we just check.
4.4.2.2. Module Definition (cut_rad_hello/wscript)
Though a short difference, the module definition has an important one:
1from wtools import module
2
3# The declare_pyqt5program instruction will automatically find
4# the QT Resources, and the UI files, and run the necessary
5# commands to produce the python versions of them.
6
7module.declare_pyqt5program(target='cut_rad_hello',
8                            use='hello.hellociiif-python')
This line indicates that this module uses the ICD definition from the hellociiif module. Without it, waf
indicates failure during the build stage.
4.4.2.3. Entry Point Python Script (cut_rad_hello/src/cut_rad_hello.py)
The entry point python script cut_rad_hello.py is the one that creates a Qt GUI Application. It remain mostly
the same as in the previous tutorial, except that new command line options for the parser has been added. This example
add options for host and port of the server application, and to set the logging level of the example GUI.
20 parser.add_option( '-p', '--port', dest='port', help='Changes the network port used to connect to the RAD Hello Application',
21                    default=12081)
22 parser.add_option("-H", '--host', dest='host', default='localhost', help='Changes the network host used to connect to the RAD Hello Application')
23 parser.add_option("-v", '--verbose',dest="verbose", action="store_true", default=False,
24                       help='Changes the LogLevel of the application to Debug. Output more information on application procedures.')
25 parser.add_option("-V", '--extra-verbose',dest="extraverbose", action="store_true", default=False,
26                   help='Changes the LogLevel of the application to Trace. Outputs everything.')
Only the extra logging options are used in this file to set up the proper logging level.
33app = TaurusApplication(
34    app_name = 'CUT RAD Hello GUI',
35    app_version = '0.0.1-dev',
36    org_name = 'European Southern Observatory',
37    org_domain = 'eso.org',
38    cmd_line_parser=parser
39    )
40if(app.get_command_line_options().verbose):
41    logger = Logger(app.applicationName())
42    logger.setLogLevel(Logger.Debug)
43if(app.get_command_line_options().extraverbose):
44    logger = Logger(app.applicationName())
45    logger.setLogLevel(Logger.Trace)
Since the TaurusApplication is already created at this point, we can get the Logger objects using the taurus class Logger.
Please remember that at this point the flow of control is still sequential. When the app.exec_()
method is invoked, we surrender control of the application to Qt’s QEventLoop, and we switch to an Asynchronous
paradigm. Everything from now on is governed by events.