3 USER GUIDE
This chapter is dedicated to the general description of the Motor Engineering Interface application.
3.1 Introduction
It describes how to start the application motei , the main panel (section 3.2), the essential actions of loading and saving a motor configuration (section 3.3), the configuration panels (section 3.4), the control panels (section 3.5) and the status panels (section 3.6).
The first step to perform before invoking motei is to configure the working environment(s). They are of two kinds: CCS-RTAP environment on WorkStation, LCC environment on LCU. Whereas all actions are allowed on LCU environments, only configuration activities are available on WS.
The configuration of the environment consists solely in creating dedicated database branches in the environment database:
Once the environment(s) have been created and started (see vccEnv(1) and vccConfigLcu(1)), you are ready to work with motei.
3.1.1 Panel Common Description
Each panel contains the items as shown below:
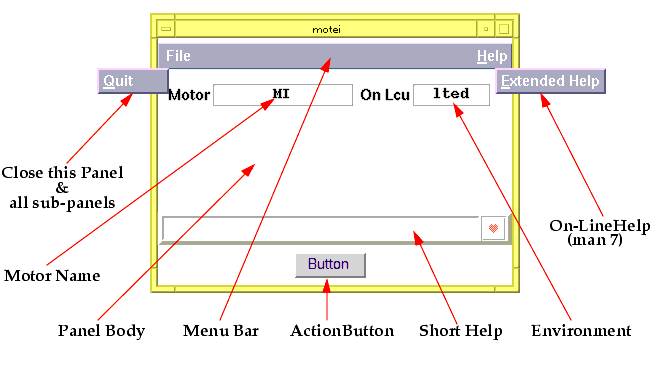
Each panel contains a menu bar, a short help field, action buttons and 2 output fields that show the selected motor and the working environment. The panel body contains all UIF elements needed by the dedicated function of the panel.
Command `Extended Help' : show the associated help text, i.e. the man-page section 7 in a dedicated xterm.
Note : In the current version of the UIF toolkit, the time needed to build a panel can take a few 10 seconds depending on its size.
In the following sections, the environment will be referred to as <mcmEnv>, the motor as <motorName>.
3.2 Main Panel
The application motei (see 5.2.1 for man page) is invoked from the Unix shell command line by typing on the running environment $RTAPENV (CCS or CCS-lite) :
The main panel of motei is shown in the figure below and allows the selection of the working environment (LCU or WS) and of the Motor:
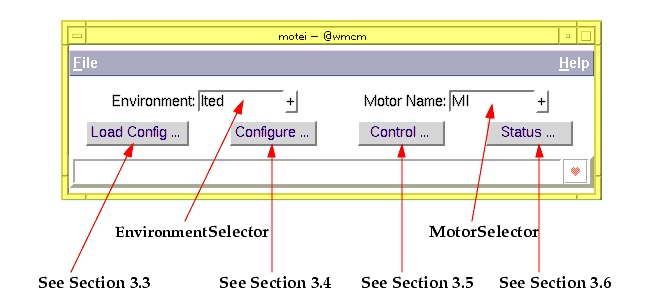
The action buttons located in the bottom part of the panel are:
3.2.1 Environment Selection
The environment selector consist of an entry and a button (+). The selection of the environment occurs either in typing in its name and <Return> or in invoking the pull-down menu via the + button and select the item. The environment defaults to $RTAPENV.
The environment may be preset using the environment variable MOTENV, e.g.
3.2.1.1 Selecting WS Environments
It is also possible to prepare and browse motor configurations without a physical motor nor a LCU. The WS environment shall be of type RTAP, i.e. full CCS.
CCS-lite environment may only be used together with a LCU. The environment is only providing the communication interface between motei and the LCU, therefore it shall not be selected.
3.2.1.2 Selecting LCU Environments
When selecting a LCU environment, an environment monitor is launched that checks every second if the environment is alive (PING command to motServer). If the LCU is not alive, the warning panel shown below pops up for acknowledge. The monitor is queried by the panels before closing.
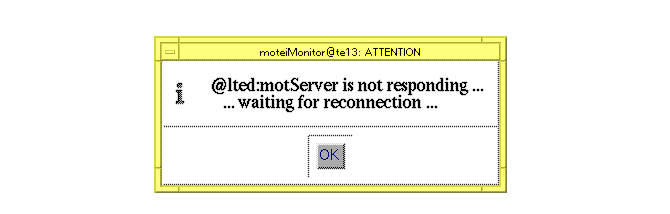
Note: This feature is under development and will be enhanced so as to improve the reliability of the product when the LCU environment becomes not alive while operating a motor.
3.2.2 Motor Selection
The motor selector is enabled after an environment has been selected. This selector behaves identically to the environment selector. However, the list of available motors may not reflect the content of the database: since motor branches may be located anywhere in the database, there is no way a priori to retrieve all motor branches out of the only database. Two scenarii may take place:
1. the database (WS or LCU) includes the template motors as provided by moteiDATABASE.db(5). The motors are then located under :Appl_data:MOTEI for a WS, resp. under :MOTEI for a LCU environment. An automatic procedure will search for them and append them to the list.
2. the database (WS or LCU) does not include the template motors. The motors may thus be located anywhere. The list is empty and the user must type in the name of the selected motor.
On LCU environment only, a second procedure is invoked that searches for installed motors, see motInstall(1), and appends them to the list. When the template motors have been included, they are automatically installed. The selection of a motor implies its installation.
The motor may be preset using the environment variable MOTNAME, e.g.
3.3 Load & Save a Motor Configuration
3.3.1 Load a Configuration
The Load Config ... button of the Main panel allows to load the database branch of the selected motor with the parameters stored in a configuration file.
A File selection Box is displayed allowing the selection of the name of the configuration file.
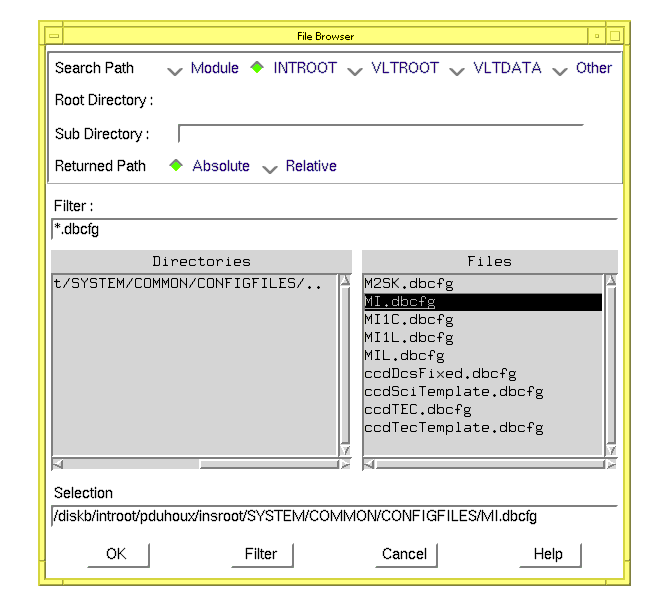
It is recommended to name these files as <motorName>.dbcfg and to locate them either:
· under $INS_ROOT/SYSTEM/COMMON/CONFIGFILES where all .dbcfg files are searched for (see motInitDb(1)).
3.3.2 Save the Configuration
The main configuration panel (see moteiConfig(7)) provides one additional button Save that is the combination of Apply + Save. In the same way as for Load Config... , a file selector is raised. The generated file should have the extension .dbcfg for compatibility and will contains the values of all configuration attributes as expected by motInitDb(1), motInstall(1):
7 Each time the LCU is rebooted, any change in the configuration is lost: it is therefore recommended to save the actual configuration in a backup file after each major change. After the LCU is rebooted, the relevant configuration must be loaded in the database.
3.4 Configure the Motor
The Configuration Panel is raised after clicking on the Configure... button of the Main panel.
The panel is shown in the figure below; Menu bar options are inset above the panel. See 5.2.2 for man page.

The panel is to be read from the part Hardware, down to Axis, Encoder and Times. According to the current settings, some items may not be enabled, some values may be modified as a consequence of a previous setting.
The Hardware part is dedicated to the description of the hardware: types of motor and boards.
The Axis part is dedicated to the description of the axis: type (linear/circular) and SW limits.
For linear axis with motion controller, the SW limits may be defined absolute or relative to Special positions (see 3.4.11). The limits are set at completion of the HW Initialization (see 3.4.12). In addition, the HW limits may be checked on request for simultaneous activation indicating a possible HW problem with the motor cables.
The Encoder part is dedicated to the description of the encoder: type (incremental/absolute) and associated parameters.
The Times part is dedicated to the setting of the status sampling period and timeouts.
In most cases the setting of these configuration items from one of the template motor allows the motor to become initialized and may be sufficient to perform some motions. Hardware tuning can be achieved via the MenuBar Hardware; advanced configuration is made via the other Menubar entries.
7 In the current version of motei, any change in the description of the axis and/or encoder must be propagated to the motion controller MAC4, by invoking the associated panel (Menubar Hardware option Controller) and Apply. When both panels are active, one must first Apply in the Main Configuration panel and then Refresh + Apply in the Motion Controller MAC4 panel.
3.4.1 Common panel items
3.4.1.1 Action Buttons
Each configuration panel provides the 3 buttons as shown below:
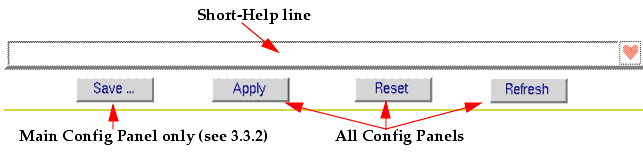
The actions may be invoked at any time from any panel and apply only on the values as available from this panel:
Apply write the configuration values of this panel into the corresponding attributes of the database. Depending on the menubar File option Enable Motor Control (in main configuration panel), the Apply action will instruct MCM to update the configuration; the motor operational state is then reset to NOT INIT.
Reset restore the configuration as when the panel was invoked. The restored configuration is then Applied.
Refresh the panel by reading the configuration from the database, but the current attributes. It is recommended especially when units, axis or HW configuration have been changed.
Any change in the configuration panels is not considered by MCM until Apply or Save is invoked.
7 The last Applied configuration is valid until a new configuration is loaded into the database or the LCU is rebooted.
3.4.1.2 List Boxes
Some of the sub-panels (see 3.4.6, 3.4.7, 3.4.9 and 3.4.12) are built around List Boxes. Below the item list, 4 buttons are provided as shown below:
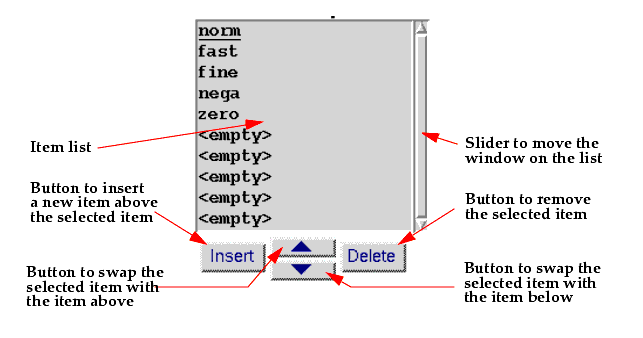
The selection of an item is made via the Mouse Button 1 (left).
The Insert button inserts an empty item above the selected one, but for the first item.
The Arrow Up swaps the selected item with the one above, but for the first item.
The Arrow Down swaps the selected item with the one below, but for the last item.
The Delete button removes the selected item.
The selected item is automatically updated with the current values when invoking Insert/Arrow Up/Arrow Down, Apply (Save) or selecting an item.
Depending on the panel, some additional restrictions may apply that will be mentioned in the corresponding sections.
Note : This kind of selection widget is used for database attributes of type TABLE. The table contains physically a predefined number of entries. It is therefore obvious that this number can not be modified neither with Insert nor with Delete. This means that the insertion is only possible when at least one empty entry is available; the deletion removes the selected entry and appends an empty one at the end of the list.
3.4.2 Menu Hardware : Events ...
These features are not implemented yet, however the default configuration as preset in the base motor classes is coherent and does not prevent the operation of the motor.
The dialog box window as shown below is raised; Click on OK to acknowledge.
3.4.3 Menu Hardware : Amplifier ...
3.4.3.1 Servo Amplifier VME4SA
This panel is only available when using the standard ESO Servo Amplifier VME4SA, see 5.2.3 for man page.
A detailed description of the board parameters is given in [2] and in the VME4SA User Manual.
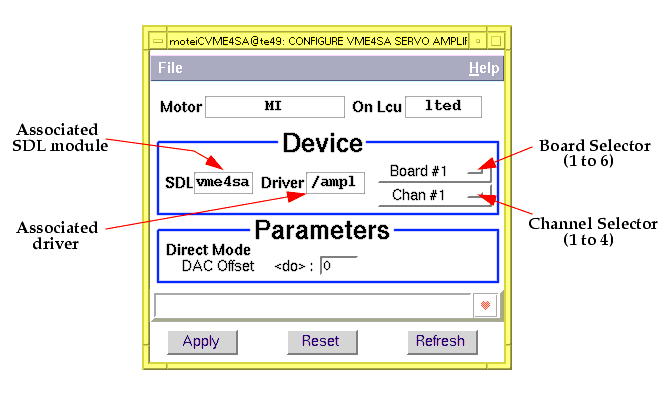
The Device part allows the setting of the associated hardware channel. The board selector refers to the board index with increasing base address; the channel selector refers to the outputs as labelled on the backplane and on the board front panel.
3.4.4 Menu Hardware : Controller ...
3.4.4.1 Motion Controller Maccon MAC4
This panel is only available when using the standard ESO Motion Controller Maccon MAC4, see 5.2.4 for man page.
A description of the board parameters is given in [2] and in the MACCON MAC4 User Manual.
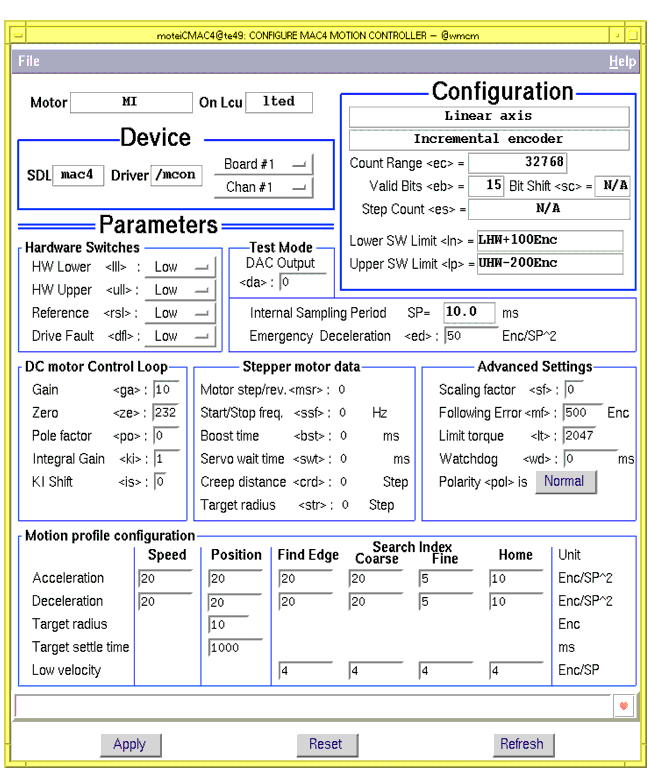
The Device part allows the setting of the associated hardware channel. The board selector refers to the board index with increasing base address; the channel selector refers to the outputs as labelled on the backplane and on the board front panel.
The Configuration part recalls the configuration as defined in the Main Configuration panel, (see moteiConfig(7)). It shows the current configuration values for the ESO Standard MAC4 controller board and allows to change or tune any parameter handled by the board. The label preceding each input field shows both the human-readable and, (between < >) the internal-board parameter name.
A description of the meaning of each board parameter is given in [2].
7 In the current version of motei, any change in the description of the axis and/or encoder must be propagated to the motion controller MAC4, by invoking the associated panel (Menubar Hardware option Controller) and Apply. When both panels are active, one must first Apply in the Main Configuration panel and then Refresh + Apply in the Motion Controller MAC4 panel.
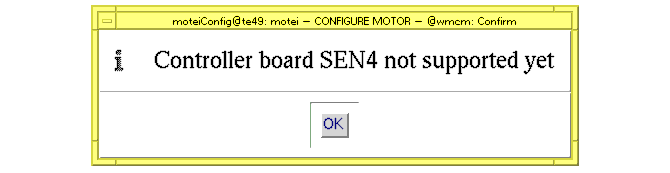
3.4.4.2 Other Motion Controllers
The motion controller CAMAC (used on NTT-EMMI) is not supported.
The dialog box window as shown below is raised; Click on OK to acknowledge.
3.4.5 Menu Hardware : Brake & Interlock ...
This panel is available only when a Digital I/O board has been declared in the HW configuration, see 5.2.5 for man page..
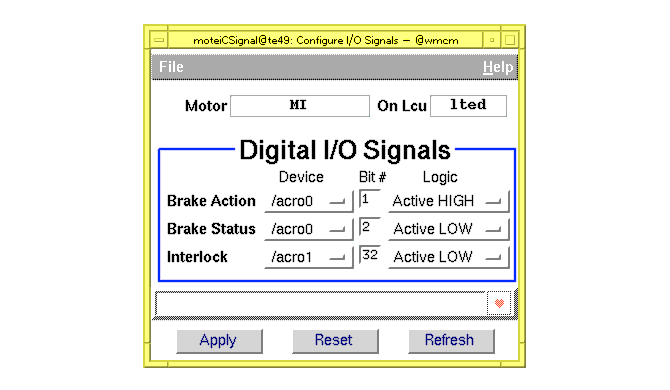
For each of the three signals, the associated device (/acro0 to /acro3) shall be selected.
Each signal is mapped by one (1) bit which shall be input (from 1 to 64).
The signal Brake Action is an Output; the other two are Inputs (status lines).
At last, the logic of the signals shall be specified :
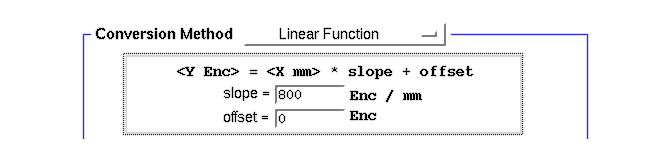
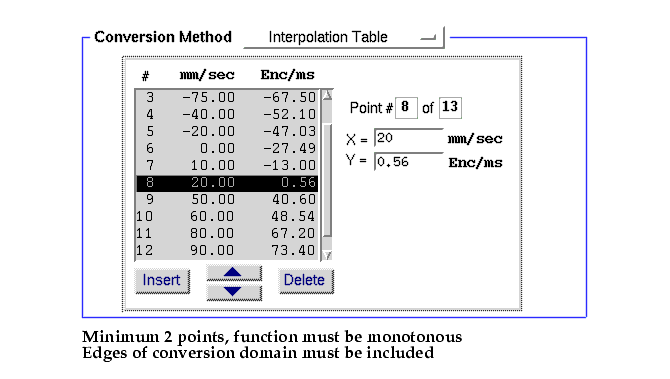
3.4.6 Menu Units : Conversion ...
One of the important features of MCM is the handling ability of units (See [2]). This panel is dedicated to the configuration of the unit conversion methods to be used by MCM and the application.
Beside the 4 board units (Enc, Enc/ms, Ref and Dig) for Position, Velocity and Current, it is possible to define user units to be used as default units, i.e. the unit in which position and velocity may be defined, and in which position, velocity and current actual values may be expressed in the status.
For each user unit declared as default unit, the associated conversion method to one of the board units must be provided.
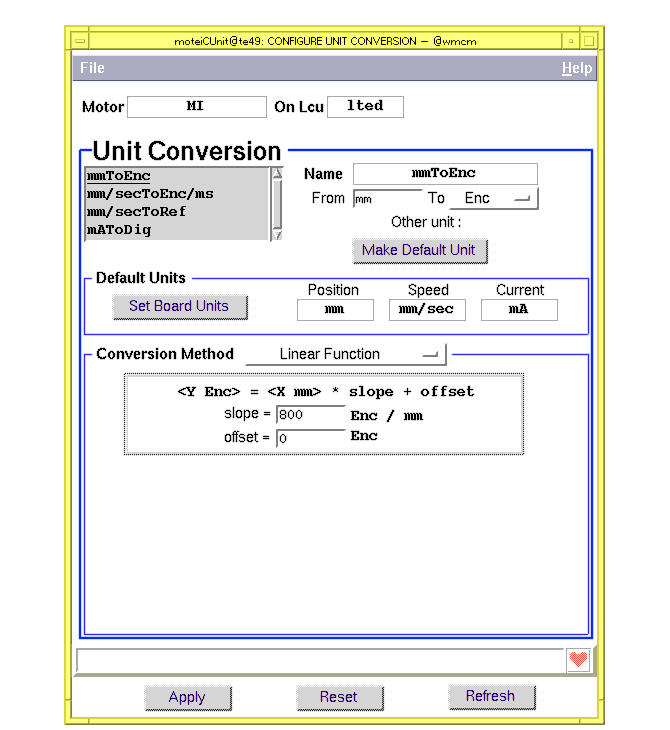
The panel shown above displays the default set of units and the table of unit conversion methods of the selected motor, see 5.2.6 for man page. The listBox displays the names of the conversion method or <empty> if the row is available. Whenever a method is selected (by clicking on it with the mouse) the panel is updated with the source unit, target unit, conversion method and its related parameters as from the database.
It is possible to set a unit as the default for Speed, Position or Current (See [2] for the requirements) by invoking the Make Default button.
The general procedure to define/modify a unit conversion method is:
3. Select the To unit from the predefined set of units or select Other to define another target unit, in the later case type in the entry below the To selector the name of the target unit. This conversion method can however not be used by MCM.
b. For interpolation method: minimum 2 up to 50 points shall be defined. The set of interpolation points must cover the whole variation domains in X and Y. The function must be monotonous. The points shall be entered either in X or Y increasing/decreasing order (use the arrows to sort the list). Add/remove points using the Insert/Delete buttons. The list is automatically updated with the current point (X,Y) when invoking the buttons Insert/Apply and the arrows.
c. For user function, enter the name of the user function. The name must be found in the Global Symbol table of the LCU and must comply the type motCONV_FUNC (defined in mot.h). The names are resolved at Install time, see motInstall(1).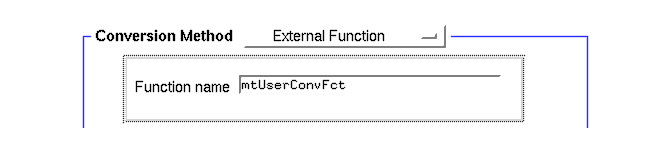
The unit conversion description is applied automatically when selecting an other method or invoking the Apply button.
Important Note: the definition of user units as default units enforces the independence of the configuration with the hardware, i.e. in case the encoder shall be replaced and the gear ratio is modified, only the update of the corresponding conversion methods is necessary so as to update the whole configuration.
7 However, the declaration of user units as default units and their use in the other configuration items forces the user not to change them. Changing the name of a user unit must be propagated through all other configuration items whenever referenced. Automatically, the unit will be forced to the corresponding board unit if the unit was not declared.
3.4.7 Menu Speeds : Named Speeds ...
Named Speeds are symbolic names assigned to physical velocities. The panel below shows the table of named speeds, see 5.2.7 for man page.
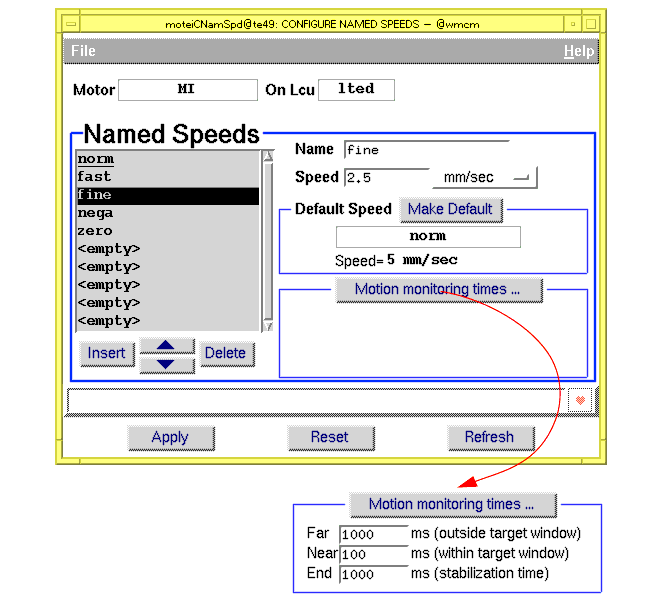
The ListBox shows the list of all defined Named Speeds or <empty> if the row is available. Whenever an entry is selected (by clicking on it with the mouse), the panel is updated with the speed name and its parameters. The default speed is also displayed and it is possible to set its value by pressing the Make Default button, the settings currently present in the panel will be used.
Note: the default speed is recorded as the index of the associated speed in the table.
In addition, for each speed the motion monitoring parameters may be specified by clicking the button Motion monitoring times ... These times are defaulted to 1000, 200 and 1000ms resp. See [2] for details.
3.4.8 Menu Speeds : Index Search ...
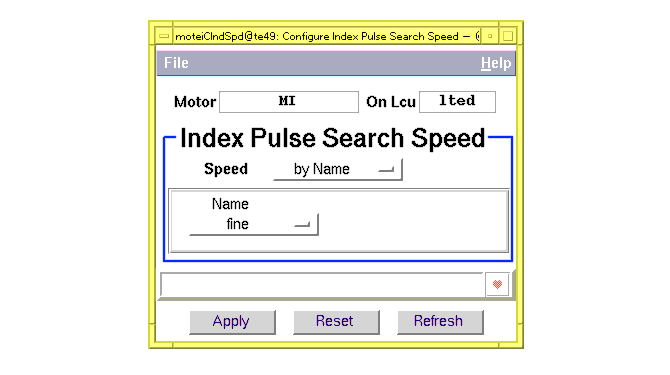
This panel is dedicated to the definition of the speed to be applied when performing the second step of the search motion to the index pulse of the encoder. See 5.2.8 for man page.
3.4.9 Menu Positions : Named Positions ...
Named Positions are symbolic names assigned to physical positions. The panel below shows the table of named positions, see 5.2.9 for man page.
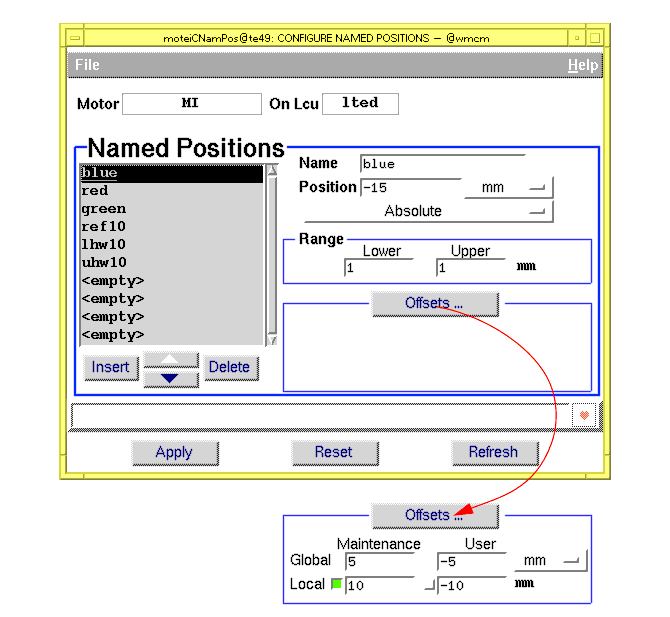
The ListBox shows the list of all defined Named Positions or <empty> if the row is available. Whenever an entry is selected (by clicking on it with the mouse), the panel is updated with the position name and its parameters. Each named position shall be described as a Nominal position and the two Lower and Upper range values that define the domain in which the name shall be valid.
A named positions shall be defined either as an Absolute position or relative to one of the Special Positions (see 3.4.11). The named positions must be fully resolved at completion of the HW Initialization (see 3.4.12).
In addition, offsets may be specified for the sections Maintenance and User-defined as described in [2], by invoking the Offsets... button. By default, both offsets are off, i.e. the global offsets are valid. The small inset panel allows the setting of both the global and the local offsets: the Global offsets are defined for all named positions, the Local offsets override the latter whenever enabled.
3.4.10 Menu Positions : Two Step Offset ...
This panel is dedicated to the description of the Offset and Speed to be applied for Two-Step type motions, see 5.2.10 for man-page:
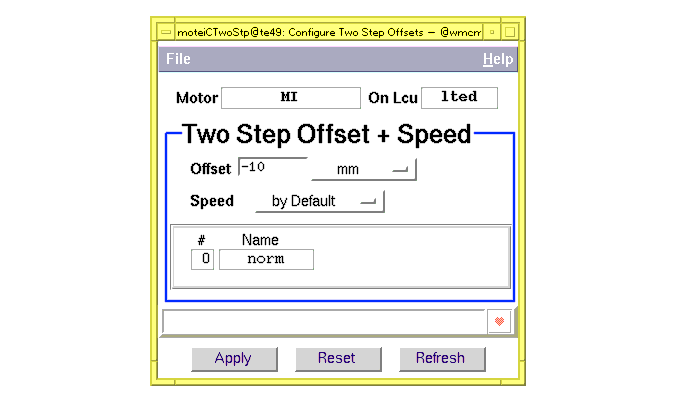
The offset is a relative value which will be added to the target position value so as to define the position to move to during the first step:
offset > 0 : the first motion will end after the target, i.e. the target will always be reached from the right side (decreasing position).
offset < 0 : the first motion will end before the target, i.e. the target will always be reached from the left side (increasing position).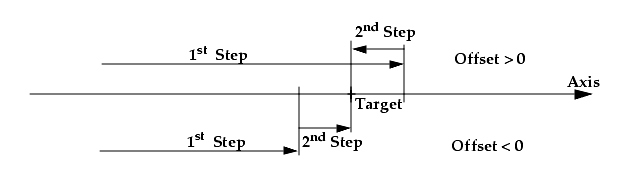
This type of motion is meant to correct for eventual mechanical backlash, and thus increase the precision of the positioning.
The speed to be applied during the second step shall not be too high so as to limit possible oscillations and achieve a better positioning accuracy.
3.4.11 Menu Initialization : Special Positions ...
The panel below is dedicated to the description of the Hardware special positions, see 5.2.11 for man-page:
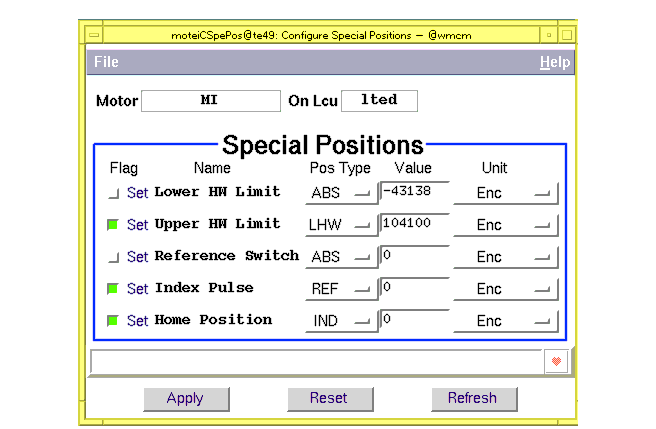
For each of the 5 positions, the Flag indicates if the position shall be made known to the system at completion of the HW initialization sequence if no action had lead to move to. All positions which are not flagged as such must have been moved to before they may be referenced by named positions or in the target definition. This table will be processed at completion of the HW initialization sequence in the order shown in the panel, thus any entry may refer to any HW position reached in a previous step. Finally the SW limits and Named Positions will be resolved for Special Position references.
In order to operate the motor in Simulation mode, the position values of the unflagged positions must be given here so as to instruct MCM about the physical position which would have been reached in normal mode.
This table is to be carefully configured together with the HW Initialization sequence, since they both describe how the motor will be initialized/calibrated.
3.4.12 Menu Initialization : Init Sequence ...
The panel below is dedicated to the configuration of the sequence of actions to be performed during the initialization of the motor, see 5.2.12 for man page:
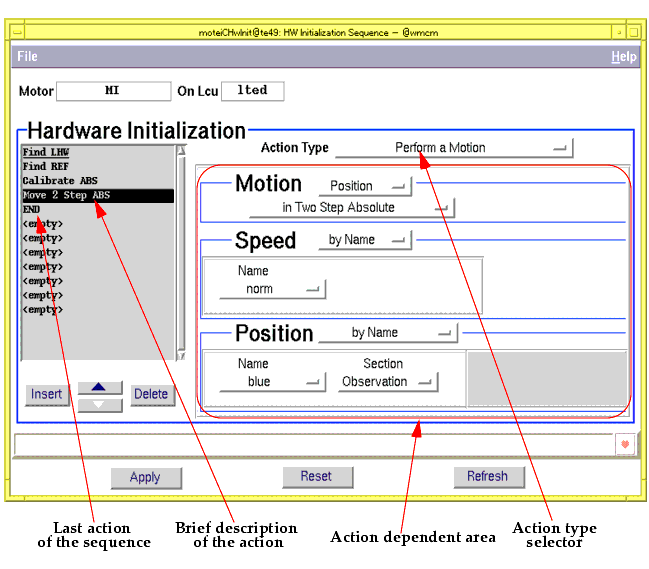
The ListBox shows the list of all defined Actions or <empty> if the row is available. Whenever an entry is selected (by clicking on it with the mouse), the panel is updated with the action type and its parameters.
The last action of the sequence shall be END. A maximum of 12 actions may be defined. Two-step motions (Move 2 Step / Search Index Pulse) count as 2 actions, thus the effective size of the table is reduced by one every time a two-step motion is defined in the initialization sequence.
The panel insets as of the action type, displayed in the Action dependent area, are shown in the sub-sections below.
3.4.12.1 Perform a Motion
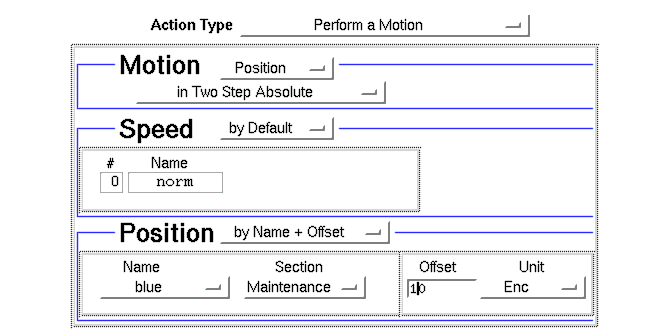
This is the main action dedicated to the description of motions. At this stage none of the special positions is known therefore care should be taken when defining the target positions when not absolute. As well, absolute positions do make sense only after the axis has been calibrated, i.e. a known position is assigned a known value (e.g. find the Reference Switch and calibrate the position as 0 Enc).
3.4.12.2 Set the Lower/Upper SW Limit
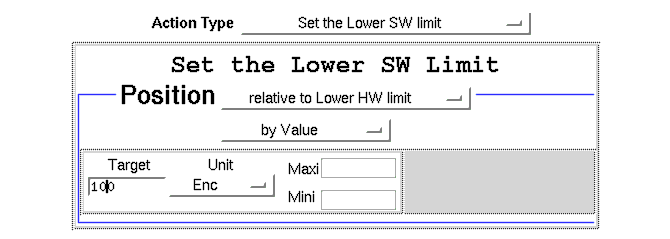
Only on Linear Axis, this setting are overridden by the SW limit settings as of the Main Configuration panel (see 3.4).
3.4.12.3 Calibrate the Axis
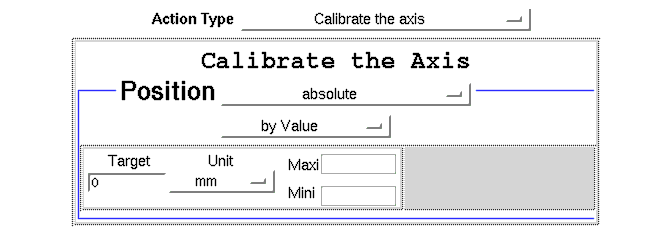
The current position will be forced to the position described in the inset above. All special positions will be accordingly corrected of the offset.
3.4.12.4 Clamp the Brake

Only together with Digital I/O board accordingly configured (see 3.4.5).
3.4.12.5 Disconnect the Power Relays

Only together with ESO VME4SA Servo Amplifier.
3.4.12.6 Execute a User-defined function

For user function, enter the name of the user function. The name must be found in the Global Symbol table of the LCU and must comply the type motINIT_FUNC (defined in mot.h). The names are resolved during the HW Initialization. See also section 3.5.7 for argument passing mechanism.
3.4.12.7 Execute a On-Board procedure

Only on Motion Controller supporting this feature (e.g. CAMAC).
3.4.12.8 Delay Init Procedure

3.5 Control the Motor
The Control Panel is raised after clicking on the Control... button of the Main panel.
It controls operation on motors: Initialization, Motion and a set of on-line control/parametrization actions. The panel is shown in the figure below; Menu bar options are inset above the panel. See 5.2.13 for the man-page.
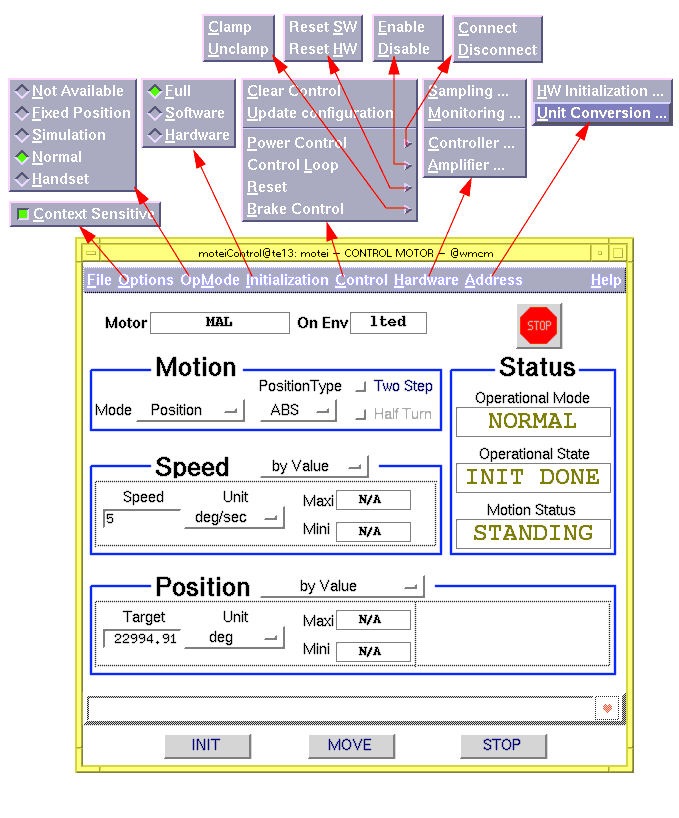
3.5.1 Active Control Operations
This panel is driven context-sensitive, it means that the panel parts/elements are automatically enabled/disabled according to the context, i.e. the state of the system. This feature is intended to help the user by simplifying the panel as the mandotory inputs are concerned. However, it is always possible to disable this behaviour and operate the panel with all elements/parts accessible: in this case, most of the checks are disabled, thus this mode is to be handled with care.
The STOP buttons are ALWAYS enabled.
3.5.1.1 Operational Mode selection
To switch the motor to any operational mode (Normal, Simulation and Handset) the wanted mode must be selected.
1. Simulation Operation without hardware: all actions enabled, simulated and performed instantaneously.
A complete description of the operational modes is given in [2].
3.5.1.2 Initialize the Motor
Before starting to move a motor, it must be initialized from the SW and HW point of view. This task is performed by pressing the INIT button.
The MenuBar Initialization allows to choose between Full initialization (default) and Software or Hardware initialization only.
The hardware initialization can be performed only when the Software initialization has been previously performed (Operational State is INIT SOFT). During the Hardware initialization, the sequence as defined in Section 3.4.12 will be performed; while executing, the Operational State is INIT RUN.
At completion, the Operational State is INIT DONE.
3.5.1.3 Define a Motion
This part of the Control panel is only accessible when the motor has been successfully initialized: Operation State is INIT DONE.
A motion may be of three (3) types, which define how the motor shall be moved:
Position via the motion controller at a given speed to a target position defined by a relative or absolute value
A complete description of the motion modes is given in [2].
Depending on the motion mode, the motor shall be moved to the following positions according to the axis type:
+Direct Mode: the target is a HW position, the motion ends on the switch. The last type (SPD) has no completion condition, thus it ends either on a STOP command or fails on reaching LHW or UHW whenever available:
+Position Mode: the target is a defined position. When the target position is not absolute (REL, LHW, UHW, REF, IND or HOM)), the target shall be defined as an offset to the reference position whenever available:
+Speed Mode: the target is a HW position, the motion ends on the edge of the switch. The last type (SPD) has no completion condition, thus it ends either on a STOP command or fails on reaching LHW or UHW whenever available:
The second item to define is the speed to apply for the motion step. This area is always accessible while the Operational State is INIT DONE.
Only in Position mode, the Position area becomes accessible. The target position may be defined in 5 ways. Beside the setting by Value, Name or Index, 2 additional possibilities are provided that allow the target to be defined as a Named/Indexed position + offset.
3.5.1.4 Initiate the Motion
The button MOVE initiates the motion.
While the motor is moving, the Motion Status goes to MOVING and the menuBar is disabled.
During a motion, speed and position can be redefined; they are activated with MOVE.
3.5.1.5 Stop the Motor
The button STOP and the Stop sign instruct MCM to stop the motor immediately.
3.5.2 Other Control Operations
3.5.2.1 Menu Control
Two sets of control commands are available:
Clear Control Clear all connections to motor, reset internal tables, establish new connection. The Operational State is reset to NOT INIT.
Update Configuration Force re-installation of motor, read the database configuration (see motDeinstall/motInstall(1)). The Operational State is reset to NOT INIT.
3.5.3 Menu Hardware : Sampling ...
The slider as shown below allows the on-line setting the Status Sampling Period, i.e. the period at which the whole motor status shall be refreshed in the database.
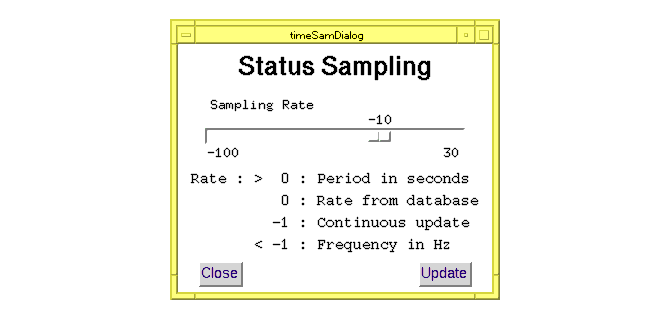
Note: High sampling rate implies also a higher CPU load. In the standard HW configuration MCM needs approx. 9.5ms to refresh the status. When many motors are controlled in parallel, high rates may not be effective.
3.5.4 Menu Hardware : Monitoring ...
The 3 sliders as shown below allows the setting the Motion Monitoring Times.
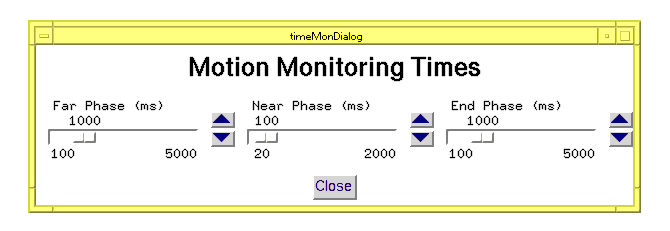
These times are defaulted to 1000, 200 and 1000ms resp. and are applied when defining the speed by value.
Note: High polling rates imply also a higher CPU load. When many motors are controlled in parallel, high rates may not be effective. For more details, see [2] Section 2.4.7.
3.5.5 Menu Hardware : Amplifier ...
This sub-panel allows the examination/setting of any board parameter.
3.5.6 Menu Hardware : Controller ...
This sub-panel allows the examination/setting of any board parameter.
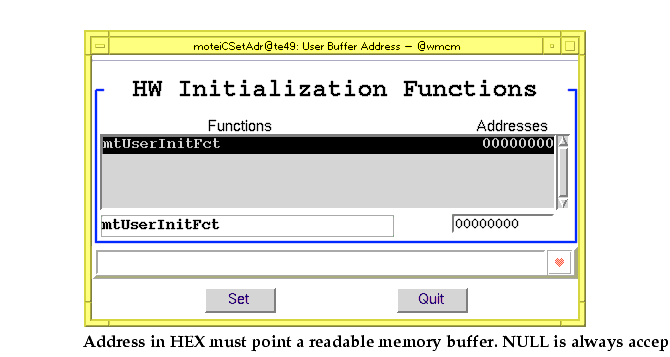
3.5.7 Menu Address
These 2 panels are accessible when reference to external function(s) is made either in the Unit Conversion methods (see 3.4.6) or in the HW Init Sequence (see 3.4.12). See 5.2.14 for the man-page.
3.5.7.1 HW Initialization ...
3.5.7.2 Unit Conversion ...

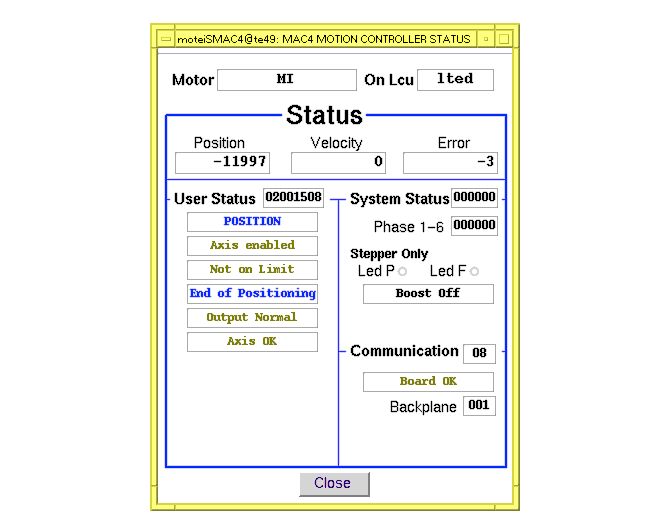
3.6 Motor Status
The Status Panel is raised after clicking on the Status... button of the Main panel.
The motor status is only accessible on LCU environments.
The panel (See 5.2.15 for man page), as shown in the figure below, displays the full status of the selected motor, as stored in the database.

It is divided into five parts: from top to bottom, General, Board/Power, Motion, Time and Events Status. The information displayed is assumed to be self-explicative. The Position information displays both Actual and Target position in User and Encoder units.
3.6.1 Buttons More ...
These 2 buttons raise dedicated status panels for the Amplifier and Controller boards.
No Extended-Help is available since the information is reflecting the hardware, therefore please refer to the corresponding manuals.
Note: The values shown on the two following panels are refreshed on database change events. This may lead to high message traffic between the LCU and the WS.
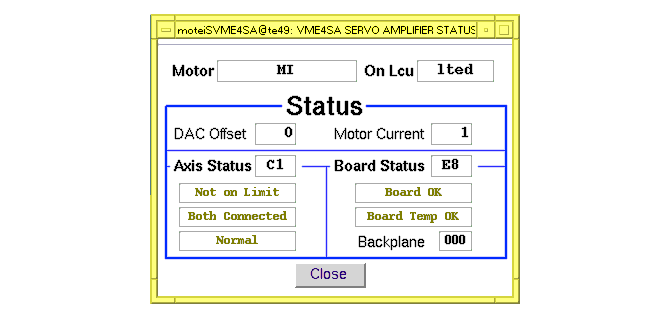
3.6.1.1 Amplifier board status
Only the ESO VME4SA Servo Amplifier is supported, especially this panel can not be displayed for
the Stand-Alone amplifier ESO VME4ST (for Stepper motors).3.6.1.2 Controller board status
Only the Maccon MAC4 Motion Controller is supported.
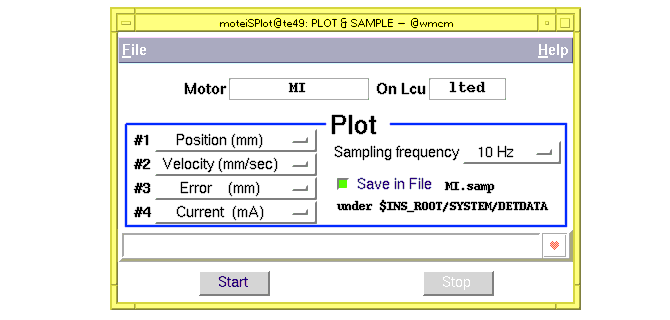
3.6.2 Icon Plot : Plotting Facility
This icon button raise a panel that provides item selectors for plotting. This feature is only available when the WS environment is of type RTAP (full-CCS), since it refers to some database points.
This facility may help tuning the control loop parameters in order to reduce possible oscillations by plotting the following error and the actual position as monitored from the motion controller (EP & CP). When plotting high level quantities (not in board units), one shall considere the status sampling period and the motion monitoring times from which the effective update rate is determined.
Up to four (4) quantities may be plotted on the same graph. The item list is available for each channel. See 5.2.18 for the man-page.
Note : CP, EP & AV only with Motion Controller MAC4;
MC only with Servo Amplifier VME4SA.
3.6.2.1
Example
This diagram shows the time evolution of the position (mm), velocity (Enc/ms), following error (mm) and current (Dig) for a typical HW initialization sequence.
3.7 Shutdown the Motor Engineering Interface
Select menubar File option Quit in the Main Panel. All panels will be shutdown. This operation may take some time until the whole application has terminated. The connection to the motor is detached, however the motor is not de-installed.
Following the same principle when Quitting one of the main 3 panels (Status, Config or Control) all related panels underlying the panel to close will be closed.
|
Quadralay Corporation http://www.webworks.com Voice: (512) 719-3399 Fax: (512) 719-3606 sales@webworks.com |