Getting Started
This section will show you the basic usage of PyCPL and PyEsoRex looking at a number of use cases. It will give you an easy entry to using PyCPL for executing recipes and it will also get you started with developing recipes using PyCPL.
Note
The following examples assume that the Python virtual environment which was used to build and install PyCPL and PyEsoRex is still active, and that the environment variables which were set at the time of the installation are still in effect (see Installing PyCPL)!
It is also assumed that a source kit installation of the GIRAFFE pipeline
(available from the VLT Instrument Pipelines page) is present and that
the pipeline recipes are located in the directory
$HOME/pipelines/lib/esopipes-plugins.
Running Recipes Using PyEsoRex
For convenience we define the environment variable PYESOREX_PLUGIN_DIR
to point to the directory where the recipes are installed to avoid hard to read
command examples in the following.
(pycpl)$ export PYESOREX_PLUGIN_DIR=$HOME/pipelines/lib/esopipes-plugins
Instead of setting the environment variable it would of course be possible to use the corresponding PyEsoRex command line option to specify the recipes search path.
(pycpl)$ pyesorex --recipe-dir=$HOME/pipelines/lib/esopipes-plugins ...
Using PyEsoRex as Command Line Tool
If you are used to run pipeline recipes using EsoRex, the easiest way to run pipeline recipes using PyCPL is to use PyEsoRex as a drop-in replacement of EsoRex. The look-and-feel of PyEsoRex is essentially the same as for EsoRex:
Getting usage information from PyEsoRex
(pycpl)$ pyesorex --help
Output:
[ INFO  ] pyesorex: This is PyEsoRex, version 1.0.4.

     ***** ESO Recipe Execution Tool, Python version 1.0.4 *****

usage: pyesorex [pyesorex options] recipe [recipe options] sof

positional arguments:
  recipe
  sof

options:
  --version             Display version information and exit.
  --show-products {off,summary,details,dump}
                        Display the set of product frames after the recipe
                        execution is complete.

pyesorex options:
  --help [HELP]         Display this help and exit. If a recipe name is also
                        given, then help will be given for it as well.
                        PyEsoRex will exit after this option. It should always
                        be the last option on the command line. [False]
  --config CONFIG       Configuration file to be used for PyEsoRex. This
                        option may also be set using the environment variable
                        PYESOREX_CONFIG. []
  --create-config [[CONFIG] [RECIPE] ...]
                        Creates a configuration file for PyEsoRex. If set a
                        config file 'pyesorex.rc' is created in the
                        '.pyesorex' directory in $HOME of the user. If a
                        filename is specified, a config file will be created
                        accordingly. If a recipe is specified in the command
                        line then the configuration file will be created for
                        the recipe instead (called 'recipename.rc'). Note that
                        an existing file will be overwritten but a backup will
                        be copied to 'filename.rc.bak' in the same directory.
                        If the filename ends with extension .json then a
                        machine-readable JSON format will be used. PyEsoRex
                        will exit after this option. It should always be the
                        last option on the command line. [False]
  --display-import-errors [DISPLAY_IMPORT_ERRORS]
                        When True any import errors encountered while
                        searching for Python recipes will be displayed as
                        warnings. When False import errors will be suppressed.
                        This option may also be set using the environment
                        variable PYESOREX_DISPLAY_IMPORT_ERRORS. [False]
  --link-dir LINK_DIR   The directory in which a symbolic link to each of the
                        product files should be written. The enable/disable
                        switch to control whether the link is actually made is
                        the '--suppress-link' option. This option may also be
                        set using the environment variable PYESOREX_LINK_DIR.
                        [/tmp]
  --log-dir LOG_DIR     Directory where to place the logfile. This option may
                        also be set using the environment variable
                        PYESOREX_LOG_DIR. [.]
  --log-file LOG_FILE   Filename of logfile. This option may also be set using
                        the environment variable PYESOREX_LOG_FILE.
                        [pyesorex.log]
  --log-level LOG_LEVEL
                        Controls the severity level of messages that will be
                        printed to the logfile. This option may also be set
                        using the environment variable PYESOREX_LOG_LEVEL.
                        <debug|info|warning|error|off> [info]
  --man-page MAN_PAGE   Display a manual page for the specified. Note that
                        this option only applies to recipes, and that it does
                        nothing for pyesorex by itself. See also the '--help'
                        optionPyEsoRex will exit after this option. It should
                        always be the last option on the command line. [False]
  --msg-level MSG_LEVEL
                        Controls the severity level of messages that will be
                        printed to the terminal. This option may also be set
                        using the environment variable PYESOREX_MSG_LEVEL.
                        <debug|info|warning|error|off> [info]
  --no-datamd5 [NO_DATAMD5]
                        Disables the computation of the MD5 data hash for FITS
                        product files. This option may also be set using the
                        environment variable PYESOREX_NO_DATAMD5. [False]
  --no-checksum [NO_CHECKSUM]
                        Disables the computation of the standard FITS product
                        checksums. This option may also be set using the
                        environment variable PYESOREX_NO_CHECKSUM. [False]
  --output-dir OUTPUT_DIR
                        The directory where the product files should be
                        finally moved to (all products are first created in
                        the current dir). This option may also be set using
                        the environment variable PYESOREX_OUTPUT_DIR. [.]
  --output-mkdir [OUTPUT_MKDIR]
                        When True output and link directories will be created
                        if they do not already exist. When False an output or
                        link directory that does not exist will result in an
                        error, as it does with EsoRex. This option may also be
                        set using the environment variable
                        PYESOREX_OUTPUT_MKDIR. [False]
  --output-prefix OUTPUT_PREFIX
                        Prefix applied to any output file. For example,
                        specifying 'pre' would translate 'filename.fits' to
                        'pre_0000.fits'. See also the '--suppress-prefix'
                        option. This option may also be set using the
                        environment variable PYESOREX_OUTPUT_PREFIX. [out]
  --params [RECIPE]     List the input parameters and their current settings
                        (whether from the command line or a configuration
                        file) for the pyesorex application. Parameters are
                        labelled using the parameter's CLI alias. If a recipe
                        is also specified, then the list of its parameters
                        will also be generated in the same way. PyEsoRex will
                        exit after this option. It should always be the last
                        option on the command line. [False]
  --products-sof PRODUCTS_SOF
                        Output file which contains the FITS files created by
                        the recipe. If the filename ends with extension .json
                        then a machine-readable JSON format will be used. This
                        option may also be set using the environment variable
                        PYESOREX_PRODUCTS_SOF. []
  --products-sof-abspaths [PRODUCTS_SOF_ABSPATHS]
                        When True file paths in products SOF files will be
                        converted to absolute paths, otherwise they will not
                        be modified. This option may also be set using the
                        environment variable PYESOREX_PRODUCTS_SOF_ABSPATHS.
                        [False]
  --recipes             Display a list of all available recipes (that are
                        available in the directory tree specified with '--
                        recipe-dir'). PyEsoRex will exit after this option. It
                        should always be the last option on the command line.
                        [False]
  --recipe-config RECIPE_CONFIG
                        Configuration file for any selected recipe. This
                        option may also be set using the environment variable
                        PYESOREX_RECIPE_CONFIG. []
  --recipe-dir RECIPE_DIRS
                        Directory containing recipe libraries. Note that
                        esorex will recursively search not only the specified
                        directory, but all sub-directories below it as well.
                        Multiple directory heads may be specified, by
                        separating the starting paths with colons (:). This
                        option may also be set using the environment variable
                        PYESOREX_PLUGIN_DIR.
                        [/home/dummy/pipelines/lib/esopipes-plugins]
  --suppress-link [SUPPRESS_LINK]
                        When True, no symbolic link is created to the output
                        product. However, if False, then a symbolic link is
                        created in the directory specified with the option '--
                        link-dir' for each product that is created by the
                        recipe. This option may also be set using the
                        environment variable PYESOREX_SUPPRESS_LINK. [True]
  --suppress-prefix [SUPPRESS_PREFIX]
                        When True, the original name of the output product, as
                        produced by the recipe, is maintained. If False, then
                        the name of the output file is changed to the
                        "prefix_number" format. The prefix can be altered
                        using the '--output-prefix' option. This option may
                        also be set using the environment variable
                        PYESOREX_SUPPRESS_PREFIX. [True]
  --time [TIME]         Measure and show the recipe's execution time. This
                        option may also be set using the environment variable
                        PYESOREX_TIME. [True]

Libraries used: CPL = 7.3.2, CFITSIO = 4.0.0, WCSLIB = 7.10, FFTW (normal
precision) = 3.3.10-sse2, FFTW (single precision) = 3.3.10-sse2, OPENMP =
201511
Show the list of available recipes
(pycpl)$ pyesorex --recipes
Output:
[ INFO  ] pyesorex: This is PyEsoRex, version 1.0.4.

     ***** ESO Recipe Execution Tool, Python version 1.0.4 *****

List of available recipes:

  giframestack          : Creates a stacked image from a set of raw images.
  gimasterbias          : Creates a master bias image from a set of raw biases.
  gimasterdark          : Creates a master dark image from a set of raw dark frames.
  gimasterflat          : Create the fiber master flat field and the localization mask.
  giscience             : Process a science observation.
  gistandard            : Process a spectro-photometric standard star observation and compute the instrument response curve.
  giwavecalibration     : Compute dispersion solution from an arc-lamp spectrum.
Running a recipe
The following command will execute the GIRAFFE pipeline recipe
gimasterbias, which processes the data provided by the
input set-of-frames bias.sof:
(pycpl)$ pyesorex gimasterbias bias.sof
Output:
[ INFO  ] pyesorex: This is PyEsoRex, version 1.0.4.
[ INFO  ] pyesorex: Loaded recipe 'gimasterbias'.
[ INFO  ] pyesorex: Running recipe 'gimasterbias'...

     ***** ESO Recipe Execution Tool, Python version 1.0.4 *****

[ INFO  ] gimasterbias: Creating master bias from 5 bias frames ...
[ INFO  ] gimasterbias: Combination method is Average
[ INFO  ] gimasterbias: Averaging 5 images

[ INFO  ] gimasterbias: Writing master bias image ...
[ INFO  ] gimasterbias: Creating bad pixel map from master bias frame ...
[ INFO  ] gimasterbias: Using local median +/- 3.7759 [ADU] as valid pixel value range
[ INFO  ] gimasterbias: Computing QC1 parameters ...
[ INFO  ] gimasterbias: Processing product frame 'master_bias.fits' (MASTER_BIAS)
[ INFO  ] pyesorex: Recipe 'gimasterbias' complete.
[ INFO  ] pyesorex: Calculating product checksums
[ INFO  ] pyesorex: Created product master_bias.fits (in place)
[ INFO  ] pyesorex: Created product bad_pixel_map.fits (in place)
[ INFO  ] pyesorex: 2 products created
[ INFO  ] pyesorex: Recipe operation(s) took 1.24 seconds to complete.
[ INFO  ] pyesorex: Total size of 5 raw input frames = 88.96 MB
[ INFO  ] pyesorex: => processing rate of 71.83 MB/s
The products created by the recipe are by default written to the current
working directory together with the pyesorex log file pyesorex.log.
(pycpl)$ ls
bad_pixel_map.fits  bias.sof    master_bias.fits  pyesorex.log    qc0000.paf
A different, existing output directory can be chosen with the output-dir
command line option
(pycpl)$ pyesorex --output-dir products gimasterbias bias.sof
which will put the recipe products into the subdirectory products.
Running a Recipe from Python using PyEsoRex
Instead of using Pyesorex as a command line tool, it is also possible to use it from Python through its Python API. This is demonstrated in this section.
Create a PyEsoRex instance:
>>> from pyesorex.pyesorex import Pyesorex
>>> p = Pyesorex()
[ INFO  ] pyesorex: This is PyEsoRex, version 1.0.4.
Inspect PyEsoRex settings
>>> print(p.get_params_text())
Pyesorex parameters:

help                  : False
config                :
create-config         : False
display-import-errors : False
link-dir              : /tmp
log-dir               : .
log-file              : pyesorex.log
log-level             : info
man-page              : False
msg-level             : info
no-datamd5            : False
no-checksum           : False
output-dir            : .
output-mkdir          : False
output-prefix         : out
params                : False
products-sof          :
products-sof-abspaths : False
recipes               : False
recipe-config         :
recipe-dir            : /home/dummy/pipelines/lib/esopipes-plugins
suppress-link         : True
suppress-prefix       : True
time                  : True
Note that the value shown for recipe_dirs depends on the
value of the environment variable PYESOREX_PLUGIN_DIR. If
PYESOREX_PLUGIN_DIR is not defined the PyEsoRex default
value /usr/local/share/esopipes/pyrecipes:/usr/local/lib/esopipes-plugins
would be shown instead.
Listing all available recipes
The list of available recipes contains both native CPL recipes implemented in C and PyCPL recipes implemented in Python if they are found in the recipe search path. Both types of recipes are shown in the same format.
>>> print(p.get_recipes_text())
List of available recipes:

giframestack          : Creates a stacked image from a set of raw images.
gimasterbias          : Creates a master bias image from a set of raw biases.
gimasterdark          : Creates a master dark image from a set of raw dark frames.
gimasterflat          : Create the fiber master flat field and the localization mask.
giscience             : Process a science observation.
gistandard            : Process a spectro-photometric standard star observation and compute the instrument response curve.
giwavecalibration     : Compute dispersion solution from an arc-lamp spectrum.
Loading a recipe
We use the same recipe gimasterbias, that was already used already
here Using PyEsoRex as Command Line Tool, which happens to be a native CPL recipe. PyCPL
Python recipes are loaded exactly in the same way.
>>> p.recipe = "gimasterbias"
[ INFO  ] pyesorex: Loaded recipe 'gimasterbias'.
>>> p.recipe
<cpl.ui.Recipe gimasterbias>
Setting the SOF location
Telling PyEsoRex which set-of-frames to use when running the recipe is a simple assignment:
>>> p.sof_location = "bias.sof"
To view the contents of the input set-of-frames one can create a PyCPL Frameset object
>>> from cpl.ui import Frame, FrameSet
>>> sof_frames = FrameSet("bias.sof")
>>> for frame in sof_frames:
...     print(frame)
...
(file=/home/dummy/test/bias/GIRAF.2019-06-25T09:47:34.623.fits, tag=BIAS, group=FrameGroup.NONE, level=FrameLevel.NONE, type=FrameType.NONE)
(file=/home/dummy/test/bias/GIRAF.2019-06-25T09:52:45.527.fits, tag=BIAS, group=FrameGroup.NONE, level=FrameLevel.NONE, type=FrameType.NONE)
(file=/home/dummy/test/bias/GIRAF.2019-06-25T09:57:55.430.fits, tag=BIAS, group=FrameGroup.NONE, level=FrameLevel.NONE, type=FrameType.NONE)
(file=/home/dummy/test/bias/GIRAF.2019-06-25T10:03:05.335.fits, tag=BIAS, group=FrameGroup.NONE, level=FrameLevel.NONE, type=FrameType.NONE)
(file=/home/dummy/test/bias/GIRAF.2019-06-25T10:08:15.239.fits, tag=BIAS, group=FrameGroup.NONE, level=FrameLevel.NONE, type=FrameType.NONE)
This shows the attributes, like file name and tag, of each frame in the Frameset object. As an alternative, the following variant will show some technical details of each frame in addition:
>>> for frame in sof_frames:
...     print(repr(frame))
...
cpl.ui.Frame('/home/dummy/test/bias/GIRAF.2019-06-25T09:47:34.623.fits', 'BIAS', cpl.ui.Frame.FrameGroup.NONE, cpl.ui.Frame.FrameLevel.NONE, cpl.ui.Frame.FrameType.NONE)
cpl.ui.Frame('/home/dummy/test/bias/GIRAF.2019-06-25T09:52:45.527.fits', 'BIAS', cpl.ui.Frame.FrameGroup.NONE, cpl.ui.Frame.FrameLevel.NONE, cpl.ui.Frame.FrameType.NONE)
cpl.ui.Frame('/home/dummy/test/bias/GIRAF.2019-06-25T09:57:55.430.fits', 'BIAS', cpl.ui.Frame.FrameGroup.NONE, cpl.ui.Frame.FrameLevel.NONE, cpl.ui.Frame.FrameType.NONE)
cpl.ui.Frame('/home/dummy/test/bias/GIRAF.2019-06-25T10:03:05.335.fits', 'BIAS', cpl.ui.Frame.FrameGroup.NONE, cpl.ui.Frame.FrameLevel.NONE, cpl.ui.Frame.FrameType.NONE)
cpl.ui.Frame('/home/dummy/test/bias/GIRAF.2019-06-25T10:08:15.239.fits', 'BIAS', cpl.ui.Frame.FrameGroup.NONE, cpl.ui.Frame.FrameLevel.NONE, cpl.ui.Frame.FrameType.NONE)
Running the recipe
Running the recipe is simply calling the run() method of the
PyEsoRex instance. The result of the recipe invokation is a PyCPL
Frameset which can be inspected as priviously shown.
>>> result = p.run()
[ INFO  ] pyesorex: Running recipe 'gimasterbias'...
[ INFO  ] gimasterbias: Creating master bias from 5 bias frames ...
[ INFO  ] gimasterbias: Combination method is Average
[ INFO  ] gimasterbias: Averaging 5 images

[ INFO  ] gimasterbias: Writing master bias image ...
[ INFO  ] gimasterbias: Creating bad pixel map from master bias frame ...
[ INFO  ] gimasterbias: Using local median +/- 3.7759 [ADU] as valid pixel value range
[ INFO  ] gimasterbias: Computing QC1 parameters ...
[ INFO  ] gimasterbias: Processing product frame 'master_bias.fits' (MASTER_BIAS)
[ INFO  ] pyesorex: Recipe 'gimasterbias' complete.
[ INFO  ] pyesorex: Calculating product checksums
[ INFO  ] pyesorex: Created product master_bias.fits (in place)
[ INFO  ] pyesorex: Created product bad_pixel_map.fits (in place)
[ INFO  ] pyesorex: 2 products created
[ INFO  ] pyesorex: Recipe operation(s) took 2.29 seconds to complete.
[ INFO  ] pyesorex: Total size of 5 raw input frames = 88.96 MB
[ INFO  ] pyesorex: => processing rate of 38.87 MB/s
>>> for frame in result:
...     print(frame)
...
(file=master_bias.fits, tag=MASTER_BIAS, group=FrameGroup.PRODUCT, level=FrameLevel.FINAL, type=FrameType.IMAGE)
(file=bad_pixel_map.fits, tag=BAD_PIXEL_MAP, group=FrameGroup.PRODUCT, level=FrameLevel.FINAL, type=FrameType.IMAGE)
The output Frameset object will only contain recipe products which are FITS files!
Inspecting Recipe Parameters
Whether a recipe is a native CPL recipe or a PyCPL recipe, they usually have parameters a user may want to inspect and eventually modify to customize the processing of the input data set. The parameters of a recipe can be listed as shown here
>>> for parameter in p.recipe_parameters: print(f"{parameter.name}={parameter.value}")
...
giraffe.stacking.method=average
giraffe.stacking.ksigma.low=5.0
giraffe.stacking.ksigma.high=5.0
giraffe.stacking.minmax.minimum=1
giraffe.stacking.minmax.maximum=1
giraffe.masterbias.overscan.remove=False
giraffe.masterbias.badpixel.clean=False
giraffe.masterbias.bpm.create=True
giraffe.masterbias.bpm.factor=5.0
giraffe.masterbias.bpm.fraction=0.15
Changing Recipe Parameters
The following example changes the method used for stacking the input images
from average to from median
>>> p.recipe_parameters.update({"giraffe.stacking.method": "median"})
>>> for parameter in p.recipe_parameters: print(f"{parameter.name}={parameter.value}")
...
giraffe.stacking.method=median
giraffe.stacking.ksigma.low=5.0
giraffe.stacking.ksigma.high=5.0
giraffe.stacking.minmax.minimum=1
giraffe.stacking.minmax.maximum=1
giraffe.masterbias.overscan.remove=False
giraffe.masterbias.badpixel.clean=False
giraffe.masterbias.bpm.create=True
giraffe.masterbias.bpm.factor=5.0
giraffe.masterbias.bpm.fraction=0.15
Executing the recipe again with the changed parameters
>>> result = p.run()
[ INFO  ] pyesorex: Running recipe 'gimasterbias'...
[ INFO  ] gimasterbias: Creating master bias from 5 bias frames ...
[ INFO  ] gimasterbias: Combination method is Median
[ INFO  ] gimasterbias: Finding median of 5 images
[ INFO  ] gimasterbias: Writing master bias image ...
[ INFO  ] gimasterbias: Creating bad pixel map from master bias frame ...
[ INFO  ] gimasterbias: Using local median +/- 3.9626 [ADU] as valid pixel value range
[ INFO  ] gimasterbias: Computing QC1 parameters ...
[ INFO  ] gimasterbias: Processing product frame 'master_bias.fits' (MASTER_BIAS)
[ INFO  ] pyesorex: Recipe 'gimasterbias' complete.
[ INFO  ] pyesorex: Calculating product checksums
[ INFO  ] pyesorex: Created product master_bias.fits (in place)
[ INFO  ] pyesorex: Created product bad_pixel_map.fits (in place)
[ INFO  ] pyesorex: 2 products created
[ INFO  ] pyesorex: Recipe operation(s) took 2.96 seconds to complete.
[ INFO  ] pyesorex: Total size of 5 raw input frames = 88.96 MB
[ INFO  ] pyesorex: => processing rate of 30.08 MB/s
Working with Recipe Config Files
In order to keep a changed set of recipe parameters for reusing it later the recipe parameters can be saved to a configuration file:
>>> p.write_recipe_config("gimasterbias.rc")
[ INFO  ] pyesorex: Wrote config file '/home/dummy/test/gimasterbias.rc'.
The parameter values can now also be edited in the configuration file, and once finished the updated parameters can be loaded again:
>>> p.read_recipe_config("gimasterbias.rc")
[ INFO  ] pyesorex: Read config file '/home/dummy/test/gimasterbias.rc'.
The recipe configuration file which was created calling the
write_recipe_config method is shown here as an example:
# File: /home/dummy/test/gimasterbias.rc
#
# Note: This configuration file has been automatically
#       generated by the pyesorex (v1.0.4) program.
#
# Date: 2026-06-10 11:21:23
#

# --stack-method
# Stacking method: average, median, minmax or ksigma
# <average|median|minmax|ksigma>
giraffe.stacking.method=median

# --stack-ksigmalow
# Lower threshold multiplier for method ksigma
giraffe.stacking.ksigma.low=5.0

# --stack-ksigmahigh
# Upper threshold multiplier for method ksigma
giraffe.stacking.ksigma.high=5.0

# --stack-minreject
# Minimum rejection level for method minmax
giraffe.stacking.minmax.minimum=1

# --stack-maxreject
# Maximum rejection level for method minmax
giraffe.stacking.minmax.maximum=1

# --mbias-oscremove
# Remove pre- and over-scan regions from the created master bias image.
giraffe.masterbias.overscan.remove=False

# --mbias-bpxclean
# Correct master bias image for bad pixels
giraffe.masterbias.badpixel.clean=False

# --bpm-create
# Create bad pixel map using a simple thresholding algorithm. (temporary!)
giraffe.masterbias.bpm.create=True

# --bpm-factor
# Readout noise multiplier defining the valid range of pixel values for
# searching bad pixels.
giraffe.masterbias.bpm.factor=5.0

# --bpm-frac
# Maximum fraction of pixels which may be flagged as 'bad. If more pixels are
# found to be 'bad a warning is issued.
giraffe.masterbias.bpm.fraction=0.15

#
# End of file
Writing a Simple Recipe in Python
This section will demonstrate how a simple recipe is implemented with PyCPL. This section can, by no means, be comprehensive and cover the complete PyCPL API, but it will show what is required in order to create a PyCPL recipe which can be executed with PyEsoRex.
A Minimal PyCPL Recipe
There is actually not much that is really required. In order to create a
PyCPL recipe one needs to define a class which inherits from cpl.ui.PyRecipe
and this class must at least implement the method run. The method run
has two arguments, the input cpl.ui.Frameset which contains the input data
files the recipe should process, and a dictionary containing the recipe parameters.
When run finishes it must return a cpl.ui.Frameset. It will contain the
created products, if there are any.
The only other thing that needs to be done is to provide the necessary information about the recipe itself. This information is:
the recipe name
the recipe version
the author name
the author’s contact email address
the copyright information
a verbose description of the recipe: what its purpose is, how it works, etc.
a short, one line description of the recipe’s purpose.
The most important recipe information in the previous list is the recipe name. It is this name that is used to distiguish different recipes and it should therefore be unique. The name of the file where the recipe is defined does not matter in this context. Actually, a single Python source file may define more than one recipe.
The first, minimal example is a PyCPL version of the usual “Hello, world!”. As Python code this will look like this:
from typing import Any, Dict

# Import the required PyCPL modules
import cpl.ui


# Define our "Hello, world!" recipe as a class which inherits from
# the PyCPL class cpl.ui.PyRecipe
class HelloWorld(cpl.ui.PyRecipe):
    # The information about the recipe needs to be set. The base class
    # cpl.ui.PyRecipe provides the class variables to be set.
    # The recipe name must be unique, because it is this name which is
    # used to identify a particular recipe among all installed recipes.
    # The name of the python source file where this class is defined
    # is not at all used in this context.
    _name = "helloworld"
    _version = "1.0"
    _author = "U.N. Owen"
    _email = "unowen@somewhere.net"
    _copyright = "GPL-3.0-or-later"
    _synopsis = "PyCPL version of 'hello, world!'"
    _description = (
        "This is the PyCPL version of the well known hello, world program.\n"
        + "It says hello to each input file in the input set-of-frames."
    )

    # Our recipe class also needs to provide the run() method with the
    # correct arguments and return values.
    #
    # As inputs the run method must accept a cpl.ui.FrameSet, and a dictionary
    # that contains the parameters of the recipe.
    # In this example the rcipe does not have any recipe parameters, but the
    # function still has to accept the dictionary as second argument.
    #
    # When the recipe is done, it has to return the produced product files in
    # another cpl.ui.FrameSet object. The current example will not create any
    # output data, so that it will have to return an empty cpl.ui.FrameSet.
    def run(
        self, frameset: cpl.ui.FrameSet, settings: Dict[str, Any]
    ) -> cpl.ui.FrameSet:
        for frame in frameset:
            print(f"Hello, {frame.file}!")
        return cpl.ui.FrameSet()
How is this recipe now executed? Assume that the recipe we just implemented is stored in the following location:
(pycpl)$ ls /home/dummy/test/pyrecipes
pycpl_recipe_helloworld.py
Executing this recipe is done in exactly the same way as previously shown for native CPL recipes:
>>> from pyesorex.pyesorex import Pyesorex
>>> p = Pyesorex()
[ INFO  ] pyesorex: This is PyEsoRex, version 1.0.4.
>>> print(p.get_params_text())
Pyesorex parameters:

help                  : False
config                :
create-config         : False
display-import-errors : False
link-dir              : /tmp
log-dir               : .
log-file              : pyesorex.log
log-level             : info
man-page              : False
msg-level             : info
no-datamd5            : False
no-checksum           : False
output-dir            : .
output-mkdir          : False
output-prefix         : out
params                : False
products-sof          :
products-sof-abspaths : False
recipes               : False
recipe-config         :
recipe-dir            : /home/dummy/pipelines/lib/esopipes-plugins
suppress-link         : True
suppress-prefix       : True
time                  : True
In order to see the new PyCPL recipe, which is not stored in the current
recipe search path of PyEsoRex, we have to update the recipe_dirs
parameter of PyEsoRex to include the directory where
pycpl_recipe_helloworld.py is located:
>>> p.parameters.update({"recipe_dirs": "/home/dummy/pipelines/lib/esopipes-plugins:/home/dummy/test/pyrecipes"})
>>> print(p.get_recipes_text())
List of available recipes:

  giframestack          : Creates a stacked image from a set of raw images.
  gimasterbias          : Creates a master bias image from a set of raw biases.
  gimasterdark          : Creates a master dark image from a set of raw dark frames.
  gimasterflat          : Create the fiber master flat field and the localization mask.
  giscience             : Process a science observation.
  gistandard            : Process a spectro-photometric standard star observation and compute the instrument response curve.
  giwavecalibration     : Compute dispersion solution from an arc-lamp spectrum.
  helloworld            : PyCPL version of 'hello, world!'
Now the PyCPL recipe is listed among all other available recipes in the search path. To actually run the recipe the same steps as previously shown have to be executed: loading the recipe, set the input set-of-frames and eventually call the recipe.
>>> p.recipe = "helloworld"
[ INFO  ] pyesorex: Loaded recipe 'helloworld'.
[WARNING] pyesorex: Recipe 'helloworld' has no parameters attribute, cannot access recipe settings or use recipe config files.
>>> p.recipe
<cpl.ui.Recipe helloworld>
>>> p.sof_location = "bias.sof"
>>> result = p.run()
[ INFO  ] pyesorex: Running recipe 'helloworld'...
Hello, /home/dummy/test/bias/GIRAF.2019-06-25T09:47:34.623.fits!
Hello, /home/dummy/test/bias/GIRAF.2019-06-25T09:52:45.527.fits!
Hello, /home/dummy/test/bias/GIRAF.2019-06-25T09:57:55.430.fits!
Hello, /home/dummy/test/bias/GIRAF.2019-06-25T10:03:05.335.fits!
Hello, /home/dummy/test/bias/GIRAF.2019-06-25T10:08:15.239.fits!
[ INFO  ] pyesorex: Recipe 'helloworld' complete.
[ INFO  ] pyesorex: Calculating product checksums
[ INFO  ] pyesorex: 0 products created
[ INFO  ] pyesorex: Recipe operation(s) took 0.00 seconds to complete.
[ INFO  ] pyesorex: Total size of 5 raw input frames = 88.96 MB
[ INFO  ] pyesorex: => processing rate of 35945.34 MB/s
The warning can be ignored, since we did not add any parameters to this
recipe. Also, since the recipe does not create any product files the
returned set-of-frames result is of course empty. How this can be
changed is shown in the following.
A Recipe with Parameters
A recipe which cannot be configured by the user, by either passing a command line option to the PyEsoRex command line tool, or setting a parameter value through the PyEsoRex API, is hardly useful. Therefore, in this next step, we will add parameters to our recipe.
This example will greet the user with the name the user has specified. The message that is printed will also show a reaction that can be set by the user, and the user can select the number of input files being listed.
from typing import Any, Dict

# Import the required PyCPL modules
import cpl.core
import cpl.ui


class HelloWorld(cpl.ui.PyRecipe):
    _name = "hellouser"
    _version = "1.0"
    _author = "U.N. Owen"
    _email = "unowen@somewhere.net"
    _copyright = "GPL-3.0-or-later"
    _synopsis = "PyCPL version of 'hello, world!' using parameters"
    _description = (
        "This is the PyCPL greets the user and lists the first N input files."
    )

    # The username and the number of input files listed should be configurable
    # by the user when executing this recipe. To make this possible, one needs
    # to define the corresponding parameters. There are 3 kinds of parameters
    # defined in CPL and PyCPL. Simple values, ranges and enumeration. The
    # following illustrates each of them.
    #
    # Parameters must have a unique name, are related to a context (typically the
    # leftmost part of the full parameter name), a description and a default value.
    # Ranges and enumerations have also additional attributes, which specify
    # the range boundaries or the enumeration alternatives.
    #
    # The defined parameters have to be stored in a parameter list object.
    def __init__(self) -> None:
        super().__init__()

        self.parameters = cpl.ui.ParameterList(
            (
                cpl.ui.ParameterValue(
                    name="hellouser.username",
                    context="hellouser",
                    description="User's name",
                    default="Unknown user",
                ),
                cpl.ui.ParameterRange(
                    name="hellouser.nfiles",
                    context="hellouser",
                    description="Number of input files to process.",
                    default=3,
                    min=1,
                    max=5,
                ),
                cpl.ui.ParameterEnum(
                    name="hellouser.reaction",
                    context="hellouser",
                    description="Reaction to the user.",
                    default="nice",
                    alternatives=("nice", "nasty"),
                ),
            )
        )

    # Again the run method has to be implemented. This time, in order to print the
    # message that the user requested, we have to query the settings argument for
    # the actual values the user may have set, for instance on the pyesorex command
    # line. Contrary to the first example, the messages are now printed using the
    # standard messaging format for recipes.
    def run(
        self, frameset: cpl.ui.FrameSet, settings: Dict[str, Any]
    ) -> cpl.ui.FrameSet:
        for key, value in settings.items():
            try:
                self.parameters[key].value = value
            except KeyError:
                cpl.core.Msg.warning(
                    self.name,
                    f"Settings includes {key}:{value} but {self} has no parameter named {key}.",
                )

        cpl.core.Msg.info(
            self.name,
            f"Hello, {self.parameters['hellouser.username'].value}, "
            + f"{self.parameters['hellouser.reaction'].value} to see you.",
        )

        cpl.core.Msg.info(
            self.name,
            f"The first {self.parameters['hellouser.nfiles'].value} input files are:",
        )

        for i, frame in enumerate(frameset):
            if i >= self.parameters["hellouser.nfiles"].value:
                break
            cpl.core.Msg.info(self.name, frame.file)

        # Return an empty cpl.ui.FrameSet because there are no recipe products
        return cpl.ui.FrameSet()
Again, parameters of PyCPL work in the same way as for native CPL recipes:
>>> p.recipe = "hellouser"
[ INFO  ] pyesorex: Loaded recipe 'hellouser'.
>>> for parameter in p.recipe_parameters: print(f"{parameter.name}={parameter.value}")
...
hellouser.username=Unknown user
hellouser.nfiles=3
hellouser.reaction=nice

>>> p.recipe_parameters.update({"hellouser.username": "World"})
>>> for parameter in p.recipe_parameters: print(f"{parameter.name}={parameter.value}")
...
hellouser.username=World
hellouser.nfiles=3
hellouser.reaction=nice

>>> result = p.run()
[ INFO  ] pyesorex: Running recipe 'hellouser'...
[ INFO  ] hellouser: Hello, World, nice to see you.
[ INFO  ] hellouser: The first 3 input files are:
[ INFO  ] hellouser: /home/dummy/test/bias/GIRAF.2019-06-25T09:47:34.623.fits
[ INFO  ] hellouser: /home/dummy/test/bias/GIRAF.2019-06-25T09:52:45.527.fits
[ INFO  ] hellouser: /home/dummy/test/bias/GIRAF.2019-06-25T09:57:55.430.fits
[ INFO  ] pyesorex: Recipe 'hellouser' complete.
[ INFO  ] pyesorex: Calculating product checksums
[ INFO  ] pyesorex: 0 products created
[ INFO  ] pyesorex: Recipe operation(s) took 0.00 seconds to complete.
[ INFO  ] pyesorex: Total size of 5 raw input frames = 88.96 MB
[ INFO  ] pyesorex: => processing rate of 30217.63 MB/s
A Complete Recipe
While the first two examples are basically showing the anatomy of a PyCPL recipe, this example will showcase a bit of actual data processing using the PyCPL API. While still being basic, this recipe example contains everything that is needed to do data processing with PyCPL.
While this example demonstrates some error handling, please note that it is neither complete, nor should it be used as a template. It is heavily simplified and its purpose is only to showcase different parts of the PyCPL API.
from typing import Any, Dict

from cpl import core
from cpl import ui
from cpl import dfs
from cpl.core import Msg


class ScienceDataProcessor(ui.PyRecipe):
    # Fill in recipe information
    _name = "basic_science"
    _version = "1.0"
    _author = "U.N. Owen"
    _email = "unowen@somewhere.net"
    _copyright = "GPL-3.0-or-later"
    _synopsis = "Basic science image data processing"
    _description = (
        "The recipe combines all science input files in the input set-of-frames using\n"
        + "the given method. For each input science image the master bias is subtracted,\n"
        + "and it is divided by the master flat."
    )

    def __init__(self) -> None:
        super().__init__()

        # The recipe will have a single enumeration type parameter, which allows the
        # user to select the frame combination method.
        self.parameters = ui.ParameterList(
            (
                ui.ParameterEnum(
                    name="basic_science.stacking.method",
                    context="basic_science",
                    description="Name of the method used to combine the input images",
                    default="add",
                    alternatives=("add", "average", "median"),
                ),
            )
        )

    def run(self, frameset: ui.FrameSet, settings: Dict[str, Any]) -> ui.FrameSet:
        # Update the recipe paramters with the values requested by the user through the
        # settings argument
        for key, value in settings.items():
            try:
                self.parameters[key].value = value
            except KeyError:
                Msg.warning(
                    self.name,
                    f"Settings includes {key}:{value} but {self} has no parameter named {key}.",
                )

        raw_frames = ui.FrameSet()
        product_frames = ui.FrameSet()
        bias_frame = None
        flat_frame = None

        output_file = "OBJECT_REDUCED.fits"

        # Go through the list of input frames, check the tag and act accordingly
        for frame in frameset:
            if frame.tag == "OBJECT":
                frame.group = ui.Frame.FrameGroup.RAW
                raw_frames.append(frame)
                Msg.debug(self.name, f"Got raw frame: {frame.file}.")
            elif frame.tag == "MASTER_BIAS":
                frame.group = ui.Frame.FrameGroup.CALIB
                bias_frame = frame
                Msg.debug(self.name, f"Got bias frame: {frame.file}.")
            elif frame.tag == "MASTER_FLAT":
                frame.group = ui.Frame.FrameGroup.CALIB
                flat_frame = frame
                Msg.debug(self.name, f"Got flat field frame: {frame.file}.")
            else:
                Msg.warning(
                    self.name,
                    f"Got frame {frame.file!r} with unexpected tag {frame.tag!r}, ignoring.",
                )

        # For demonstration purposes we raise an exception here. Real world
        # recipes should rather print a message (also to have it in the log file)
        # and exit gracefully.
        if len(raw_frames) == 0:
            raise core.DataNotFoundError("No raw frames in frameset.")

        # By default images are loaded as Python float data. Raw image
        # data which is usually represented as 2-byte integer data in a
        # FITS file is converted on the fly when an image is loaded from
        # a file. It is however also possible to load images without
        # performing this conversion.
        bias_image = None
        if bias_frame:
            bias_image = core.Image.load(bias_frame.file)
            Msg.info(self.name, f"Loaded bias frame {bias_frame.file!r}.")
        else:
            raise core.DataNotFoundError("No bias frame in frameset.")

        flat_image = None
        if flat_frame:
            flat_image = core.Image.load(flat_frame.file)
            Msg.info(self.name, f"Loaded flat frame {flat_frame.file!r}.")
        else:
            raise core.DataNotFoundError("No flat frame in frameset.")

        # Flat field preparation: subtract bias and normalize it to median 1
        Msg.info(self.name, "Preparing flat field")
        flat_image.subtract(bias_image)
        median = flat_image.get_median()
        flat_image.divide_scalar(median)

        header = None
        processed_images = core.ImageList()
        for idx, frame in enumerate(raw_frames):
            Msg.info(self.name, f"Processing {frame.file!r}...")

            if idx == 0:
                header = core.PropertyList.load(frame.file, 0)

            Msg.debug(self.name, "Loading image.")
            raw_image = core.Image.load(frame.file)

            Msg.debug(self.name, "Bias subtracting...")
            raw_image.subtract(bias_image)

            Msg.debug(self.name, "Flat fielding...")
            raw_image.divide(flat_image)

            # Insert the processed image in an image list. Of course
            # there is also an append() method available.
            processed_images.insert(idx, raw_image)

        # Combine the images in the image list using the image stacking
        # option requested by the user.
        method = self.parameters["basic_science.stacking.method"].value
        Msg.info(self.name, f"Combining images using method {method!r}")

        combined_image = None
        if method == "add":
            for idx, image in enumerate(processed_images):
                if idx == 0:
                    combined_image = image
                else:
                    combined_image.add(image)
        elif method == "average":
            combined_image = processed_images.collapse_create()
        elif method == "median":
            combined_image = processed_images.collapse_median_create()
        else:
            Msg.error(
                self.name,
                f"Got unknown stacking method {method!r}. Stopping right here!",
            )
            # Since we did not create a product we need to return an empty
            # ui.FrameSet object. The result frameset product_frames will do,
            # it is still empty here!
            return product_frames

        # Create property list specifying the product tag of the processed image
        product_properties = core.PropertyList()
        product_properties.append(
            core.Property("ESO PRO CATG", core.Type.STRING, r"OBJECT_REDUCED")
        )

        # Save the result image as a standard pipeline product file
        Msg.info(self.name, f"Saving product file as {output_file!r}.")
        dfs.save_image(
            frameset,
            self.parameters,
            frameset,
            combined_image,
            self.name,
            product_properties,
            f"demo/{self.version!r}",
            output_file,
            header=header,
        )

        # Register the created product
        product_frames.append(
            ui.Frame(
                file=output_file,
                tag="OBJECT_REDUCED",
                group=ui.Frame.FrameGroup.PRODUCT,
                level=ui.Frame.FrameLevel.FINAL,
                frameType=ui.Frame.FrameType.IMAGE,
            )
        )

        return product_frames
Running the recipe will produce an output file OBJECT_REDUCED.fits in the
current working directory:
>>> p.recipe = "basic_science"
[ INFO  ] pyesorex: Loaded recipe 'basic_science'.
>>> p.sof_location = "object.sof"
>>> result = p.run()
[ INFO  ] pyesorex: Running recipe 'basic_science'...
[ INFO  ] basic_science: Loaded bias frame '/home/dummy/test/fors/FORS1.2003-05-28T11:12:17.762.fits'.
[ INFO  ] basic_science: Loaded flat frame '/home/dummy/test/fors/FORS1.2003-05-28T10:53:44.489.fits'.
[ INFO  ] basic_science: Preparing flat field
[ INFO  ] basic_science: Processing '/home/dummy/test/fors/FORS1.2003-06-02T07:26:47.725.fits'...
[ INFO  ] basic_science: Processing '/home/dummy/test/fors/FORS1.2003-06-02T07:26:47.725.fits'...
[ INFO  ] basic_science: Processing '/home/dummy/test/fors/FORS1.2003-06-02T07:26:47.725.fits'...
[ INFO  ] basic_science: Combining images using method 'add'
[ INFO  ] basic_science: Saving product file as 'OBJECT_REDUCED.fits'.
[ INFO  ] basic_science: Writing FITS image product(OBJECT_REDUCED): OBJECT_REDUCED.fits
[ INFO  ] pyesorex: Recipe 'basic_science' complete.
[ INFO  ] pyesorex: Calculating product checksums
[ INFO  ] pyesorex: Created product OBJECT_REDUCED.fits (in place)
[ INFO  ] pyesorex: 1 products created
[ INFO  ] pyesorex: Recipe operation(s) took 0.49 seconds to complete.
[ INFO  ] pyesorex: Total size of 5 raw input frames = 42.74 MB
[ INFO  ] pyesorex: => processing rate of 87.17 MB/s
This example shows how simple data products, in this case a single image data product, can be created. A modification of this recipe demonstrating how complex data products can be assembled can be found in the section Creating complex data products.
A few things to be aware of
When writing recipes in Python, please be aware that when you modify your code in an editor and save it the modified code is not executed unless you reload the recipe (which will compile the modified code). There is no reload command or function in PyCPL. To reload a python recipe you simply have to reassign it to the
recipeproperty of yourPyesorexinstance.>>> from pyesorex.pyesorex import Pyesorex >>> p = Pyesorex() >>> p.recipe = "helloworld" # initial recipe code is loaded and compiled >>> # Code changes happen here! >>> p.recipe = "helloworld" # modified code is loaded and compiled
Using PyCPL with Other Packages
Visualizing Data
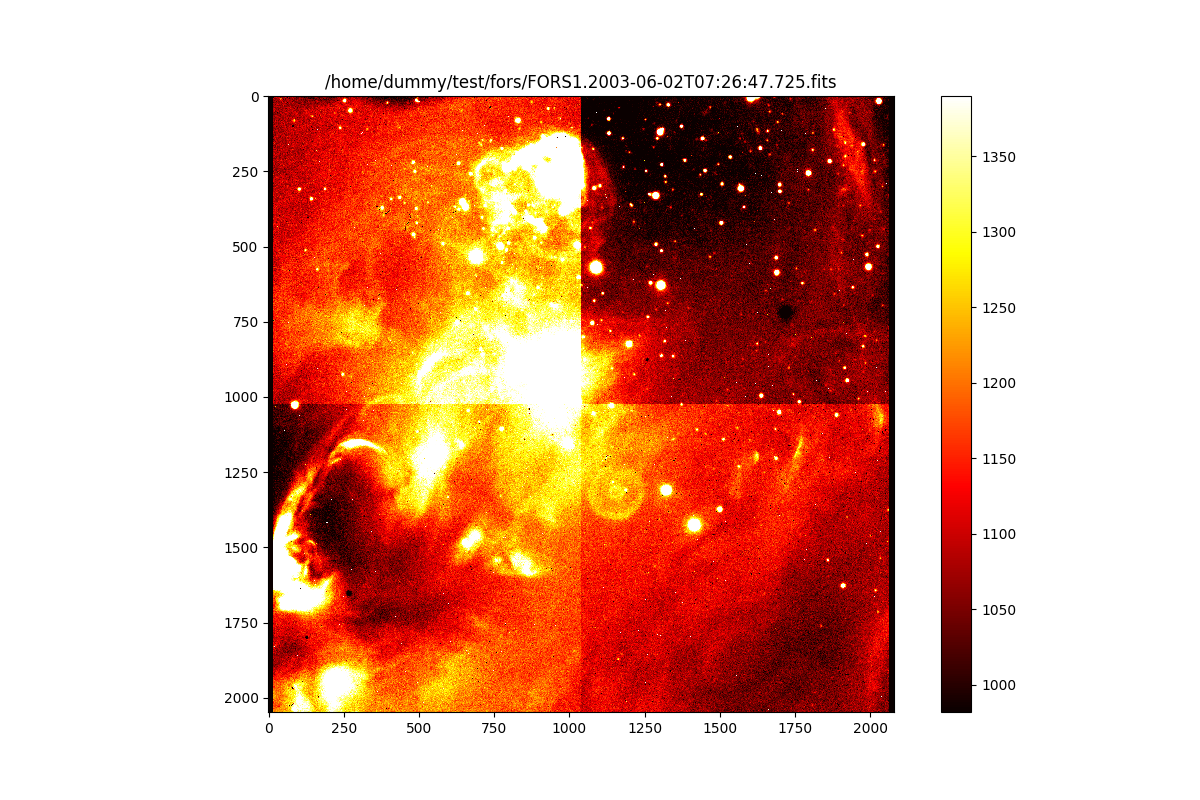
PyCPL Image objects can be passed to functions that expect numpy arrays,
e.g. matplotlib plotting functions. As an example the following displays the
raw image used for the previous run of our basic_science recipe:
>>> import numpy as np
>>> from matplotlib import pyplot as plt
>>> from astropy.visualization import PercentileInterval, ImageNormalize
>>> from cpl.ui import FrameSet
>>> from cpl.core import Image
>>> sof_frames = FrameSet("object.sof")
>>> raw_frame = sof_frames[0]
>>> raw_image = Image.load(raw_frame.file)
>>> plt.rcParams['figure.figsize'] = 12, 8
>>> norm = ImageNormalize(raw_image, interval=PercentileInterval(90))
>>> plt.imshow(raw_image, interpolation='nearest', cmap='hot', norm=norm)
<matplotlib.image.AxesImage object at 0x7fb18c329b70>
>>> plt.title(raw_frame.file)
Text(0.5, 1.0, '/home/dummy/test/fors/FORS1.2003-06-02T07:26:47.725.fits')
>>> plt.colorbar()
<matplotlib.colorbar.Colorbar object at 0x7fb18c329f00>
>>> plt.show()
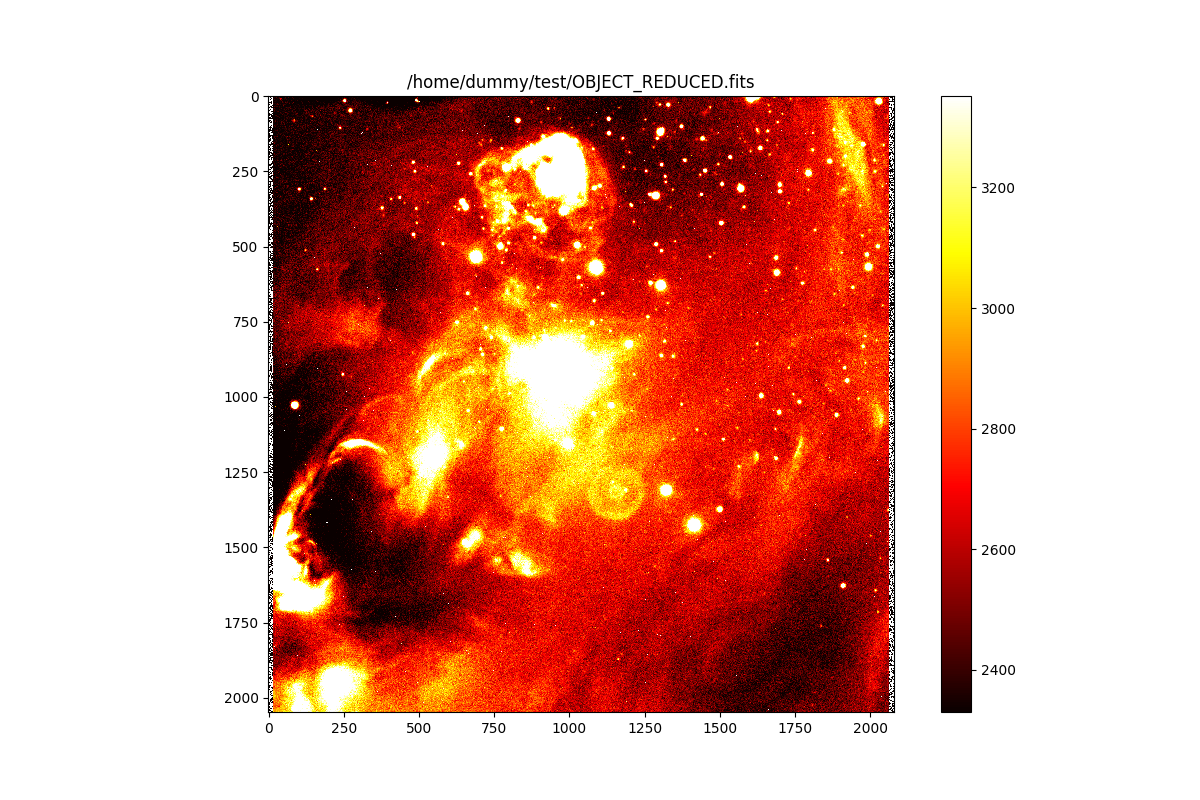
And the same for the created result image. Since the recipe returned the
cpl.ui.FrameSet object containing the processed image frame, one can
just use it directly:
>>> result_frame = result[0]
>>> result_image = Image.load(result_frame.file)
>>> norm = ImageNormalize(result_image, interval=PercentileInterval(90))
>>> plt.imshow(result_image, interpolation='nearest', cmap='hot', norm=norm)
<matplotlib.image.AxesImage object at 0x7fb18c3a4a90>
>>> plt.title(result_frame.file)
Text(0.5, 1.0, '/home/dummy/test/OBJECT_REDUCED.fits')
>>> plt.colorbar()
<matplotlib.colorbar.Colorbar object at 0x29c64b1c0>
>>> plt.show()
Exchanging data with astropy
Converting Frames to an HDU list
cpl.ui.Frame objects can open the corresponding FITS file as an astropy.io.fits.HDUList object.
>>> sof_frames = FrameSet("object.sof")
>>> raw_hdulist = sof_frames[0].as_hdulist()
>>> raw_hdulist
[<astropy.io.fits.hdu.image.PrimaryHDU object at 0x134d2a9c0>]
>>> raw_hdulist[0].header
SIMPLE  =                    T / Standard FITS format (NOST-100.0)
BITPIX  =                   16 / # of bits storing pix values
NAXIS   =                    2 / # of axes in frame
NAXIS1  =                 2080 / # pixels/axis
NAXIS2  =                 2048 / # pixels/axis
EXTEND  =                    F / Extension may be present
ORIGIN  = 'ESO     '           / European Southern Observatory
DATE    = '2003-06-02T07:42:39.276' / UT date when this file was written
CRVAL1  =            285.39040 / value of ref pixel
CRPIX1  =               1030.0 / Ref pixel in x-axis
CDELT1  =         -0.000055631 / Increment in rows
CTYPE1  = 'RA---TAN'           / Coordinate system of x-axis
CRVAL2  =            -37.00833 / value of ref pixel
CRPIX2  =               1021.2 / Ref pixel in y-axis
CDELT2  =          0.000055631 / Increment in columns
CTYPE2  = 'DEC--TAN'           / Coordinate system of y-axis
BSCALE  =          1.000000000 / pixel=FITS*BSCALE+BZERO
BZERO   =              32768.0 / pixel=FITS*BSCALE+BZERO
MJD-OBS =       52792.31027459 / MJD start (2003-06-02T07:26:47.725)
DATE-OBS= '2003-06-02T07:26:47.724' / Date of observation
EXPTIME =             949.9549 / Total integration time
INSTRUME= 'FORS1   '           / Instrument used
TELESCOP= 'ESO-VLT-U1'         / ESO Telescope Name
RA      =           285.390417 / 19:01:33.7 RA (J2000) pointing (deg)
DEC     =            -37.00833 / -37:00:29.9 DEC (J2000) pointing (deg)
EQUINOX =                2000. / Standard FK5 (years)
RADECSYS= 'FK5     '           / Coordinate reference frame
LST     =            69995.675 / 19:26:35.675 LST at start (sec)
UTC     =            26807.000 / 07:26:47.000 UTC at start (sec)
CROTA1  =              0.00000 / Rotation in degrees for x-axis
CROTA2  =              0.00000 / Rotation in degrees for y-axis
PC001001=              1.00000 / Translation matrix element
PC001002=              0.00000 / Translation matrix element
PC002001=             -0.00000 / Translation matrix element
PC002002=              1.00000 / Translation matrix element
HIERARCH ESO OBS TPLNO = 2 / Template number within OB
HIERARCH ESO OBS NAME = 'LS-RCrA-1_Halpha_first' / OB name
HIERARCH ESO OBS PROG ID = '71.C-0429(D)' / ESO program identification
HIERARCH ESO OBS ID = 137544 / Observation block ID
HIERARCH ESO OBS DID = 'ESO-VLT-DIC.OBS-1.7' / OBS Dictionary
HIERARCH ESO OBS OBSERVER = 'UNKNOWN ' / Observer Name
HIERARCH ESO OBS PI-COI NAME = 'UNKNOWN ' / PI-COI name
HIERARCH ESO OBS PI-COI ID = 5291 / ESO internal PI-COI ID
HIERARCH ESO OBS GRP = '0       ' / linked blocks
HIERARCH ESO OBS START = '2003-06-02T07:21:43' / OB start time

...
>>> raw_hdulist[0].data
array([[249, 245, 244, ..., 236, 235, 236],
      [240, 241, 248, ..., 235, 235, 236],
      [242, 249, 245, ..., 233, 241, 237],
      ...,
      [248, 248, 250, ..., 253, 249, 248],
      [243, 246, 243, ..., 251, 248, 246],
      [244, 247, 250, ..., 250, 246, 251]], dtype=uint16)
Converting the Frames to CCDData
cpl.ui.Frame can also open the corresponding FITS file as an astropy.nddata.CCDData object.
>>> raw_ccddata = sof_frames[0].as_ccddata(unit="adu")
WARNING: FITSFixedWarning: RADECSYS= 'FK5 ' / Coordinate reference frame
the RADECSYS keyword is deprecated, use RADESYSa. [astropy.wcs.wcs]
WARNING: FITSFixedWarning: PC001001= 1.00000 / Translation matrix element
this form of the PCi_ja keyword is deprecated, use PCi_ja. [astropy.wcs.wcs]
WARNING: FITSFixedWarning: PC001002= 0.00000 / Translation matrix element
this form of the PCi_ja keyword is deprecated, use PCi_ja. [astropy.wcs.wcs]
WARNING: FITSFixedWarning: PC002001= -0.00000 / Translation matrix element
this form of the PCi_ja keyword is deprecated, use PCi_ja. [astropy.wcs.wcs]
WARNING: FITSFixedWarning: PC002002= 1.00000 / Translation matrix element
this form of the PCi_ja keyword is deprecated, use PCi_ja. [astropy.wcs.wcs]
>>> raw_ccddata
CCDData([[249, 245, 244, ..., 236, 235, 236],
        [240, 241, 248, ..., 235, 235, 236],
        [242, 249, 245, ..., 233, 241, 237],
        ...,
        [248, 248, 250, ..., 253, 249, 248],
        [243, 246, 243, ..., 251, 248, 246],
        [244, 247, 250, ..., 250, 246, 251]], unit='adu')