TOC PREV NEXT INDEX

Put your logo here!


2 - FIERA SLCU VLTSW UPGRADES

The installation of a new version of the VLTSW on the FIERA SLCU can be performed in two different ways, depending if the Operating System (OS) has to be upgraded or not.

The case which requires the update of the OS is the most complex one, and requires direct access to the different Instrument SLCUs, while the installation of the VLTSW without the upgrade of the OS can be performed logging remotely from another computer.

In the following paragraphs, the different procedures are described.

IMPORTANT: knowledge of system management is required to be able to go through the whole procedures successfully.

2.1 Complete upgrade of the SPARC (including OS)

Whenever an upgrade of the Operating System of the FIERA SLCU is required, the installation is performed in two steps:

· first on a "Master" Hard Disk, connected via SCSI to a "Master" SLCU;
· this "Master" Hard Disk is then used to upgrade the Hard Disks of all the other FIERA SLCUs (the "Instrument" SLCUs).

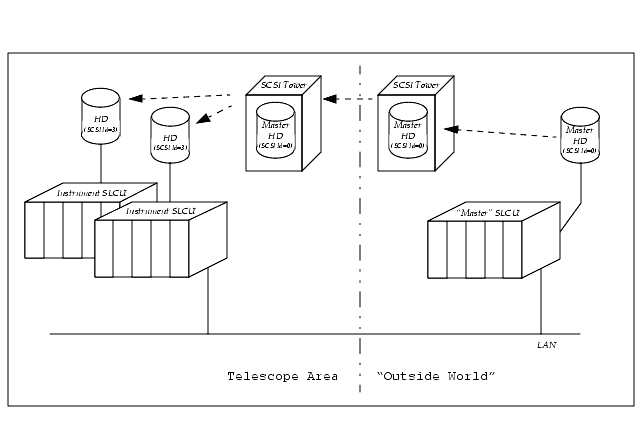
2.1.1 Upgrade of the "Master" SLCU

2.1.1.1 Upgrade of the Operating System

Preparation:

· Before starting the upgrade of the Operating System, collect the following information:
a. IP address and hostname of the "Master" SLCU
b. IP address of the default router
c. Check whether your system uses ATM or ethernet. If ATM is used, you need to know also the LECS ATM address and the ELAN name for your system.
d. IP address and name of the xntp server
e. IP address and hostname of the ACC_HOST

Actions:

1. To upgrade the Operating System, follow the steps described in [8], using the following information:
· When partitioning the Hard Disk, use the following values:
Tab. 1 - FIERA SLCU partition table
Part (1)
Tag (a)
Flag (a)
Filesystem (2)
Size (MB)
0
root
wm
/
160
1
usr
wm
/usr/openwin
300
2
backup
wu
overlap
(3)
3
var
wm
/var
250
4
swap
wu
swap
256 (4)
5
unassigned
wm
/opt
200
6
usr
wm
usr
300
7
home
wm
/export/home
<remaining space>
1
as shown by the "format" command

2
as shown at the "Automatically Layout File Systems" screen during the OS Installation Procedures described in [8]

3
don't change the size shown here !!!

4
as a rule, define here the double of the available system memory


NOTE: select /usr/openwin when requested about which partitions must be created.
· on the Instrument SLCUs only the local /etc/hosts file is used to resolve the hostnames (no NIS, no DNS !)
· When configuring NFS, since /diska is not defined, substitute /export/home to /diska when creating the symbolic links for /vlt, /vltdata, /data. Then only one entry is required in /etc/dfs/dfstab:
share -F nfs -o rw=localhost /export/home
NOTE: it's not necessary to define the insroot and introot directories defined in [8].
2. At the end of the installation, edit the /etc/hosts file, adding the complete hostname of the SCLU, the IP address and hostname of the ACC_HOST computer, the IP address and hostname of the xntp server.
The file /etc/hosts should then look like the following (with the appropriate names and IP addresses):

#
# Internet host table
#
127.0.0.1 localhost
134.171.196.19 wf1ccd.pl.eso.org wf1ccd loghost
# ACC_HOST in Paranal
134.171.224.2 wgsops.pl.eso.org wgsops
# xntp server in Paranal
134.171.224.144 ogstime.pl.eso.org ogstime

3. Install the OS patches, if needed, as described by the Notes of the VLTSW Release under distribution.
2.1.1.2 Installation of drivers for the FIERA SLCU

Specific code for the FIERA SLCU is available in the CDROM labelled "FIERA SPARC Configuration Code" 1.

To install the drivers for the SLCU follow what is described in the file fcdsys/src/README on the CDROM

IMPORTANT: there are two types of DSP board (LSI and Jens Benner boards). Be sure to install the appropriate driver !!!

2.1.1.3 VLTSW Installation

Actions:

1. To install the VLTSW, follow what is described in [7], performing in addition the following steps at the end of the PECS installation:
a. as "root", edit the file
$PECS_ROOTDIR/releases/$PECS_RELEASE/etc/locality/apps-$HOST.env
uncomment the line:
VLTSW_CCSTYPE=lite
add the following line:
SOFTWARE_ROOTS=
b. as "pecsmgr", install the FIERA related pecs files:

> cp <VLTSW>/FCD/FCD/fcdsys/templates/misc-FIERA.env \
$PECS_ROOTDIR/releases/$PECS_RELEASE/etc/locality/misc-$HOST.env

> chmod 644 \
$PECS_ROOTDIR/releases/$PECS_RELEASE/etc/locality/misc-$HOST.env

Edit the file
$PECS_ROOTDIR/releases/$PECS_RELEASE/etc/locality/misc-$HOST.env
modifying the definitions of ACC_HOST, RTAPENV, CCDNAME and INS_ROOT appropriately.

NOTE: in the $PECS_ROOTDIR/releases/$PECS_RELEASE/etc/locality/misc-$HOST.env file are set all the environment variables for the generation of the VLTSW in the "CCS-lite-WS" case.
2.1.1.4 Final Common Configuration
1. Check the configuration of the shared memory.
If needed, modify as "root" the configuration of the shared memory in /etc/system:
set shmsys:shminfo_shmmax=128000000
(As a rule of thumb, the system needs a quantity of memory which is at least twice the dimensions of the CCD installed in the camera, and shminfo_shmmax must reflect this. Apart from special cases, the value shown above is the one used in the common FIERA systems)
2. Install the "Fiera cleanup" program.
NOTE: Since you are doing the installation as vltmgr, become root typing "su root" (not "su - root") in order to keep the definition of VLTROOT.
As "root":
> cp $VLTROOT/bin/fcdboot /etc/init.d
> chmod +x /etc/init.d/fcdboot
> ln -s /etc/init.d/fcdboot /etc/rc2.d/S99fcdboot
3. Test the connections with the DSP.
Run:
> fcdHalloDsp
The following reply should appear:
Your FIERA DSP says: Hallo World !
4. Add the "fcdrun", "halt" and "reboot" users
Perform the following steps while logged in as "root".
a. Edit the file /etc/passwd adding lines like:
fcdrun:x:0:1::/export/home/fcdrun:/bin/bash
halt:x:0:1:0000-Halt user(0000):/:/usr/sbin/halt
reboot:x:0:1:0000-Reboot user(0000):/:/usr/sbin/reboot
b. Edit the file /etc/shadow adding lines like:
fcdrun::11022::::::
halt::11022::::::
reboot::11022::::::
c. Create the home directory for the fcdrun user and populate it:
> mkdir /export/home/fcdrun
> su - fcdrun
> /etc/pecs/bin/pecssh mklinks -i
Reply:
PECS_ROOTDIR [/etc/pecs]: "return"
PECS_RELEASE [000]: "return"
[...]
Do you wish to install VUE support files? [y]: "n"
> exit
> su - fcdrun
> zcat $VLTROOT/templates/forFCD/FieraTemplateUser.tar.gz | \
tar xf -
> chmod +x ~/bin/*
d. Correct the prompt for the fcdrun user, adding the following lines to the file
~fcdrun/.pecs/misc-all.env:
SAVED_PS1="\h $USER:\w \! > "
PS1="\h $USER:\w \! > "

NOTE: In order for CCSLite to function correctly, the user fcdrun must be defined on the Instrument Workstation2 (although it is neither necessary that the same user id is used on the Instrument Workstation and the FIERA SLCU, nor that the fcdrun user has a home directory on the Instrument Workstation).

2.1.2 Upgrade of the Instrument SLCUs

Preparation:

· Before starting the upgrade of the Instrument SLCU, collect the following information:
a. IP address and hostname of the Instrument Workstation
b. name, id and group of "Instrument User", the user which runs the FIERASW on the Instrument Workstation
c. name of the OnLine Database Environment on the Instrument SLCU
d. name of the RTAP Environment on the Instrument Workstation

· Hardware needed:
a. ASCII terminal.
b. Serial cable with a special connector for the Instrument SLCU (one 26 pins connector that goes to two normal serial connectors, labelled as TTYA and TTYB).
c. SCSI tower containing the "Master hard disk" (external HD, scsi id 0), tape device and a CD-ROM drive.
d. Note: the internal HD of the Instrument SLCU has scsi id 3.
e. SCSI cable.
f. Power extension.
g. Trolley to carry all these items to the instrument at the telescope.

Action:

1. From any telescope machine, log into the Instrument SLCU as "halt".
2. Wait a couple of minutes and then turn off power of the FIERA cabinet.
3. Connect the SCSI tower to the closest SCP.
4. Open the front cover of the FIERA cabinet. Connect the SCSI tower to the SCSI connection on the front panel of the SPARC, using the SCSI cable listed above.
IMPORTANT: Be extremely careful when connecting to the SPARC.
5. Remove the cable that is connected to the serial connector at the front panel of the SPARC (labelled as "SERIAL A/B"). Connect the serial cable listed above. to the "SERIAL A/B" connector and the other side to the terminal using the cable labelled as "TTYA".
6. Turn on the SCSI tower and then the FIERA cabinet.
7. Interrupt the boot procedure3.
8. Check that both the internal and the "Master" hard disks are recognized using "probe-scsi" at the ok prompt. If ok, then boot the Instrument SLCU from the "Master HD", typing "boot disk3" (disk0 = scsi id 3; disk3 = id 0).
9. Login as root.
10. Check the partition table of the Hard Disk of the Instrument SLCU (using the command "format"). If it differs form the one of the "Master" Hard Disk (see Tab. 1), change the partitions of the Hard Disk of the Instrument SLCU (c0t3d3) using "format", according to the Tab. 1. Don't forget to do "label" before quit!

> format
Searching for disks...done

AVAILABLE DISK SELECTIONS:
0. c0t3d0 [...]
Specify disk (enter its number): 0

FORMAT MENU:
disk - select a disk
.......
quit

format> par

PARTITION MENU:
0 - change `0' partition
.......
quit

partition> pri

Current partition table (original):
[...]
partition>
partition> quit
..........
format> quit
11. For each partition, dump the contents of the "Master" SLCU Hard Disk into the Instrument SLCU Hard Disk, repeating the following sequence of commands (replace <i> with 0, 1, 3, 5, 6, 7 - skip 2 and 4 !):
# newfs /dev/rdsk/c0t3d0s<i>
# mount /dev/dsk/c0t3d0s<i> /mnt
# ufsdump 0f - /dev/rdsk/c0t0d0s<i> | (cd /mnt;ufsrestore xf -)
# fsck -y /dev/rdsk/c0t3d0s<i>
# umount /mnt
12. IMPORTANT: Correct the file /etc/vfstab on the Instrument SLCU Hard Disk:
# mount /dev/dsk/c0t3d0s0 /mnt
# vi /mnt/etc/vfstab
Modify all the "t0" in "t3" and save
# umount /mnt
NOTE: if you forget this step, or do it wrong, the SLCU cannot reboot !
13. When the procedure is finished, halt the machine ("su - halt").
14. At the "ok" prompt type "boot disk0".
15. If needed, modify the shmsys:shminfo_shmmax entry in /etc/system
16. Edit /etc/hosts: correct the SLCU hostname and IP address, add the hostname and IP address of the Instrument Workstation
17. Edit /etc/defaultrouter: correct the IP address of the defaultrouter, if needed. The format of the contents of this file should be:
WWW.XXX.YYY.254
where WWW.XXX.YYY are the first three numbers of the SLCU IP address (WWW.XXX.YYY.ZZZ)
18. Edit /etc/nodename: correct the SLCU hostname
19. Edit /etc/hostname.le0: correct the SLCU hostname
20. Edit /etc/netmasks: correct it, if needed. The format of the contents of this file should be:
WWW.XXX.0.0 255.255.255.0
where WWW.XXX are the first two numbers of the SLCU IP address (WWW.XXX.YYY.ZZZ)
21. mv \
$PECS_ROOTDIR/releases/$PECS_RELEASE/etc/locality/apps-<mslcu>.env \
$PECS_ROOTDIR/releases/$PECS_RELEASE/etc/locality/apps-$HOST.env
where <mslcu> is the name of the Master SCLU
22. mv \
$PECS_ROOTDIR/releases/$PECS_RELEASE/etc/locality/misc-<mslcu>.env \
$PECS_ROOTDIR/releases/$PECS_RELEASE/etc/locality/misc-$HOST.env
where <mslcu> is the name of the Master SCLU
23. Edit $PECS_ROOTDIR/releases/$PECS_RELEASE/etc/locality/misc-$HOST.env and modify the definition of the variables RTAPENV, CCDNAME and INS_ROOT

Now the machine is ready to be accessed remotely.

24. Type "su - halt".
25. Power off the FIERA cabinet.
26. Power off the SCSI tower.
27. Disconnect the SCSI cable and the serial cable.
28. Connect back the original serial cable to the Instrument SLCU.
29. Power on the FIERA cabinet.

Check that the machine is accessible from the network and continue the configuration.

2.1.3 Last configuration steps for the Instrument SLCUs

On each FIERA SLCU:

1. Set access rights for fcdrun user
As "fcdrun" user edit the file ~fcdrun/.rhosts (create it if it does not exist yet). It should contain one line looking like:
<InsWs> +
NOTE: Replace <InsWs> with the Instrument Workstation name.
2. Add the "Instrument User" user
The "Instrument User" is the user which runs the FIERASW on the Instrument Workstation. It must be defined also on the SPARC SLCU, with the same user id and group.
Perform the following steps while logged in as "root". In the example below, replace "IUser" with the Instrument User name.
a. Edit the file /etc/passwd adding a line like:
IUser:x:<IUser_id>:<IUser_grp>::/export/home/IUser:/bin/bash
NOTE: Replace <IUser_id> and <IUser_grp> with the user id and group for the Instrument User from the Instrument Workstation /etc/passwd file.
b. Edit the file /etc/shadow adding a line like:
IUser::11022::::::
c. Create the home directory for the user:
> mkdir ~IUser
d. Change ownership of the files of the "Instrument User":
> chown -R IUser:<IUser_grp> ~IUser
e. Populate the home directory of the "Instrument User" user:
> su - IUser
> /etc/pecs/bin/pecssh mklinks -i
Reply:
PECS_ROOTDIR [/etc/pecs]: "return"
PECS_RELEASE [000]: "return"
[...]
Do you wish to install VUE support files? [y]: "n"
> exit
> su - IUser
> zcat $VLTROOT/templates/forFCD/FieraTemplateUser.tar.gz | \
tar xf -
> chmod +x ~/bin/*
3. Generation of the OnLine Database
a. Check that the environment is known to the ACC database: lookup the Online Database environment host
> fcdEnvToHost wmyfiera
A reply with the FIERA SLCU host name should appear:
myfiera
If the utility does not answer with the name of the SLCU host, there is a problem with the ACC Database. In this case, check that the value of the environment ACC_HOST is pointing at the host with the correct ACC database. If this value is incorrect check the setting in the file $PECS_ROOTDIR/releases/$PECS_RELEASE/etc/locality/misc-$HOST.env.
b. As "root" modify the file /etc/services, adding the (local) OLDB environment of the Instrument LCSU and the (remote) OLDB environment of the Instrument Workstation. Do that adding the following lines:
<RTAPENV> <PORT1>/tcp
<InsWsEnv> <PORT2>/tcp
Substitute <RTAPENV> with the name of the local environment, <InsWsEnv> with the name of the remote Instrument Workstation environment, <PORT1> and <PORT2> with the numbers of the ports used for the tcp connections (ask the System Administrator for them)
c. Check the definition of RTAPRUNNER in /etc/rtap.conf (it should be vltmgr)
d. Configure the SLCU to log messages onto the Instrument Workstation:
edit the file /etc/syslog.conf while logged in as "root", adding the following lines

# ===========================================================
# The following three lines configure the VLT logging system
# ===========================================================
#*info;mail,local1,local2.none /var/adm/messages
#local1.warning /vltdata/tmp/logFile
#local2.warning /vltdata/tmp/logAuto
*.info;mail,local1,local2.none @myws
local1.warning @myws
local2.warning @myws

Substitute the instrument workstation hostname for "myws". This change will take affect after rebooting the SLCU.
IMPORTANT: use tabs for spacing !
e. As "vltmgr":
Create the file $VLTDATA/config/CcsEnvList putting the following lines:
<RTAPENV> /export/home/vltdata/ENVIRONMENTS/<RTAPENV>
<InsWsEnv> <InsWs>
Substitute <RTAPENV> with the name of the local environment, <InsWsEnv> with the name of the remote Instrument Workstation environment, <InsWs> with the name of the remote Instrument Workstation
f. As "vltmgr" run:
> export CCDWENV=<InsWsEnv>
> fcdinsInstall
Substitute <InsWsEnv> with the name of the remote Instrument Workstation environment.
g. Verify that the environment has been generated:
> dbRead "@${RTAPENV}:<alias>${CCDNAME}.date"
The following reply should appear:
BYTES value =
4. Installation of the Instrument Configuration File and CCD clock patterns
No installation of Instrument Configuration File and CCD clock patterns is needed on the Instrument SLCU, since the Instrument SLCU mounts the INS_ROOT from the Instrument Workstation via nfs (see [5]).

2.2 OS patches

TBD

2.2.1 Upgrade of the "Master" SLCU

TBD

2.2.2 Upgrade of the Instrument SLCUs

TBD

2.3 Upgrade of the VLTROOT only

In the case of the only upgrade of the $VLTROOT (i.e., a VLTSW delivery where neither Operating System update nor OS patches installation is required), the VLTSW installation can be performed on the "Master" SLCU, then the $VLTROOT can be copyed (e.g., tar'd and ftp'd) on the Instrument SLCUs.

2.3.1 Upgrade of the "Master" SLCU

Generate the new VLTSW on the "Master"SLCU, performing the steps described in 2.1.1.3.

2.3.2 Upgrade of the Instrument SLCUs

Distribute the new VLTROOT contents to all the Intrument SLCUs:

1. Copy the $VLTROOT directory into the Instrument SLCU (tar'ing the $VLTROOT)

2. Check that the following files have the permission and ownership set as following:
-rwsr-xr-x root /vlt/MAR2001/CCSLite/bin/ccsScheduler*
-rwsr-xr-x root /vlt/MAR2001/CCSLite/bin/msgServer1*
-rwsr-sr-x vltmgr /vlt/MAR2001/CCSLite/bin/wpQueryData*
-rwsr-sr-x vltmgr /vlt/MAR2001/CCSLite/bin/wpSendToArchive*
If this is not the case, as "fcdrun", set the file properties:
chown root $VLTROOT/bin/ccsScheduler
chmod u+s $VLTROOT/bin/ccsScheduler
chown root $VLTROOT/bin/msgServer1
chmod u+s $VLTROOT/bin/msgServer1
chown vltmgr $VLTROOT/bin/wpQueryData
chmod u+s $VLTROOT/bin/wpQueryData
chown vltmgr $VLTROOT/bin/wpSendToArchive
chmod u+s $VLTROOT/bin/wpSendToArchive

3. Regenerate the environment, being the user defined as RTAPRUNNER in /etc/rtap.conf:
> vccEnvStop -e $RTAPENV
> cd $VLTDATA/ENVIRONMENTS/$RTAPENV/dbl
> make clean db
> vccEnvInit -e $RTAPENV
> vccEnvStart -e $RTAPENV

2.4 CCD Camera Installation Verification

See the corresponding paragraph in [5].

1
The contents of the CDROM are archived in the fcdsys module

2
This is valid for CCS_Lite on HP-UX 11

3
Depending on the terminal, you can type "break", or "ctrl-break", or "shift-break", or "ctrl-\" (ctrl-backslash) or "<enter>" followd by "~" and "ctrl-break", or any terminal-dependent key combination whichc sends a "break" to the serial port (The corresponding combination on the SPARC console is "Stop-A")


Quadralay Corporation
http://www.webworks.com
Voice: (512) 719-3399
Fax: (512) 719-3606
sales@webworks.com
TOC PREV NEXT INDEX