4 ENVIRONMENT SETUP - vccEnv
This chapter describes version 2.7 of the vcc module.

4.1 Overview
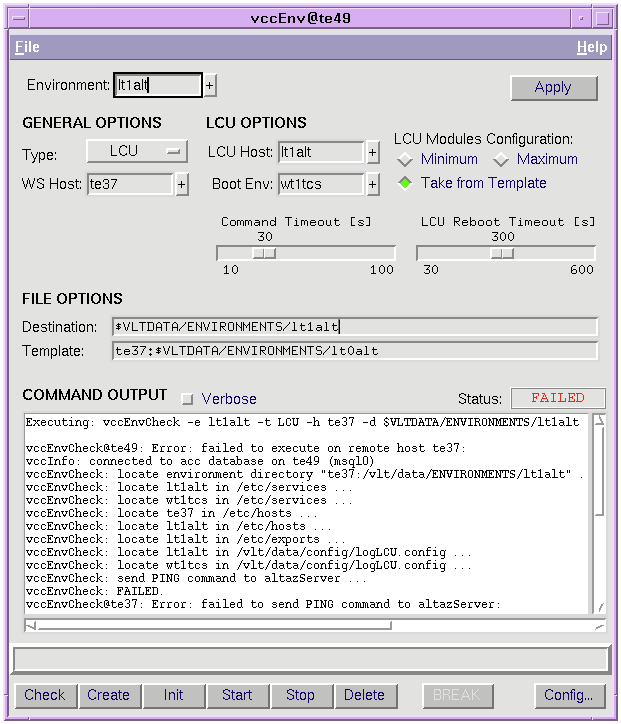
The vccEnv panel allows to perform common maintenance operations for a specific environment. All environments are handled in a uniform way, regardless of which type it is (Rtap, Qsemu, LCU). Moreover, it is automatically resolved on which host the environment is located, and correspondingly remote operation is selected.
4.2 Starting from the Command Line
The program then connects to the VCCDB and the following panel pops up:
4.3 Panel Description
1. Choose an environment with the Environment selector; either select from the menu, or type the name in (with completion function) and press <Return> or the Apply button at the right.
2. Adjust the General Options and LCU Options if the selected defaults (partly taken from the database) do not fit. This, however, will rarely be necessary. Note also that some combinations, although they can be selected, can lead to an inconsistency with the information in the VCCDB, that is detected when an action is started.
3. For LCUs two timeouts are of interest in connection with the Init, Start and Stop actions: one for each shell command that is sent, and one to complete a reboot. Both can be adjusted with the two scales, in case that errors occur due to insufficient timeout values.
4. The File Options provide a way to specify another directory where the environment files are or shall be located (Destination), and which user-provided template directory to use (Template) during the Create action. All files in this template will override the defaults. The template directory can be located on another host, in which case the hostname and a colon must be given as prefix. See the man-page of vccEnvCreate for more, in particualar concerning dbl files and LCU bootScript handling.
5. Press an action-button to perform the operation. The result (OK or FAILED) is displayed in the Status output after completion; during execution RUNNING is displayed instead.
4.4 Actions
All actions can be applied to any type of environment.
The name of the actions match the dedicated programs vccEnv<Action>, that are described in full detail in the reference chapter 8.
Since Init and Delete will overwrite or remove data, a pop-up dialog is presented for confirmation.
The Create actions makes use of the envsCreate program, see reference chapter 8.
Two additional action buttons are available:
5 CONFIGURATION OF LCU ENVIRONMENTS - vccConfigLcu
This chapter describes version 2.7 of the vcc module.

5.1 Overview
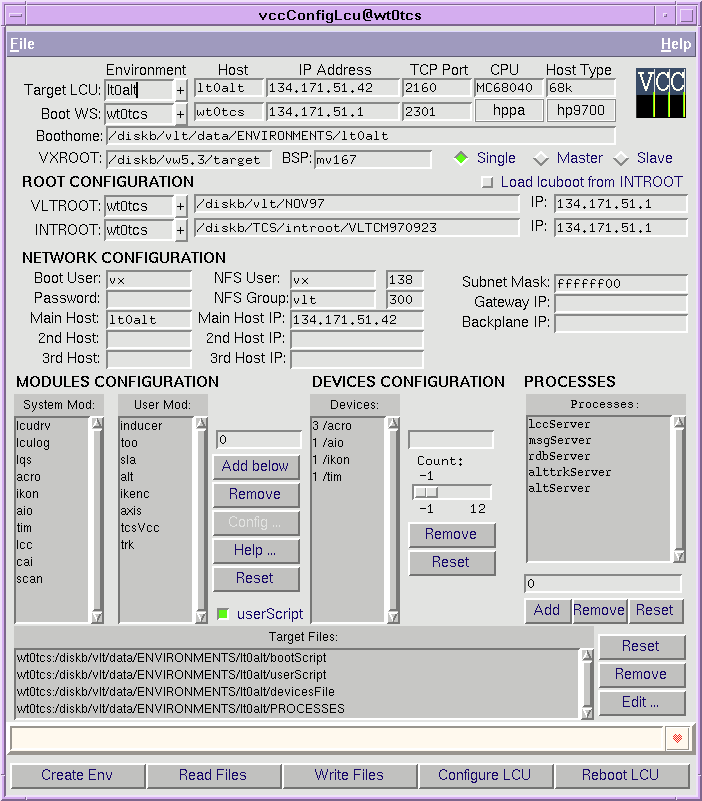
This vccConfigLcu panel allows to generate and configure the most important files needed for an LCU environment, in particular:
� the boot-script executed by the LCU upon start-up that is suitable for the LCU module lcuboot, see chapter 7.
5.2 Starting from the Command Line
If an explicit LCU environment is given then the configuration data is immediately read from the corresponding target files (that must have been previously created), otherwise the environment can be selected interactively.
The following section presents quick instructions how to operate the panel. A more detailed description of the usage of each corresponding part in the panel is given later in section 5.4.
5.3 Example of Usage
This describes how to modify a LCU Environment with vccConfigLcu.
5. After your modifications, press the `Write Files' action button to generate the files listed in the `Target Files' box, and confirm overwriting for each file.
This will reboot the LCU using the new bootScript. You can see the output during the reboot in the terminal window. A temporary pop-up window lets you adjust the connection time.
Near the end, "LCC INITIALISATION SUCCESSFULL" should be listed. A possible start-up error message about timeOpenDevice can be ignored if no TIM board is installed.
The bootScript will be aborted if anything goes wrong.
After the selected time the connection is closed. You cannot rlogin to the LCU's shell before that, unless you press the `Cancel Connection' button in the pop-up dialog.
5.4 Panel Description
5.4.1 Environments Selection
The first action must always be the selection of the Target LCU Environment that shall be modified. This is done by selection from the menu at the top left in the panel. The derived values like node-name, IP-address and associated boot-host are the queried from the configuration database, provided it is used. Otherwise these values have to be typed in. The Boot WS Environment can be arbitrarily selected. Remote file operations are performed if the Boot WS Host is not identical to the workstation where this panel is running on. Note that these remote accesses are much slower than local accesses. Boothome specifies the home-directory of the LCU environment, and VXROOT the VxWorks root-directory.
The BSP value assigns the LCU environment to a specific board support package. Several of such BSP directories can exist under $VXROOT/config, which contain VxWorks kernels that are specifically configured for a certain (set of) environment(s). The selection for a Single, Master, or Slave CPU is indirectly represented by the BSP name, whereby multi-CPU systems are supported; see the man-page for details.
Note that the address parameters in the first line represent the LCU booting interface, which may not be the same as the CPU ethernet port. For slave CPUs this is the backplane interface address.
5.4.2 Root Configuration
The variables VLTROOT, and optionally INTROOT must exist in the LCU environment. The contents of the entries is by default set to the same values of the corresponding shell variables on the selected "Boot Host". They may be edited by the user. Note that only physical path names without links must be given, as seen from the LCU. Separate NFS mounts will be done to VLTROOT and INTROOT, so that each can be located on a different host as the selected "Boot Host". The checkbutton allows to load the lcuboot module (which is always implicitly loaded first ) from INTROOT rather than VLTROOT, which is only useful during development on lcuboot.
5.4.3 Network Configuration
The defaults in these entries will fit in most cases. The Boot User specifies under which user-name the LCU is accessing the boot-script. The Password is usually empty, so that remote shell access is used; otherwise FTP is applied. The Gateway allows to specify an IP-address as gateway to the boot-host. The Subnet-Mask must be set to the network's value. The NFS User-ID and Group-ID is mandatory and must be set corresponding to a valid user on the boot-host. By default the user vx's IDs are taken.
In case of multi-network systems, the entries for Main/2nd/3rd Host become important. These determine the IP addresses of the CPU main ethernet port and up to two optional additional ethernet interface baords. For single and master CPUs the Main Host is always identical to the address entered in the ENVIRONMENTS SELECTION, while for slave CPUs booting over the backplane it is different.
For details about multi-network configuration see the man-page.
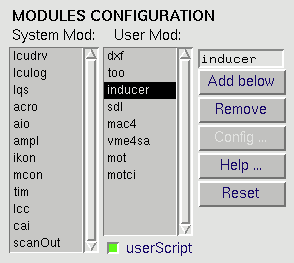
5.4.4 Modules Configuration
The names of modules to be loaded must be specified in the two boxes. Modules in the System box are normally always needed and their order should not be changed (unless you know about possible side effects). Modules in the User box usually require all the system-modules and are not always needed, depending on the LCU hardware etc. Individual changes to the lists can be done by selecting an entry and using the Add below and Remove buttons on the right of the boxes. For each module listed, there must exist a module-boot-script named module.boot in one of the directories in the module-boot-script search-path, see 7.2.2.
The Help button shows the man-page for a selected module-boot-script, provided it is available. The Reset button fills the two boxes with all modules for which module-boot-scripts are available. The userScript button enables the processing of the user-script.5.4.5 Devices Configuration
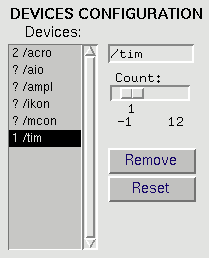
All hardware-devices on the LCU can be installed automatically, using the facilities of lcuboot. The devices configuration therefore consists only in checking that the required number of devices have actually been installed by that procedure. An explicit number can be given, or the special value ? resp. -1, meaning that no explicit check shall be done ("Plug & Play"). This is useful when the board configuration in a LCU often changes. No modification in the boot-script would be necessary then. The Remove button completely removes a selected device name from the list. The Reset button returns to the default. Add new entries by editing the device name and moving the scale.
5.4.6 Processes
This box contains the names of the LCU processes that shall be accessible by commands via the message-system. The list is normally only used by engineering interfaces (lccei, ccsei) to provide user-menus, but not to restrict any access. The generated processes-file will be written to the ENVIRONMENTS sub-directory of VLTDATA.
The list can be modified by the Add and Remove buttons. The Reset button returns to the default.
5.4.7 Target Files
This box contains the names of files that shall be processed when the action-button for Read Files or Write Files is pressed. A specific target can be selected and removed with the Remove button, so that it is not processed anymore (but not deleted, of course). An editor can be called with the selected file by the Edit button. The Reset button returns to the default.
(Remark: Although the userScript and devicesFile are listed, they will not be altered by the tool.)
5.4.8 Actions
One of these action buttons must be pressed in order to perform a specific operation. All buttons are disabled until an LCU environment is selected.
� "Create Env" creates a new set of files under $VLTDATA/ENVIRONMENTS on the selected boot-host. The operation fails if one of the files to be created already exist.
� "Read Files" reads the files listed in the "Target Files" box and parses their contents, so that the sections in the panel are updated accordingly. Note that the behaviour for reading files not produced with this tool is undefined!
� "Write Files" writes the files listed in the "Target Files" box according to selections in the panel's sections. A confirmation is requested before overwriting any existing files.
� "Configure LCU" write the boot-line according to the selections in the panel, i.e. host-names, IP-addresses etc. See section 5.5 for potential failures.
� "Reboot LCU" restarts the LCU and executes the selected boot-script. The output during start-up is redirected to the terminal where the panel was started from. During booting, a temporary pop-up window allows to specify the default connection time, which must be at least the actually used time to complete the boot. The connection can be aborted explicitly with the Cancel Connection button.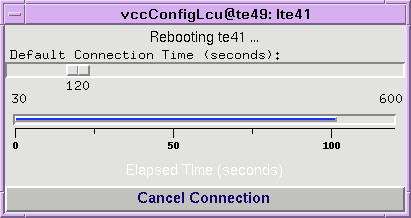
5.5 Known Problems
The actions `Configure LCU' and `Reboot LCU' require a rlogin to the target LCU. The panel might be blocked when this remote login fails, e.g. when another session is active on the same LCU. To recover from this situation, the user must manually "kill" all active rlogin processes to this LCU node (e.g. with: "psg <LCU-name>" to find out the PID, then "kill <PID>" to stop the process).
Also `crashed' LCUs - where the rlogin daemon is not working anymore - can cause the panel to block.
The rlogin done by `Reboot LCU' is terminated after a fixed time (by default a few minutes) and not synchronized with the boot-script execution, i.e. it cannot be detected when the boot process terminates to cancel the connection automatically. The shell variable VLT_VCCBOOTTIME specifies the time in seconds after that the connection to the LCU during booting is closed.
The LCU understands only physical path-names without links. Although the panel should automatically resolve links, the user should explicitly check this, particularly when paths are entered manually.
It is impossible to recover an LCU node after a `Configure LCU' and `Reboot LCU' sequence when wrong configuration data were entered. A serial terminal must be used as LCU console to re-adjust the boot-line.
The device installation checks are for some situations not rigid enough, so that the boot-script can run into a secondary error rather than stopping at the expected point. In case of troubles, the device's jumper settings should be checked carefully.
6 CONFIGURATION ACCESS FOR PROGRAMMERS
6.1 Panel Mega-Wigets
6.2 Programmatic Access from Seqencer-Scripts
|
Quadralay Corporation http://www.webworks.com Voice: (512) 719-3399 Fax: (512) 719-3606 sales@webworks.com |