3 THE IRACE CONTROLLER
3.1 PHYSICAL INTERFACES
The IRACE controller can be driven via several physical interfaces. The protocol type an the device names are given in the system configuration file (see section 7.1).
3.1.1 BIDIRECTIONAL PARALLEL PORT INTERFACE
This is the standard interface for the SBus-based Ultra-Sparc.
System configuration file entry (see section 7.1):
DET.IRACE.SCLBOOTFILE "sclpp.btl" or "scl2pp.btl" for 2 CLDC boards
3.1.2 SERIAL PORT INTERFACE
The IRACE front end can also be connected to the SPARC via the serial port (ttya, ttyb). The i/o routines are assembled in the icmdEcpp library. In future releases this will also support IEEE1284 ECP mode for the parallel port of the PCI-Bus based SPARC.
System configuration file entry (see section 7.1):
DET.IRACE.SCLDEV "/dev/ttya" or "/dev/ttyb"
DET.IRACE.SCLBOOTFILE "sclpp.btl" or "scl2pp.btl" for 2 CLDC boards
3.2 PROCESSOR NETWORK
3.3 IRACE STATUS BUS
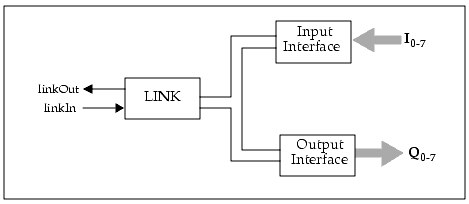
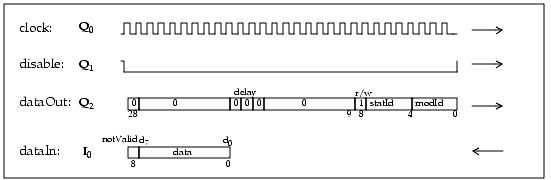
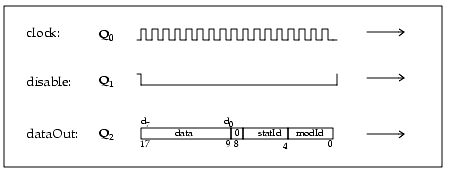
Control I/O to all connected HW-modules can be done via the status bus. The status bus is connected to the processor on the TIF-module via a link adapter. Each HW-module on the status bus is addressed by a unique module number (4 bit). The status-id (4 bit) selects an 8-bit status register on the module. An error-bit is used to detect error states like cable-break, overflow or loss of synchronization. If the error-bit is set on the status bus, a broadcast has to be done to all modules to find the one, which has generated the error. It is also possible to do some hardware configuration via the status bus, like setting filters on the ADC-board or switching LED's on and off.
If the module number is not valid on the status bus, the notValid bit in dataIn will be set to one. Link input (I0-7) and link output (Q0-7) are done in parallel during the status read phase. While there is no status bus I/O request, the status control process just waits for linkIn. If a module goes in error state, it will initiate a dataIn phase and set the error bit (d7). The control process will hold the error condition, until it receives an error request command from the command interpreter. Afterwards the host can do a status read from all modules connected to the status bus and can check, if the error bit is set.
3.4 SEQUENCER
The sequencer system processor is a 32-bit transputer (T425) with 8 MBytes DRAM. A detailed description of the sequencer hardware can be found in [2].
3.4.1 CLOCK PATTERNS
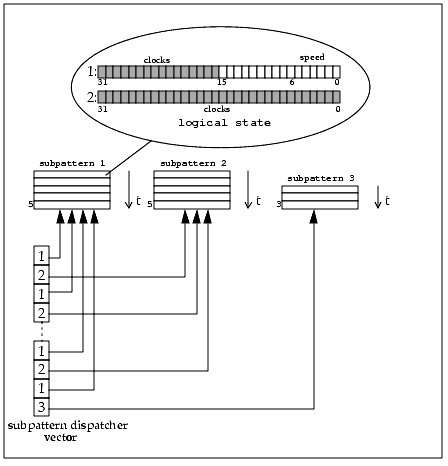
The clock patterns produced by the sequencer are composed of a set of sub-patterns. Each sub-pattern consists of a number of logical states for the 48 sequencer clocks. Each state has a 7 bit time-counter which defines a time per state between 50 ns (= sequencer clock rate) and 6.3 us. Each sub-pattern can have up to 128 states. A maximum number of 256 different sub-patterns can be stored in the SRAM-pages of the sequencer processor. The IRACE front-end back-plane routes the first 32 clocks to two possible CLDC-boards. Clocks 33 and 34 are the convert strobes for two possible groups of ADC-boards. Clocks 35,36 are reserved. Clock 37 is used to invert the lowest bit of the header of the ADC-boards which are attached to convert strobe 33 or 34. Clocks 45-48 are available on lemo-connectors on the front-panel of the sequencer board. Clocks 38-48 are not connected to the back-plane.
The clock-patterns are defined in an ASCII file (SHORT-FITS format) which is referred to in the detector configuration. The clock-pattern files are located in
"$INS_ROOT/$INS_USER/MISC/IRACE/CLK/*.clk"
The parameter DET.SUBPAT.NO defines the number of sub-patterns, which are configured in the file. DET.CLKP.NO specifies the number of clocks used by the detector. These clocks have to be mapped onto the 48 physical sequencer clocks:
Example for 16 defined clocks:
DET.CLKP.SWHWCLK1 "1,2,3,4,5,";
DET.CLKP.SWHWCLK2 "6,7,8,9,10,";
DET.CLKP.SWHWCLK3 "11,12,13,33,46,";
In the following DET.CLKP.NO sub-pattern blocks are configured. The index (i) is used as reference for the sub-pattern address.
DET.SUBPATi.STATES <number of states>;
DET.SUBPATi.RFAC 1; # always 1 for backwards compatibility
DET.SUBPATi.STATEV1 "111111111111";
DET.SUBPATi.STATEV2 "111111000001";
DET.SUBPATi.STATEV3 "000001111111";
DET.SUBPATi.STATEV4 "111111111111";
DET.SUBPATi.STATEV5 "111111111111";
DET.SUBPATi.STATEV6 "000000000000";
DET.SUBPATi.STATEV7 "111111111111";
DET.SUBPATi.STATEV8 "111111111111";
DET.SUBPATi.STATEV9 "111111111111";
DET.SUBPATi.STATEV10 "111111111111";
DET.SUBPATi.STATEV11 "000000000000";
DET.SUBPATi.STATEV12 "000000000000";
DET.SUBPATi.STATEV13 "000000000000";
DET.SUBPATi.STATEV14 "000010000010";
DET.SUBPATi.STATEV15 "000010000010";
DET.SUBPATi.STATEV16 "000000000000";
DET.SUBPATi.RSPEEDV "5,5,5,5,8,4,5,5,5,5,8,4";
DET.SUBPATi.RSPEEDP "1,1,1,1,0,0,1,1,1,1,0,0";
The DET.SUBPATi.RSPEEDV vector defines the reference duration for each state. This value can be multiplied later by a global read-speed factor (setup parameter DET.RSPEED). A fine-tuning by adding clock-cycles in multiples of 50 ns can be achieved by setting the DET.RSPEEDADD parameter, which can also have negative values. The setup parameter DET.RSPEED cannot be set to zero, because when setting a new factor all state counters have to be divided internally by the previous factor. The DET.SUBPATi.RSPEEDP vector defines for each state whether its reference duration is tunable via the global read-speed factor/add or not.
3.4.2 SEQUENCER SUBPATTERN DISPATCHER
The execution of subpatterns (->Sequencer Control) is controlled by a vector (32 Bit) containing the addresses and repetition factors for a sequence of sub-patterns. The vector is transferred to a FIFO (4K x 16 bit) in blocks of 2K x 16 bit. Several vectors of variable length can be stored in the DRAM of the sequencer processor to define sequences for detector read-out, delay-patterns, detector reset or different window read-outs.
For each vector the object-code (loop-structure) of a sub-pattern dispatcher program is downloaded to the sequencer. The code is interpreted to generate the vectors before the sequence is started. This avoids the downloading overhead, as the subpattern-dispatcher vector may have a size of several MBytes. A more detailed description of the subpattern dispatcher loop can be found in [3].
3.4.3 SEQUENCER PROGRAM LOOP
The order of read-outs is defined by the sequencer program, which has the same loop-structure as the subpattern-dispatcher. The sequencer program is executed at run-time. Each readout refers to one subpattern dispatcher vector. A more detailed description of the sequencer program loop can be found in [3]. Examples for a high-level loop implementation can be found in section 7.6.
3.4.4 SEQUENCER MODES
The sequencer can operate in two different modes. In normal running mode the sequencer starts immediately after receiving the start-command. It terminates, when the sequencer program loop terminates or when a stop-command is received.
In external trigger mode after receiving the start-command the sequencer waits for a pulse on the first TTL-input and then starts executing the sequencer program loop. When the program loop reaches a synchronization point, the execution is suspended, until the next pulse on the other TTL-input is received. Synchronization points are either the beginning or the end of the sequence or explicit synchronization markers ("SYNC") within the sequencer program loop.
The sequencer mode can be changed with the setup command "SETUP -function DET.IRACE.SEQMODE 0|1", where `0' refers to normal running mode and `1' refers to external trigger mode.
The database attribute is `<alias>iracq:irace.seqMode'.
3.4.5 SEQUENCER RUN-CONTROL
The sequencer is started/stopped with the "SEQ -start|stop" command. The stop command will stop the sequence after the current dispatcher vector has been transferred to the sequencer FIFO (i.e. the sequencer will not interrupt a detector readout). It is also possible to interrupt the running sequence immediately. This is done when the system switches to STANDBY or LOADED state. In any case the current FIFO content is transferred and the function will wait until the FIFO is empty.
3.5 CLOCK AND DC-BIAS DRIVER (CLDC)
The Clock and DC-Bias driver (CLDC) provides 16 clock and 16 bias voltage generators with an amplitude range of +/- 10 V. Clock high/low levels and bias voltages are generated by 12-bit DAC's. At power-up all outputs are disabled and can be enable/disabled with the `CLDC -enable/disable' command. Several CLDC-boards can be installed within one IRACE front-end. The board to witch all further CLDC-commands refer is set with the `CLDC -board <num>' command. A detailed description of the CLDC-hardware can be found in [2].
The multiple CLDC-boards can be used to control either one or several detector configurations. If only one CLDC board is used, the DET.IRACE.CLDC parameter can be set in the detector configuration to specify the number of the CLDC board that should be used for the detector (the board numbers start with zero). In this case the DET.IRACE.VOLTAGES keyword refers to the voltage setup file for the single CLDC-board.
If more than one CLDC-board is used, the DET.IRACE.CLDC parameter must be omitted and the index (i-1) of DET.IRACE.VOLTAGESi is used to retrieve the CLDC-board numbers. In that case the `CLDC -enable/disable' command refers to all CLDC-boards configured in the detector configuration file. Please note that the indices start with 1, so DET.IRACE.VOLTAGES1 will configure CLDC-board 0.
The voltage setup file is an ASCII-file defining the set-values for all clock- and bias-voltages for one CLDC-board. The voltage setup files are located in
"$INS_ROOT/$INS_USER/MISC/IRACE/VOLTAGES/*.v"
The telemetry can be retrieved with the `CLDC -readAllVoltages' command. The format of the result is:
<# of clocks><clk_hi_1><clk_lo_1> ... <clk_hi_n><clk_lo_n>
<# of bias><DC_1_tel_1><DC_1_tel_2> ... <DC_n_tel_1><DC_n_tel_2>
3.6 ADC CONTROL
The IRACE ADC-boards have several parameters to be configured via the IRACE-DCS. The configuration is done via IRACE front-end "STATUS BUS" (see section 3.3).
The system configuration keywords
DET.IRACE.ADCi.ADDR <address>;
define an address and a name for each ADC-board in the system. The address is unique (slot number in the front-end) while the name can be shared by several boards. All ADC-boards with the same name build a group. If a value is changed from the control panel for one ADC-board, the same value is applied also for all other ADC-boards within the same group.
Default values for all ADC-boards of an individual detector setup have to be defined in the detector configuration.
DET.IRACE.ADCi.HEADER <header>; # header on IRACE data-Bus
DET.IRACE.ADCi.ENABLE 0|1; # enable/disable (0/1)
DET.IRACE.ADCi.FILTER 0|1; # filter1 off/on (0/1)
DET.IRACE.ADCi.FILTER2 0|1; # filter2 off/on (0/1)
DET.IRACE.ADCi.DELAY <delay>; # conversion strobe delay (0-15)
The value for the ADC-boards are stored in a table (`name, address, header, enable, filter1, filter2, delay') in the database attribute `<alias>iracq:irace.adcStatus'. The header is assigned to all data packets created by one ADC-board. It has to be resolved by acquisition interface-devices in the IRACE back-end to route data from the ADC-boards to different targets. The header for the acquisition interface-devices is declared in the system configuration file via the DET.IRACE.ACQi.HDR keyword. If the DET.IRACE.ACQi.HDR keyword is not specified, a default header (1) is used.
|
Quadralay Corporation http://www.webworks.com Voice: (512) 719-3399 Fax: (512) 719-3606 sales@webworks.com |