Sequencer GUI
The sequencer GUI allows to load and execute Python sequences and OBs (JSON format as defined by OTTO).
Note
Do not rely on standard output to debug/check sequencer scripts.
Warning
Since the server is the responsible of executing sequencer scripts, therefore standard output is swallowed by the server.
Overview
The sequencer GUI requires its own special purpose server.
The server spawns and controls a seqtool shell process. The client(s) (seqtool gui in this case) talks to the server which relays the commands to the underlying shell process. This is one way communication from the client to the server.
However, the seqtool shell publishes the state of the Sequencer script execution, the modules loaded, state updates, logs and more using ELT’s Pub/Sub mechanism and DDS. Allowing interested parties, namely seqtool gui or many instances of the seqtool gui to display the state Sequencer Graph. Figure GUI interaction with server..
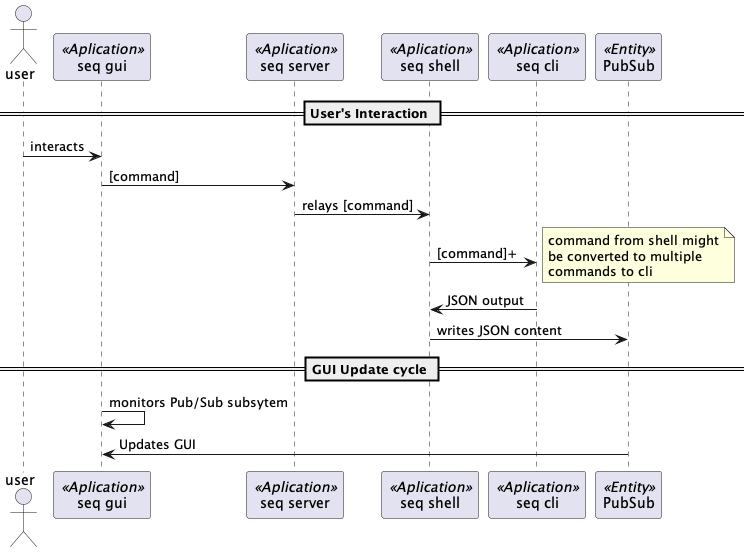
GUI interaction with server.
The Sequencer GUI requires the sequencer server to be up and running in order to work. Upon starting, the GUI allocates ans spawns its own server. On the other hand there is an option to startup the GUI and connect it to a running server.
During normal use, one would starts the GUI (and all supporting processes) as:
$ seqtool gui
In such a case, a sequencer server will be spawned to which the gui will connect.
To connect to a running server, e.g. running at port 8000:
$ seqtool gui --address 8000
Usage:
$ seqtool gui --help
Usage: seqtool gui [OPTIONS] [SCRIPT]...

  Client application for the Sequencer that allows to load OBs and execute
  scripts and monitor their progress.

Options:
  --address TEXT                  Sequencer server address [HOST:]PORT
  --log-level [DEBUG|INFO|WARN|CRITICAL|ERROR]
                              Will present logs at this level of higher
  --help
Using the Sequencer GUI
Starting the sequencer GUI is done as follows:
$ seqtool gui
One can pass change the defaults values for hosts and ports using the following options.:
$ seqtool gui --help
Usage: seqtool gui [OPTIONS] [SCRIPT]...

  Client application for the Sequencer that allows to load OBs and execute
  scripts and monitor their progress.

Options:
  --address TEXT                  Sequencer server address [HOST:]PORT
                                  [default: 8000]
  --log-level [DEBUG|INFO|WARN|CRITICAL|ERROR]
                                  Will present logs at this level of higher
                                  [default: INFO]
  --help                          Show this message and exit.
The defaults values used by the sequencer server and the sequencer gui will suffice to run all of this in the same machine.
If any port clash is forseen, please use the command line options to change port values to suitable ones.
The GUI opens the following window.
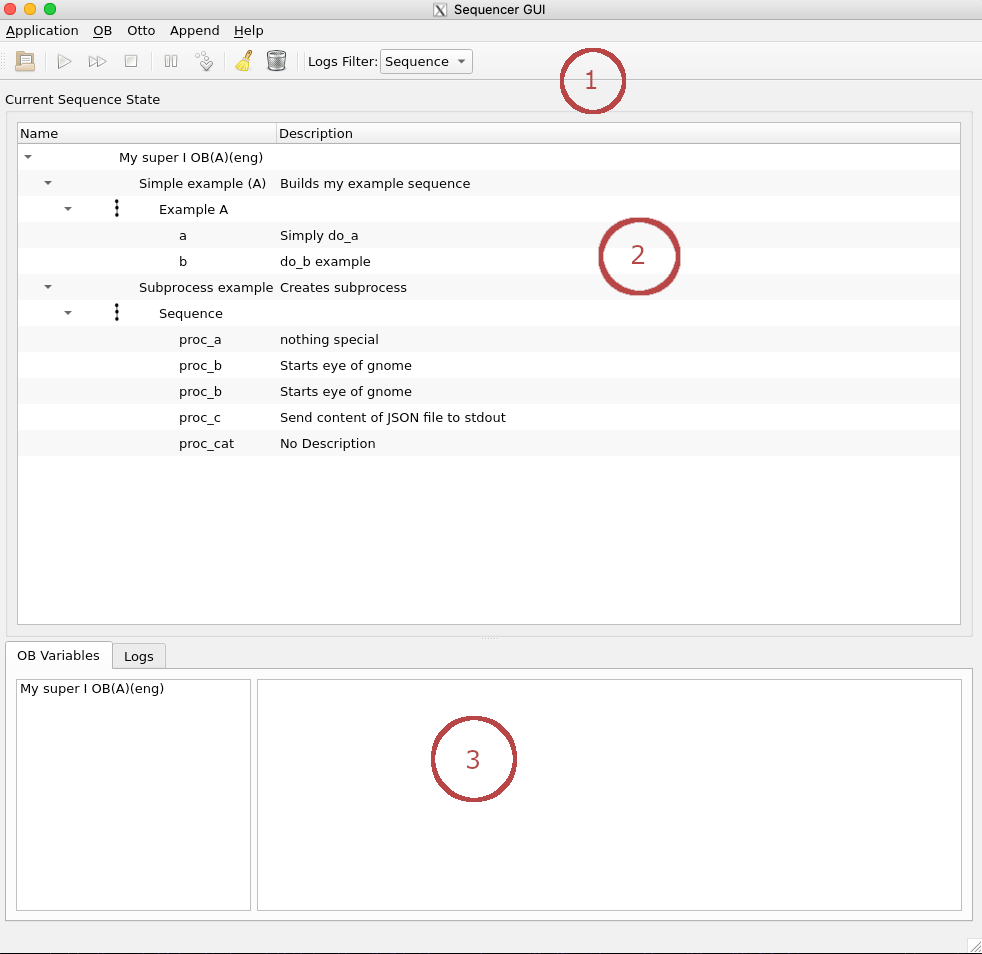
The GUI will try to automatically connect on start to the sequencer server, and its logs.
The GUI is divided in three parts.
The toolbar, displays button to open Observing Blocks, manipulate the OB, its steps, and filter logs.
The Sequence tree. For each sequence step, displays two columns: name, and a description in case provided.
The logs and OB variables tabs:
OB variables presents and allows edition of variables for the block.
Logs shows entries beloging to the Observing Block, and its steps, that are logged using python logging module.
The Toolbar

- The GUI toolbar sports the following buttons and options.
- Append OB
Loads and append to the sequencer server the selected OB in json format. When pressed, a file selection dialog will appear. The user may select an OB file.
- Run
Executes the scripts loaded into the sequencer.
- Continue
A script(s) execution can be aborted or paused. The execution resumes with the Continue button.
- Abort
Stop a script that is currently in execution.
- Reset
Cleans the execution tree and restarts the execution engine.
- Pause
Sets the selected node to pause when reached. The same button may be used to unpause a step.
- Skip
Marks the selected node to be skipped when reached. The same button may be used to toggle this option off.
- Logs Filter
This dropbox applies a filter to the logs (section 3 in the GUI).
Sequence: shows logs produced by the explicit calls to the logger by
the author of the sequence.
seq.lib: shows internal logs produced by the sequencer.
seq.user: shows logs that describes the changes in state of the sequence.
The toolbar commands can also be given directly on the input widget.
The Tree Window
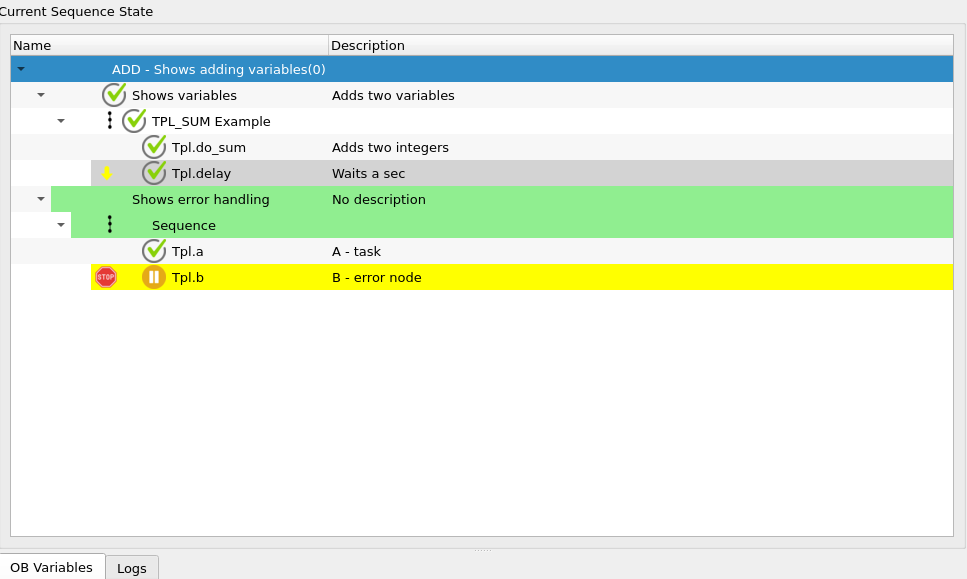
The tree window shows the loaded scripts in a tree widget. The script and its components can be expanded or collapsed. Each column shows a single node with its name, state and doc string (from python).
Note
The mouse secondary button displays a context menu that allows to Pause/UnPause or Skip/UnSkip the selected node.
Along the node number an icon is displayed, which depends on the node type to help identify their intent.
Marks Sequence nodes.
Marks Parallel nodes.
Marks Loop nodes.
When the sequence starts (by pressing the Run Button on the toolbar), this view will automatically scroll to the latest node with Running state. Also, they will be highlighted in light green color while the node is in Running state.
Logs
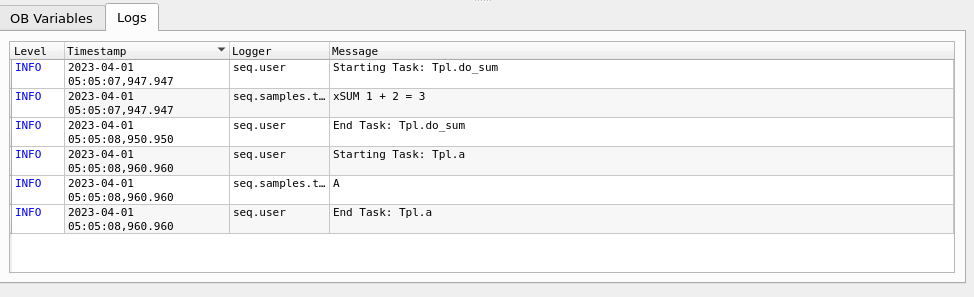
This view presents a table with logs produced by the sequencer. The table contains a row for each log, with the following columns:
- Level
The log type, or level, which can be DEBUG, INFO, ERROR, CRITICAL, EXCEPTION and FATAL. The colors helps to state the importance of the log entries.
- Timestamp
Date and time of the log entry, up to milliseconds, using the sequencer server reported time.
- Logger
Name of the logger used to produce the entry. For developers of sequences is important to use names that do not start with seq.lib.
- Message
The log message displayed.
OB Variables
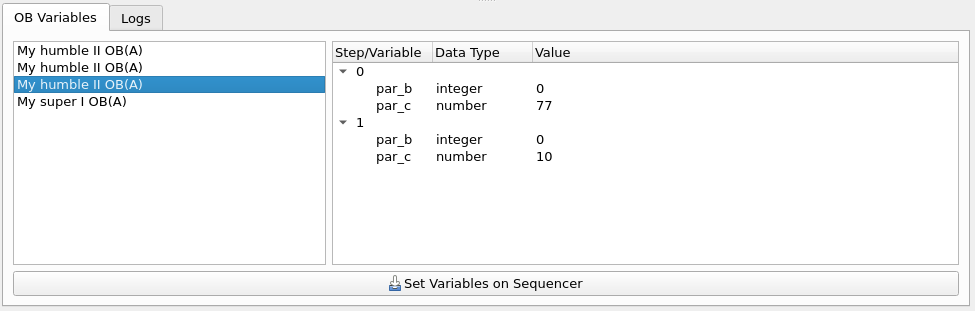
Variables for Observing Blocks can be set through this Tab.
The left side of the Tab shows the different OBs loaded in the sequencer server, while the right side display the variables. Variables are grouped by the node in which they are required, and display the name of the variable, the data type expected, and its current value.
Double clicking on a particular value edits the existing value.
Once a user is satisfied with the changes, they can be applied back to the sequencer server by using Set Variables on Sequencer Button.
Note
Variables are saved back to the server per OB, so if changes were made for more than one OB, the user needs to select that particular OB, and press the Set Variables on Sequencer.
OTTO Interface
For an explanation about OTTO’s purpose see Interface to Observation Handling SW. The GUI allows to fetch and execute OBs from a VES (visitor execution sequence). The OTTO pop-up menu consist of the following actions. See Otto popup menu.
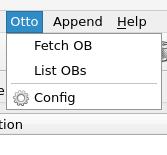
Otto popup menu.
- Fetch OB
Fetch next execution sequence from the queue.
- List OBs
List OBs in the queue. See OTTO list available OBs.
- Config
Opens OTTO server condfiguration dialog.
OTTO’s default configuration is found in the GUI’s configuration file but the GUI allows to configure its parameters as shown in OTTO server configuration dialog
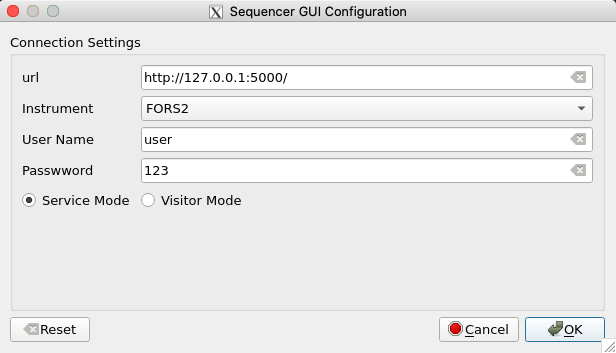
OTTO server configuration dialog
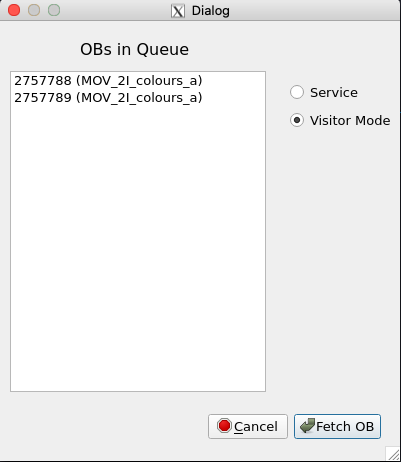
OTTO list available OBs
Error Handling
When a script aborts with an error (some exception was raised) a dialog window appears and displays the python traceback.
The dialog presents three buttons that allows to:
Retry the failed node.
Ignore the error and resume script execution.
Discard the error window and reflect on what just happened.
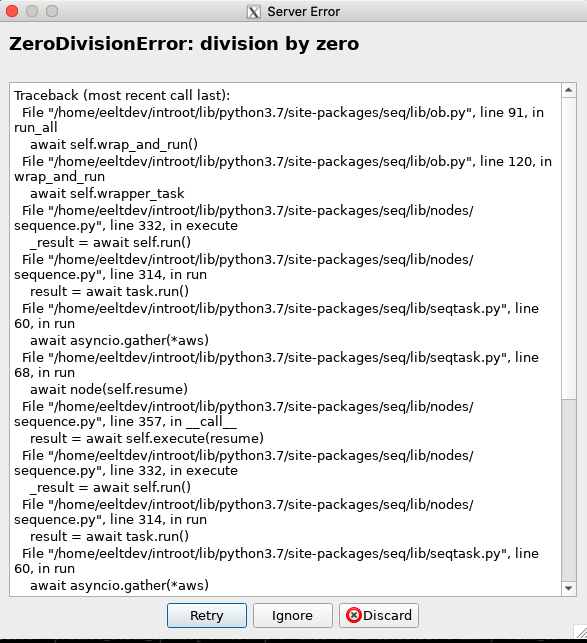
In addition, an aborted script can be continued (skipping the failed node) by means of the continue button in the toolbar.
One can retry the failed node typing the retry command and using the node serial number.
Advanced: Debug Mode
The Application Menu hold the Debug Mode option. When clicked, it will present more options oriented at developers of sequences.
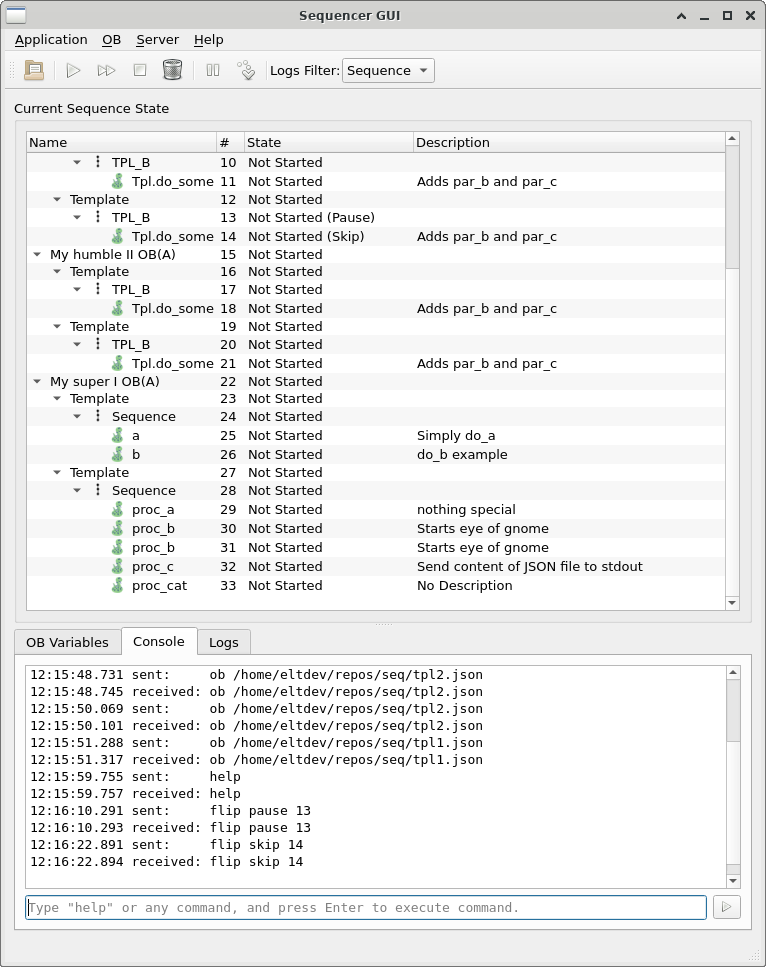
The Nodes Treeview in section 2 of the GUI will display two more column: the internal serial number assigned to the step (column #) and the state column.
The state column displays not only the node state but also if the node has been marked to pause or to skip its execution. Pause and Skip are runtime flags, which extend the description of the state for a given node. Node states can be one of the following:
- Not Started
Node has not been started yet.
- Scheduled
Script execution started. The node will be executed at some point.
- Running
Node is currently executing.
- Finished
Node has completed its execution. A finished node can be in any of the following substates:
- Skip
Node is considered finished because it was purposedly skipped (Skip runtime flag).
- Error
The node raised a runtime exception and has finished with error.
- Cancelled
Node execution has been cancelled. This happens when some other node, down the tree has finished with error.
- Paused
The execution of the tree is paused in the node mark with Pause runtime flag. A paused script can be resumed by removing the Pause flag from the node. This is done with the right mouse button menu and select Pause/UnPause node, or by selected the node, and using the Pause Button in the toolbar.
The Tabs in section 3 of the GUI will display one more Tab named Console
The console is a direct communication line with the sequencer server, in which the user can execute commands. This is not intended for final users and commands entered here will not display its output on the same console.
It accepts the same commands for the sequencer kernel or shell. For feedback please see the standard output on the sequencer server.
Sequencer server
Since the Sequencer GUI takes care of starting and stopping the sequencer server there shoud be no need for an user to start on on its own. Anyway, this is how one can start the sequencer server and its options
$ seqtool server
Usage, seqtool server [options]:
$ seqtool server --help
Usage: seqtool server [OPTIONS]

  Starts the Sequencer Server, a socket server for the sequencer.

  It listens on the "address" for commands and applies them to its own
  instance of sequencer (seqtool shell).

  If you need multiple instances of the sequencer server, please start them in
  their own port and provide their own instance of redis.

Options:
  --address TEXT                  Sequencer server address [HOST:]PORT
                                  [default: 8000]
  --log-level [DEBUG|INFO|WARN|CRITICAL|ERROR]
                                  Will present logs at this level of higher
                                  [default: INFO]
  --help                          Show this message and exit.
The theory is that one can have a sequencer server running on a different host than the GUI.
The server address is given as [HOST:]PORT.